Thursday 6 January 2022

Breast Cancer - Full Diagnosis

This post follows my initial post about Sewing a gown for breast cancer surgery
and my previous post about my initial diagnosis

Please note that this is my personal medical story. There are details of medical procedures. I am not a medical doctor. 


Appointments and tests

Finally the day of the appointment with the breast surgeon arrived. I was nervous. but pleased that something might finally start happening. I was called in first to see a doctor and the breast nurse. They explained my diagnosis so far (which I already knew) and took some information from me. Then I met the breast surgeon. She said I would be needing surgery, but that it would be necessary to have some tests and scans first to determine exactly what they would be dealing with and what kind of surgery would be needed. This was frustrating as I felt that I could have been having these tests over the last month while I was waiting for the appointment. Anyway, as it turned out I was booked in the next day for a contrast mammogram and the following week for a CT and bone scan.

After I saw the surgeon, the breast nurse spent a long time with me making sure I understood everything and that all my questions were answered. This was very helpful. She also gave me the direct phone number for the nurses' station at the clinic and said to call any time. I have since called a few times with burning questions and the nurses could not have been more caring and helpful.

The first test I needed was the Contrast-enhanced Spectral Mammography (CESM or CSM), which involved the injection of a contrast dye, which shows up the cancer in a mammogram. A cannula is inserted for the dye injection (Top tip: drink plenty of water before you have the cannula needle. I didn't and it took six attempts!). The dye is then injected by a machine into the cannula. There is an immediate and weird sensation of having wet your pants (which doesn't happen). You then have the mammogram, which is like a normal mammogram where each breast is squeezed between two thick perspex plates, once vertically and once horizontally, and images are taken. 

This photo is my squished left breast (I didn't think that is a sentence I would ever write on my blog). The white areas clumped together in the top half is the cancer. 


The next week I had a cannula inserted again. I didn't have any problem with the cannula this time as I'd drunk loads of water beforehand, even though I was fasting (fluids were allowed). This time I was having a CT scan and bone scan. To start with, I went to Nuclear Medicine where I was injected with a radioactive substance for the bone scan. This takes three hours to seep into the bones, so while I was waiting I went to Radiology for the CT scan. I had more of the dye that makes you feel like you've wet yourself and then it was onto a platform which is moved in and out of a hole in a massive machine. It was cold, but luckily they had given me a blanket. I had to lie completely still. I thought happy thoughts about my dog and it wasn't too bad at all.

I was then allowed to have some food and a coffee before going back for the bone scan, The process was similar to the CT scan - in and out of a big machine and it was time to go home. 


Diagnosis

A week or so after the scans I saw the breast surgeon again. This time I was given the full diagnosis (a month and a half after the initial cancer diagnosis). I was told that I had Stage 2, Grade 2 invasive lobular breast cancer that was oestrogen and progesterone positive and HER2-. The lymph nodes did not seem to be affected but one was enlarged so I was referred for a PET scan to check it out. There was no evidence of cancer elsewhere in my body.

That's a lot to take in. Broken down this means:

Stage 2 - a cancer diagnosis has four possible stages. Early breast cancer is Stage 1 or 2. Determining the stage is very complicated and is explained more here.
Grade 2 - this determines how quickly the cancer cells are growing with 1 being slow growing and 3 being fast growing. Mine was intermediate.
Invasive - meaning that the cancer has spread within the breast
Lobular - breast cancer occurs most commonly in the milk ducts (ductal) or the milk glands/lobes (lobular). Only about 10% of breast cancers are invasive lobular.
Oestrogen and progesterone positive - my cancer uses these hormones to grow and blocking these hormones is an important treatment option.
HER2 negative - HER2 is a cell surface protein controlling cell division. HER2- usually means less aggressive cancer than HER2+.
Lymph nodes - lymph fluid from the breast drains into lymph nodes under the arm, so if the cancer spreads, this is the most likely place it will reach first. I have an enlarged lymph node that needs further investigating.


Treatment Plan

I was told that the treatment plan was mastectomy of the left breast with chemotherapy likely after surgery. Lumpectomy was not an option as the cancer had already invaded the breast. The prospect of chemo was quite a shock as I had assumed the mastectomy would be enough. Apparently lobular breast cancer is a bit insidious and can send cells off into the body, requiring chemo to sort them out.

The surgeon said that I could have a breast reconstruction at the time of the mastectomy as long as the plastic surgeon was available within 4-6 weeks. If not, she would need to do the mastectomy by then as it was too risky to wait any longer. If the reconstruction was done at the same time as the mastectomy, I could have what's called 'skin-sparing and nipple-sparing surgery' which means that I could keep my breast skin and nipple and have the breast re-filled (my terminology!) with an implant or some of my own fat tissue (eg. from my tummy). If I just had a mastectomy I would lose the skin and nipple, affecting future reconstruction options. I had read extensively about reconstruction and I definitely wanted to see if I could have the reconstruction done at the same time as the mastectomy and the tummy fat one if possible - called a 'DIEP flap' procedure, which has the added bonus of a tummy tuck, but on the down side has a long recovery time. My surgeon agreed to send a referral to Plastic surgery and see if someone was available. She also raised the possibility of starting chemotherapy before the surgery, depending on when it would be. 

After seeing the surgeon I went in to see the physiotherapist at the breast clinic. She went through exercises I would need to do after surgery to regain movement in my arm and help healing. She seemed confident that I could return to hip hop dancing once this was all over. Maybe I'll be on stage again with my lovely dance mamas before 2022 is over! She then explained about lymph node removal and possible swelling (lymphoedema) of the arm that could result. She took incredibly detailed measurements all along and around my arms as a baseline measurement to use later to determine if swelling had occurred.


So, now more waiting. Waiting for the PET Scan and waiting for an appointment date with the plastic surgeon. Meanwhile I keep reading about breast cancer (when I feel able - sometimes it's too much and I get emotional and need a break), going for walks, planning Christmas (which has now been and gone and was lovely), sewing and spending time with people I love. I am taking things day by day and trying to do something nice every day, because waiting for phone calls about appointments and results means that planning anything is almost impossible. It's hard, but I'm in a bit of a rhythm now and I'm getting good (well a bit better) at pushing away thoughts that become too overwhelming. My partner is always a good listener to my ramblings and worries and I feel so much better after putting them into words. One day, I said to him that I was worried I might not have enough tummy fat to make a boob and he kindly reassured me that of course I did!!

Next I should have some news from the Plastic Surgeon. 

And for those who come here for the sewing, here's a bag I made last week. It's the Buckley Tote by Elbe Textiles with a few changes due to fabric constraints :)


Wednesday 29 December 2021

Breast cancer - Initial diagnosis

This post follows my previous post about Sewing a gown for breast cancer surgery

Please note that this is my personal medical story. There are details of medical procedures. I am not a medical doctor. 

The initial diagnosis

A couple of months ago, in October 2021, I found a lump in my right breast. It felt like a large grape under the skin and was movable when pressed. I had had a mammogram five months prior, so this seemed to have been a hasty development. I wasn't too concerned, but I booked an appointment with my GP straight away. She thought it was probably just a cyst and referred me to a local radiological screening breast clinic for an ultrasound. I mentioned the lump to my friend on our usual Monday walk and we agreed that I'd be fine and joked that I just didn't have the time or space in my life for breast cancer. A few days after finding the lump, I was at the clinic ready to be told it was all ok.

As expected, the ultrasound showed that the lump I'd found in the right breast was indeed a cyst. The sonographer then checked the left breast as is routine in these examinations. She seemed to be looking for a long time at one area and said that there was a region of 'altered texture' in the left breast. She was finding it difficult to see the area properly as my breast tissue is very dense. It was recommended that I have an immediate mammogram and some biopsies to see what was what.

If you are reading this and have been told you have dense breasts, then it is likely that you should have regular screening ultrasounds as well as, or instead of mammograms. It is difficult to see cancer in dense breasts on a mammogram alone. Breasts usually lose density as women age, which is partly why mammograms are not routinely offered to younger women. However, many older women also have dense breasts, so it is worth asking if you have them and asking for additional screening if necessary. I wish I had done so.

The mammogram and biopsies were done later the same day. The biopsies involved having an ultrasound to pinpoint the exact areas, then a local anaesthetic was given and a core biopsy punch, that sounds and feels like a staple gun, takes a sample of tissue. It is not terribly pleasant to say the least. I had around 15 core biopsies (and several local anaesthetic injections) in two separate areas of the left breast. I then had more anaesthetic and a fine needle aspiration (FNA) of the lymph nodes in my left underarm. The FNA was much better than the core biopsies.

By this time, I was more concerned that there was a problem. I waited over the weekend and rang the GP the next Monday. They said there might be some results later that day. I heard nothing and rang again about 4.30. The receptionist said she would put me straight through to the doctor for the results. I was on hold for a while. The longer I waited, the more I expected bad news. Finally my doctor came on the phone. She said I had breast cancer. She told me briefly what the biopsy had shown and said they were still waiting on the lymph node results. I started to break down. I said I would see the doctor the next day. I put down the phone. I was home alone. The shock was immense.


Following diagnosis

The initial diagnosis showed that I had invasive, lobular breast cancer in one breast which was present in both areas that had been biopsied. The cancer was positive for oestrogen and progesterone, which meant that hormone treatment, such as tamoxifen (which blocks oestrogen) would be recommended. The lymph nodes were shown to be negative for cancer cells at that stage.

I was referred to my local hospital in Perth for an appointment with a breast surgeon. The referral stated that my diagnosis put me into Category 1, meaning that I should be seen within 30 days of diagnosis, but it was recommended that I should be seen within two weeks. I had cancelled my private hospital insurance last year because I never get sick (!) so I am being seen in the public system. This means that treatment is free, but waiting times are longer. I was assured that waiting would not be an issue for 'more urgent' cases such as mine.

Unfortunately this was not really the case. It took 10 days from my diagnosis to even get the appointment. During this worrying time I had phoned the hospital and the GP several times and written to the Consumer Engagement team at the hospital with my concerns about how long it was taking. Still I waited. Finally the appointment was set for 2 December, 31 days from diagnosis. That month of waiting was excruciating and exhausting. I had legal appointments for my ongoing divorce settlement, which wasn't helping. My stress levels were very high and I had to stop working. 

Fortunately my friends and family were extremely supportive. Walks and coffee meet ups were arranged and somehow the time passed.

In Kings Park with Sue of Fadanista (photo taken by @sewblooms). I'm wearing modified Hudson pants in silk and a Grainline Archer shirt in linen.


I decided to be open with everyone about the whole issue and I didn't mind if friends told other friends. I actually found it way better if people already knew about my diagnosis when I saw them, rather than having to tell the story over and over. As the time passes, it seems to be getting harder to say 'I've been diagnosed with breast cancer', but easier to discuss the details and treatment plan. I've found myself saying no to gatherings with lots of people as it feels a bit overwhelming. I'm mostly spending time with family and close friends who know me well and who I can relax with. I'm also sewing and gently reading about breast cancer. I am being very careful to stick to reputable websites and not get sucked down rabbitholes of poorly researched information, which is misleading at best and terrifying and dangerous at worst. I want to know what my options might be for treatment and have some background information for possible decisions I might need to make.

A good friend put me on to the Reclaim your Curves website and Facebook group about breast reconstruction, which has been incredibly helpful. However, if you are thinking of joining a group like this, I would recommend treading slowly and carefully as the photos can be very confronting at first. I got quite tearful when I first saw photos of mastectomies. But I'm fine to look at them now. It has also been very positive to see the amazing results that can be achieved with reconstruction and read the stories of recovery. The group is very supportive and no question is too weird or silly, which is fantastic.

Monday 13 December 2021

Tranquility Gown - Madeit Patterns


Just recently I had some bad news. I was diagnosed with breast cancer on 1 November 2021. This came as a massive shock as I have no family history of breast cancer and I am a pretty fit and healthy 52 year old. I breastfed my children for a long time, which is known to reduce the risk of breast cancer. I have regular mammograms. I thought I was safe. 

The only reason I could think of for this happening was that I have had a lot of stress in my life for the past few years. I am not able to go into detail for legal reasons, but in a nutshell, I experienced domestic violence in a relationship, which I ended 3.5 years ago. Since then my only option has been to turn to the Family Court to try to come to a resolution with my ex-partner, a process which has taken up countless hours of my time and been extremely emotionally and financially draining. The court process is ongoing.

The other reason, of course, could just be the (bad) luck of the draw. One in seven women in Australia will be diagnosed with breast cancer by their 85th birthday, making it the most common form of cancer in women (source).

I have thought a lot over the past few weeks about whether to post about my diagnosis. This is supposed to be a sewing blog after all. In the end I thought that if it helps someone then it was worth it. I was also inspired to write after reading about another woman's experience of breast cancer in Josie's Journey. Always being one to want all the information, I devoured her blog when I found it and it helped me a lot.

I will try to keep up my blog as I progress through my treatment. If you're here for the sewing, then just stick to sewing-related posts. I may share some medical pictures that might not be for everyone. I'll see how brave I feel when the time comes!

I'll post more details about my diagnosis in the next post. For now, I would like to get back to sewing talk temporarily...

Me enjoying my KATM Advent Calendar - a much appreciated gift from Katherine 


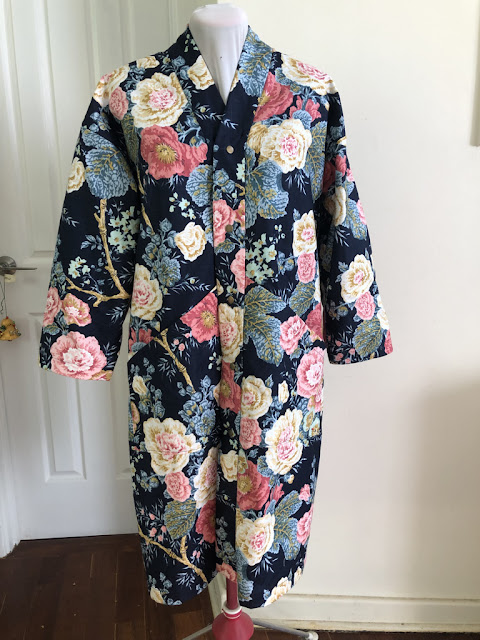
After the shock of the diagnosis, I wanted to be purposeful and practical in my sewing. I haven't done much sewing for myself over the last few years and I was really missing it. I had seen the Tranquility Gown by Madeit Patterns on Instagram and thought it would be a nice thing to make for my impending hospital stay. It wasn't until I had a good look at the pattern that I realised it had been very thoughtfully  designed for breast cancer patients. It doesn't have a tie at the waist, so as not to be uncomfortable near possible surgical sites (the breasts, but also the tummy and other areas which may be involved in the reconstruction process). It also has an optional vest insert with pockets for the temporary plastic drainage tubes that are often present after breast surgery. This contains them nicely, rather than having them trail behind you. I am really hoping this works well - I will report back. 

Madeit Patterns offer this gown for no charge on their site, but they would like donations to be made to breast cancer charities if you download the pattern. I really think they are wonderful to have designed this beautiful and specialised garment and made it available in this way.


I found this cotton fabric in my extensive stash. I think it may have come from the Remida recycling centre. It is a good weight and I hoped the print wasn't too old fashioned! In the end I really like the floral. I think the modern shape of the robe compensates for any old-fashionedness in the fabric.


The fabric was lovely to sew and the pattern comes together easily. I took my time with the construction and enjoyed the process. I love the deep front pockets and the 7/8 length sleeves.


The front band scoops up around the back neck and is joined with snaps at the front. I hammered on copper press studs for added strength.


I made the vest insert with cotton jersey fabric and edged it with bias binding made with the floral fabric. This picture shows the pockets for the drainage tubes, which are on both sides) and the buttons which attach it to the main gown. The photo is taken on the mannequin, so not the best picture.


I really love this gown and am very much looking forward to test driving it in hospital. Thank you to Madeit Patterns for this beautiful pattern.


Saturday 18 September 2021

Felix Jacket made with scraps and Boro stitching


When an idea forms itself and refuses to leave your head, sometimes you just have to go with it and see what happens. 


This jacket started as just that kind of idea. I wasn't quite sure how I wanted it, but I knew I would not be satisfied until I had given it a go.


When I finish a sewing project, any scraps that may be remotely useable are stuffed into one of several scrap boxes and hidden around the house. I'm sure I'm not alone in doing this - well maybe amongst my non-sewing friends, but sewing people will understand! 

I rarely use these scraps, but this was my opportunity! It took me some time to find where I'd hidden them, but I eventually found a couple of boxes and fished out pieces that seemed to go together. I chose lots of different denim scraps and a few other things.


I wanted to use the Felix Jacket by Pattern Union as the simple lines and bound edges were perfect for this project. Also, I have seen excellent reviews of the pattern, so I wanted to try it for myself. 

I decided on a length that was between the cropped and mid-thigh lengths in the pattern and, after a quick adjustment to the pattern pieces, cut out the jacket in a cotton twill fabric. 

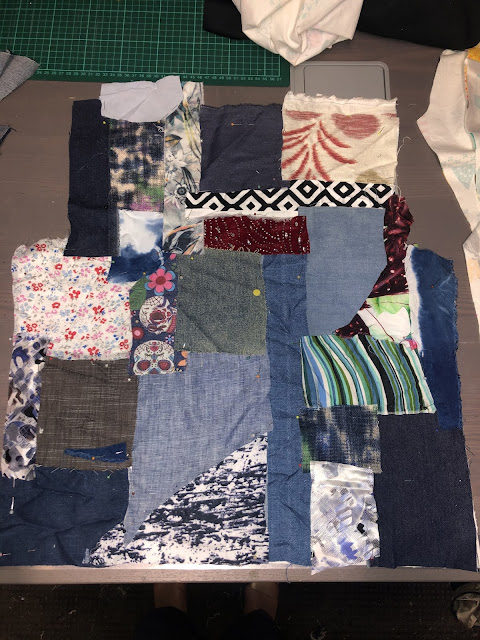
I then laid out my scraps on to each pattern piece until I was happy with the way they looked, then used lots of pins to hold them in place.


Each panel was then stitched individually, while I snuggled in front of the TV during the winter evenings. It probably took about three months to make and I worked on it most evenings during that time.

I had no plan for the stitching, just whatever took my fancy. I am not a good hand sewer, but the process of choosing coloured embroidery threads and sewing down the pieces in different patterns, was very enjoyable and I found it difficult to put it down. It was nice to remember the different things I had previously made with the fabric too. I got my Alabama Chanin stitch book out at one point and did some slightly fancier stitches in one area.

I was inspired by the Japanese technique of Boro stitching, which is a way of visibly mending garments by hand sewing on scraps of fabric.

Here and there I added some personal touches by stitching a word or two and some stick figures of my two boys and my dog. I left frayed edges showing where I could to add interest.

Here is the jacket in progress.


I didn't take many progress photos, but as soon as I finished each panel, including the patch pockets, I couldn't wait to sew them together to slowly see the jacket taking shape. I was very pleased with how the Felix jacket pattern came together.

Once all the panels were hand-stitched and sewn together, I went over the whole jacket again, adding a few more stitches in any bare bits. I used some sparkly gold thread in some places too.

Once I was satisfied, I made a lining from some blue silk that has been in my stash for ever. All the edges of the jacket were then bound with bias binding made from one of my chambray scraps.


I am really happy with this rustic, haphazard jacket. It was so enjoyable to make and it holds lots of memories in its scraps. My family said it was very 'me', which I was pleased to hear.

I wore it yesterday with my Morgan jeans, to Kings Park where I met sewing friends Sue and Katherine. The spring wildflowers were stunning and we enjoyed coffee and a visit to a lovely textile exhibition. Here we are - in our handmade outfits of course!


Sunday 7 February 2021

A tale of two chairs


A few years ago I picked up a set of replica Le Corbusier chairs that my sister saw on Gumtree for $120. There was a three seater, a two seater and three armchairs. There were also three Barcelona footstools, which I onsold for $40 each, basically making these chairs free (apart from the several trips across the city with sofas strapped to the roof etc). Such a bargain!

The sofas and one armchair were upholstered in black leather, while the other two armchairs were covered in black vinyl. The vinyl had seen better days and I hatched a plan to recover them in a patchwork of fabrics, an idea I had seen somewhere and liked.

Here they are in their original state with a painting of Perth by my Mum on the wall above!


As armchair upholstery goes, it doesn't get much easier than these. They consist of four blocks, held in a frame by a few screws. Once they are apart, it is easy to make a cover for each block and staple it on at the base. It was also a good opportunity to give them a good clean and retrieve forgotten items such as assorted pens, a spoon and a long-lost front door key. 


For the covering, I collected old sample books of expensive upholstery fabrics from Remida, the local recycling centre. I cut out the fabrics with a blue theme and added in the odd bit of pink and purple. 


Then it was time to get patching! This was time-consuming, but quite enjoyable playing with these lovely coloured and textured fabrics. I joined pieces together in a design that I liked and that was just larger than the panel size I needed. I trimmed the panels to size with a rotary cutter and then joined them together to cover the chair blocks. I didn't worry about seam matching in the patchwork as I wanted a more random, rustic look.


Here is a chair in progress. It's very exciting to put it together and see the effect.


Truffle helped where he could.


Finally it was time to put the screws back in and admire the finished product.


Each chair probably took about 8 hours total work. I did the first one about three years ago and it has taken Perth going into a five day lockdown last week for me to get around to doing the second one! I have to say that I am ridiculously happy with these and very proud of my 'statement chairs'. I keep going over to admire them.


Tuesday 12 May 2020

Tessuti Knots and Crosses competition - Maisa denim jacket, Flint shorts and Sorrento bucket hat


It's been a very long time since I entered a sewing competition, but when I saw the gorgeous fabrics in Tessuti's 2020 sewing competition, I had to give it a go. The idea was to make any garment from a cotton/linen Broderie Anglaise fabric. The fabric was available in four colours and two different patterns, the 'knots' and the 'crosses'. I chose the 'crosses' fabric in a natural colour. The rules stipulated that only the 'knots' or 'crosses' fabrics could be used as the outside of the garment and could not be dyed or embellished with any other fabric or embroidery. A lining fabric of the sewer's choice was allowed. Entries were to include photos of someone wearing the garment as well as pictures of its construction.


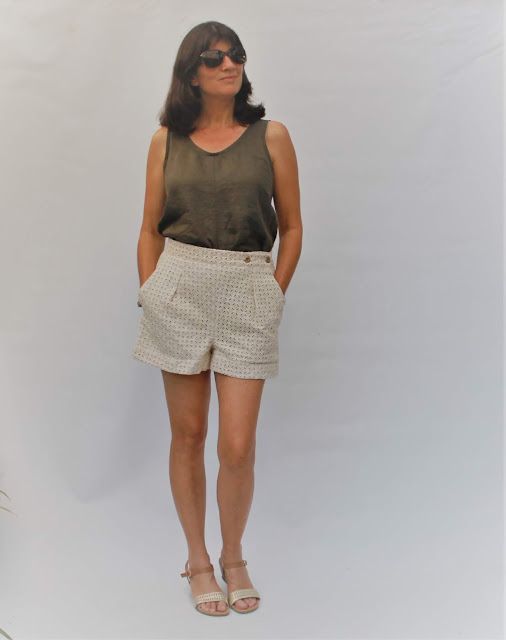
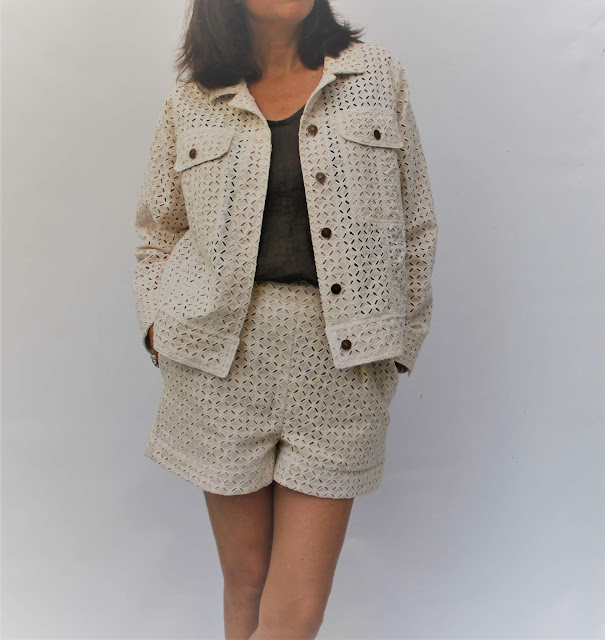
I made three pieces for my competition outfit, all of which I have made before, so I knew they would fit. These were a Named Clothing Maisa Denim Jacket, Megan Nielsen Flint Shorts and, for fun, an Elbe Textiles Sorrento Bucket Hat, which is a free pattern. I am wearing them with a Megan Nielsen Eucalyptus woven tank in khaki. I had decided on the jacket as soon as I heard about the competition, partly because my denim Maisa jacket is probably my most worn item ever and partly because I thought it would be unique to make a Broderie Anglaise jacket. After seeing the other entries, it seems I wasn't so forward-thinking after all as there are some gorgeous jackets among them. Oh well! I had originally planned to make a skirt, but it wasn't working out, so I went with shorts instead after a suggestion from my sewing friend Katherine.


I began with the Maisa Jacket. I wanted to show off the fabric as much as possible, so kept the majority of the jacket unlined. I used a natural-coloured cotton fabric to line just the collar, cuffs, pockets and hem and button bands. I sewed it around the seams (see below) so that the lining and not the seam showed through the eyelet holes on the inside and outside of the jacket. 


It was a slow process getting everything as perfect as possible, but very enjoyable, especially as I have had little time to sew for quite a while now. 


The outer seams are all top-stitched and the jacket is finished off with jeans buttons at the front, pockets and cuffs.


The inside of the pocket has a leather patch with my Meggipeg label and a Tessuti Fabrics label on it.


The next picture shows how the jacket is constructed to allow the light through the main part of it.


Next the Flint shorts. These were lined for modesty, with the lining fabric used as underlining. This meant that the view through the holes was uniform and no seams were visible. I made the style that buttons up, rather than ties, and used metal buttons. These were shortened about 4cm from the pattern after a suggestion from a (male) friend, who insisted they were originally too long! I think he was probably right as the proportions look better with the jacket at the shorter length. 


These shorts are so comfortable to wear and I love them in this fabric.


The Sorrento bucket hat is fun to sew and easy to wear. I lined it to hide the seams again and love how the light shines through the brim lining when it's worn.


I am really happy with all the pieces of this outfit. I know they will all be things I wear a lot and I thoroughly enjoyed the planning and creating of everything. The fabric is gorgeous and I'm very happy to have pushed myself to enter the competition. The closing date is 14th May and it's worth having a look at the other creative entries on Pinterest or Instagram.


LinkWithin

Related Posts Plugin for WordPress, Blogger...