Showing posts with label Activities for kids. Show all posts

Saturday 24 March 2012

Fun with flashing


'What kind of flashing?' I hear you ask, possibly with raised eyebrows. Well, not that kind, this was aluminium flashing - and much more fun!

I first had the idea for this when I saw this post for a DIY chic metal belt (Geneva's blog is gorgeous and well worth a read by the way). I bought a roll of aluminium flashing from Bunnings for about $14. The boys fell on it when I brought it home and immediately started cutting and hammering. Of course, being boys, they had to make armour! They got pretty creative though and it was so much fun to work with this stuff - it cuts with scissors, bends with fingers or pliers and is easily hammered into any shape. Make sure children are supervised with tools and that all sharp edges are turned in and hammered down.


After much industrious work, here are some of the things we ended up with...


Belt and arm cuffs made by my 8 year old


with double sword carrier and dagger holders!


And this incredible helmet designed by my six year-old.


Good, cheap, creative entertainment - the best kind :) I'd love to see what you made if you try this. I wonder what gorgeous things girls might create with this lovely silver.

Thursday 5 January 2012

Christmas presents I made WRAPup!

Hi All, as always, I got busy this Christmas and made lots of presents for family and friends. I got the children in on the action as well and we all had a lovely creative time.

Christmas was special this year as my mother-in-law came to visit from Canada. She loved being in Perth, but unfortunately there were some extremely minor medical issues on the flight over which meant that Mr Meggipeg had to fly to Hong Kong to collect her. The airline were very unhelpful and, despite having medical clearance for my MIL to fly home, they insisted that she be accompanied by a family member. This meant that Mr M has had to pay for a flight and go all the way back to Canada with her. We are currently out of pocket around $8000 for the flights and the travel insurance are being difficult about the claim as she continued to here from Hong Kong (where she had the initial problem) instead of retuning home. Anyway, I'm just looking at the positives - the family got to see each other after many years and spend Christmas together and MIL had a lovely holiday here. The other positive - I made most of our Christmas presents so the money saved there can help pay for MIL's very expensive holiday!!

So here we go. Present number 1 was a christmas skirt and matching hat for my niece made with crushed red velvet (a similar skirt is available in my Etsy shop).


The skirt has flower brooches that can be pinned to a t-shirt, headband, bag or just wherever!

She is such a sweetie

and the hat even made it out to the beach the next day!

Present number 2 was some maternity cropped leggings requested by another family member. These were so much easier than I expected and they look fab on. I will definitely be making more leggings.


Present number 3 was another request, but a rather odd one! My dad has exposed his skin to far too much sun over the years and is now paying the price. Rather than wear a long-sleeved shirt to cover up, he asked if I could make him some sun sleeves. However, he didn't want the usual style, which is close-fitting lycra that covers the arms, he wanted them loose and ventilated. I did my best and here is the final result:

They have bands to hold them on the upper arm and they cover half the hands, held by thumb holes (which are a bit folded inwards here, my Dad doesn't have conical thumbs! Unfortunately they are even weirder on than off and I told Dad that I wouldn't be offended if he didn't wear them. It is now Jan 6th and he hasn't worn them, despite several hot days since Christmas! Looks like thumbs down for these!!

Present number 4 was some gorgeous pictures that I got my boys to make for the grandparents. They drew messages and designs on squares of foil tape and made little beaded wire decorations, which we then placed in frames. These were fun to make and were very well received.


Present number 5 was also made with the boys. We found a simple recipe for chocolate truffles and made a large batch. They turned out as rather rustic looking balls but this just added to the charm! We then made little boxes from Christmas cards to put them in and we gave them to family and friends. This was such a sweet and simple gift and the boys were so proud to give gifts they had made themselves.


All in all it was a successful handmade Christmas. There were, of course, way more bought things than handmade, but hopefully these things made with love will be treasured and remembered as extra special - especially the sun sleeves ha ha!

I wish I could have posted this before the big day, but that would have ruined the surprise. Maybe you can get some ideas from these for presents throughout the year, or pin them for next Christmas. I may post a quick tutorial for the little boxes, they are such a good thing for the kids to make.

Cheers All,
 

Tuesday 27 December 2011

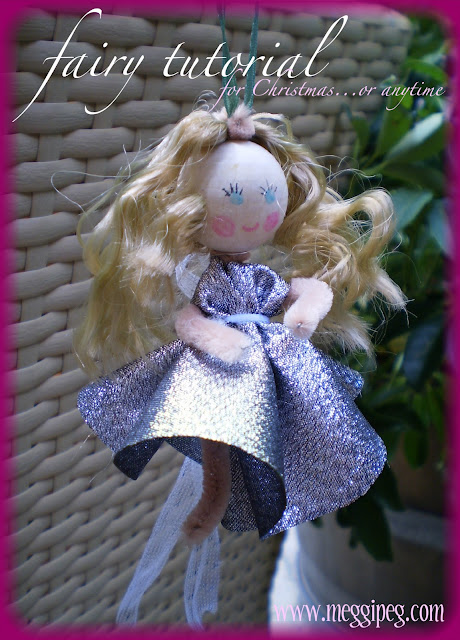
Easy fairy doll tutorial


These sweet little fairy dolls are so simple to make and they are sure to capture a little girl's heart. Perfect for hanging on the Christmas tree or bringing a smile to your face anytime.

This would be a good craft to do with a child. You could make all sorts of individual little characters.

Let's get started...

...for one fairy you will need:


- a wooden bead with a hole drilled through it
- a pipe cleaner
- scraps of fabric and ribbon or string
- wool, tulle strips or rope for hair
- marker pens
- any other embellishments you fancy eg. fake flowers, sequins, glitter

To make your fairy:

Cut a scrap of fabric into a circle of approximately 12cm or 5" in diameter. Cut a small hole in the centre. Also cut two arm slits roughly where the '2' and '3' are on the tape measure

Cut the pipe cleaner in half and fold one half in half again.

Poke the folded end through the hole in the bead and open it out.

Poke lengths of wool, tulle (or whatever you like to use as hair) through the hole in the pipe cleaner. Also poke through a piece of string or ribbon to hang up the finished fairy. I added a fake flower to this one.


Pull the pipe cleaner back through to firmly hold the hair in place and open out the ends. These will become the arms.

Fold the other half pipe cleaner in half and wind it around the fairy's neck a couple of times to secure it.

Twist a few times to form the body and legs.

And it's time to get dressed. Poke the body of the fairy through the hole in the dress and pop the arms through the slits.

Tie a ribbon around the waist of the dress.

Draw on a face, make any minor wardrobe and hair adjustments...and she's done!

I made lots!


You could add wings, sequins, glitter, hats. Go wild and have fun. I would love to see pictures of any you make. Email me or post them on my facebook page and I may feature them here.


I will be sharing this with some of the link parties listed at the bottom of the page.

Monday 5 December 2011

Ikea rug to Mexican poncho costume


Mr Six was involved in an assembly item at school. The assembly had a multicultural theme and the children were required to dress in clothes from another country. A quick raid of the dressing-up box revealed nothing more multicultural than Star Wars and Ben 10 costumes, but we did discover a Mexican sombrero at the back of the wardrobe.

Now we just needed a poncho.

I found an old Ikea rag rug and we were in business. Mr Six even did most of the work himself! This is what we did:

Fold the rug diagonally and cut it to a square shape.

Fold the square in half...

...and in half again

and cut a little bit off the top corner to form a hole to put your head through.

Trim the hole to the right size (the rug is stretchy so don't make it too big). I made a v-neck shape pointing to one of the corners for the front of the neck. I also finished off the raw edge with a narrow strip of black jersey fabric (or use bias binding) and made a little felt embellishment for the front.

Then add wool tassels to all the sides that don't already have them. We used a loop/hook rug making tool but a thick needle would be fine.

 He did all the tassels by himself and was so proud of his efforts!


And it's done. He just wore all black underneath. The assembly performance was adorable. They all looked SO cute in their international costumes, I have to admit to a couple of teary moments!


LinkWithin

Related Posts Plugin for WordPress, Blogger...