Showing posts with label Quick fixes. Show all posts

Saturday 21 September 2013

Quick fixes: boot refashion


The idea for this refashion had been knocking around in my head for a few weeks. Then, one day we were getting ready for a day out when I realised that I NEEDED a pair of ankle boots to go with my outfit! Chop, chop, sew, sew and, 20 minutes later, I had my ankle boots. See how those slim-fitting pants sit nicely over the boots in the bottom, right picture.

It was so easy to make these. I simply drew a line on the boots at the height I wanted, made sure the zip was undone to BELOW this line and cut around the boots with scissors, zip and all. Next I got some foldover elastic (but a strip of lycra would also work) folded it in half lengthwise and zig-zag stitched it around the top edge of the boots, leaving a short length (about 1cm) at the ends. This extra length was folded over to the inside and stitched in place to neaten the edges and prevent the zip-pull coming off at the top. I used a strong needle and the sewing was a breeze, no problem getting through the leather.

Done! A forgotten pair of boots given new life.

Monday 14 January 2013

Hemlines: the long and short of it


I had two dresses in my wardrobe that I wasn't wearing, well actually there are more, but cleaning out the wardrobe is such a dreary task so we'll just concentrate on these two for now. One dress was too short and the other two long. What to do?

The too short: the khaki dress was from the op shop. I thought I'd wear it as a tunic with leggings in the winter, but the fabric was too flimsy and summery and just didn't go with leggings. It was too short to wear as a summer dress and I didn't even wear it over bathers. 


I decided to add two fabrics at the hemline to fit in with the colour blocking trend of the minute. The red fabric was left over from a sheet I had cut up to fit a toddler bed. It was lightweight cotton, similar to the dress fabric, so looked right with the rest of the dress. I sewed this directly to the hem of the dress. Then I sewed on the strip of blue stretch knit to cover the join. Done!

Perfect for a casual summer outing.


The too long: the second dress was also op-shopped. It is made from lovely quality, very stretchy knit fabric so I couldn't resist it, even though it was an unflattering length on me (no 'before' pic, sorry).

Rather than just chopping a bit off and re-hemming, I decided to make a feature of the shortening process by adding horizontal pintucks to the lower edge of the dress.

I wanted three tucks, so I determined the amount I wanted the hem taken up and divided that number into six (eg. to take the hem up by 18cm, divide 18 by 6 to get 3cm. Each tuck is 3cm wide from the fold to the stitching, or 6cm wide in total if opened out). I carefully measured, folded and sewed the tucks, one at a time, by folding the fabric wrong sides together and stitching 3cm from the fold. I chose to have them next to each other, but you could leave gaps in between.

Here are the tucks from the outside of the dress showing the undersides of the tucks on the right of the photo:


The inside of the dress, showing the three seams:


 And the finished dress. Yes, the beach was stunning that day. You can see my boys having their swimming lessons in the background. I have my self-drafted bathers on underneath  :)


These were both very quick refashions which give a little extra interest to the dresses. I wear both dresses a lot now.

What are you doing with your hemlines?

Monday 26 November 2012

Quick fixes: DIY shorts update


I found these shorts during a recent op shop shopping spree for $5. They are made by Country Road (read $$) and are lovely quality so I had to take them home, even though the cut of the legs was rather unflattering, to say the least.

I tried them on at home and played around with pins and elastic tied in various ways down my legs - rest assured I was in the sewing room, nothing kinky I promise! Eventually I decided that a slimmer leg with a ribbed cuff was the way to go. I have done this before with knit and woven fabric (click on the pictures below to read all about it) and posted a tutorial. I do like this look on me, so I repeated the procedure keeping the leg slightly longer this time.

DIY cropped shorts in knit fabric DIY cropped shorts in woven fabric 

 Basically, what I did was to wear the shorts inside out and pin the side seams in to where I wanted the new seams. I took in both side seams, but if one had had top-stitching, I would have only taken in the other and left the top-stitching intact so it looked properly finished. I then laid the shorts out flat and marked where to sew the new side seams, adjusting as necessary to get both legs the same. Once the side seams were done, I just found matching ribbing (I have a large ribbing stash, also op-shopped and always coming in handy), cut it to fit my calf and sewed it on as described in the yoga pants tutorial.

Much improved shorts :)


I kept the original hem on these as I liked the detail. I top-stitched on the shorts fabric side of the cuff seam for a more polished finish. It's difficult to see in these photos, but you can just about see it here.


I wore these on the weekend when we visited Santa Land in Myer, Perth. Father Christmas was very impressed :)


It was a hot day, and the boys had a great time playing in the new water playground in the city...


...and yes, I made their swim shorts. Speaking of swimwear, I have finished my new bathers and will be posting pictures as soon as I can get to the beach and take some!

Friday 27 July 2012

Quick fixes: jacket update


I bought this denim jacket from the op shop a couple of months ago. It is by Aussie designer 'Bliss'. I liked the shape and detail on the jacket, but wasn't so keen on the frayed neckline and cuffs. I also prefer full length sleeves, rather than elbow length, on a jacket as I really feel the cold in winter.

This was a very quick fix. The frayed edges were just cut off with scissors close to the seam. Then, I lengthened the sleeves using thick, navy blue knit fabric.


For the sleeves I began with this shape, the top is the right length to attach to the existing cuff, plus seam allowance. Then it tapers down to form the new wrist cuff. Sew left and right sides together.


Place on jacket sleeve matching seams and placing the long edge to the existing cuff.


Stitch together then topstitch.


Finish off the new cuff with a neat hem.


Done.


Nice and warm now. Worn here with my ombre dyed Vogue skirt.


If you haven't worn something for a while, have another look at it and see if you can update it with a quick fix. You can see some of my other Quick Fixes here.

Wednesday 20 June 2012

Quick fixes: How to lengthen jeans for kids


This is a useful way of adding length to jeans, particularly for the boys who obviously won't stand for adding a cute frill to the hems!

I used similar black denim to the original jeans, but use whatever takes your fancy. Patterns would be gorgeous for younger boys.

Quick and easy. Go for it!

Thursday 14 June 2012

Quick fixes: super-quick yoga pants update

Everyone has a pair of these pants. Boring and unflattering, but oh so great for snuggling up in front of the TV or for yoga.

This is such an easy refashion. Here's what to do...


I used black fold-over elastic (FOE) for mine (2.5cm wide), but any elastic would do. If you don't want to sew, just cut a longer piece and tie it on!

Easy peasy.

Friday 9 March 2012

Quick fixes: turn long pants into cropped cuties - a tutorial


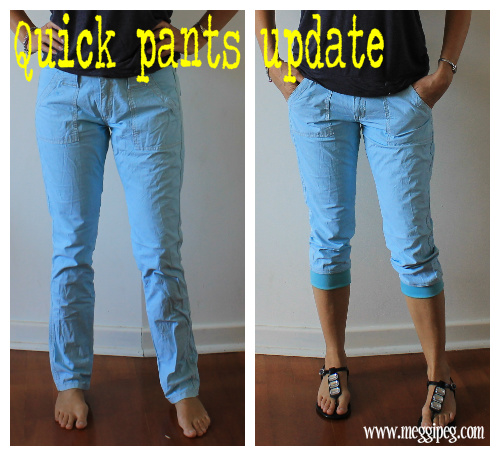
I haven't done a tutorial for a while, but I came across these stretch pants the other day at the back of a drawer. They are made from gorgeous, soft bamboo knit fabric, but I wasn't wearing them because they were just too wide and a touch on the ankle-freezery side.

As I was about to put them away again, it suddenly occurred to me that I could refashion them into something more wearable. I like the comfort and style of cropped pants with a ribbed cuff and, now I am taking hop hop classes (!!!) with Mel (the most enthusiastic dance teacher in the world), I need more work-out clothes. 

I should mention though, that this technique also works with non-jersey fabrics. Why not add a ribbed cuff to some outdated casual pants?

So, here's what I did:

To begin with I tried on the pants and did some pinning and experimenting to get the basic look I was after. Then I basted the new narrower seam in place on one leg only. The pants were still full length at this stage. I tried them on again and marked with a pin where I wanted the top of the cuff to be (it might help to roll up the pants to get the look of the cuff - just play around until you like it). My stitching started from the knee as I wanted to keep the fit the same as it was on the thigh.


Next, cut both pants legs off at the pin mark, remembering to leave some seam allowance.


Here are the pants with the bottom section cut off. There is just a bit of tapered basting stitch remaining. Mark the position of the stitching on the other leg, then stitch both legs using a serger or stretch stitch on your sewing machine. Remove basting.


OK, we are ready to make the cuffs. We will be using the cut-off pieces for these. Remove the basting stitches that you placed in one leg.


 Place the piece(s) flat and cut off any edges to make it neatly square (or rectangular). I cut off the original hem, but you could unpick it if you need the length.


My pants were so wide that one cut-off piece was enough to make both cuffs. Each of my cuff pieces was 30x23cm, the 30cm went around the leg. To determine the width of the cuffs, try the cut-off piece around your calf and pin so it is firm but comfortable. Remember to always have the greatest stretch going around the body.

Here are my two cuffs ready to sew down the long edges (each cuff is two identical pieces of fabric, each 15x23cm).


Once the long edges are sewn together, fold the seams to the inside as shown on the right below.


To attach the cuff to the pants, divide the pants leg and cuff top in quarters and mark with pins or chalk.

Pin the cuff to the right side of the pants leg matching side seams and pins. Sew together while stretching the cuff to match the pants fabric.


And you're ready to party! Now all I need are some high-top sneakers and a bad attitude. Yo!


I would love to see your version of these. Please drop me a line if you make them :)


Sunday 18 December 2011

Quick fixes - update a t-shirt with a shirred hem

I haven't had time to blog over the last few days as we've been completely consumed by an incident involving my mother-in-law. MIL was flying over to Perth from Canada when she became confused due to fatigue during the flight. The airline took her off the plane in Hong Kong and sent her to hospital for medical assessment. The hospital cleared her to continue her journey but the airline insisted that she be accompanied by someone on the flight. A friend in Hong Kong was able to visit her in hospital and offered to accompany her to Perth. However, this was refused at the check-in gate as he didn't have an Australian visa and the airline offered no help in getting him through, even though he was going to fly directly back to HK and not stay in Perth at all. They also wanted to charge him an airfare four times the usual last minute rate. Eventually my husband had to fly out to HK to sort things out (again at our expense, not theirs). It is now three days since my MIL was taken off the plane in HK. We are hoping she and my husband can return to Perth tonight. We have been appalled at the lack of information, lack of assistance and poor treatment by the airline - Cathay Pacific. They have offered my MIL and our friend no help, food or accommodation whatsoever apart from a Starbucks coffee voucher! We are planning to take this further once we get everyone home again. If anyone has any ideas or similar experiences I would love to hear them.


Anyway, back to the crafting. Today I'm showing you a very quick t-shirt update using shirring. I have done this before, but always used my 'cheat's shirring method' as I couldn't get the sewing machine method to work properly. Well, I am pleased to say that I can now do machine shirring and it's incredibly easy!

I think I was going wrong with winding the shirring elastic on to the bobbin. I had been carefully winding it by hand. Wrong idea! This time I just wound the elastic on to the bobbin automatically using the machine bobbin winder and sewed as normal. And it worked! Yay. Thanks to my friend Amanda for telling me this trick, I will be using it often.

Thursday 17 November 2011

Quick fix: t-shirt update with some shirring


I have had this top in my wardrobe for ages. It's one of those items that you don't want to throw away, but every time you put it on you take it off again as it's not quite right. This top is made from fine jersey fabric that clings annoyingly around the hips and tummy (see first pic) and the length was a bit in-between as well. Time to do something about it.

Enter my cheat's shirring method - of course if, unlike me, you are able to get your machine to shirr/smock in the usual way go right ahead. I applied several rows of shirring elastic in a continuous spiral around the bottom of the t-shirt, starting 1-2cm from the hem. This t-shirt had a serged, rolled, lettuce hem so the effect was quite pretty after the shirring. If you have the length in your top, you could replace a normal t-shirt hem with your own rolled lettuce hem using a serger or a small, close zig-zag stitch, stretching the fabric as you sew, or just leave the original hem.

Once you have done enough rows of shirring, just merge the elastic into the row below to finish it off. You will never notice that you haven't got individual rows of shirring once it is being worn. This is now finished, although I decided that my top was still a bit long, so I just sewed a pleat of fabric to the inside of the t-shirt, just above the shirring and trimmed off the excess.

Here it is - with a sneak peek at my new Jalie jeans!!!


I'm wearing a cami underneath in these pics.

Love a quick fix!

LinkWithin

Related Posts Plugin for WordPress, Blogger...