Showing posts with label meggipeg. Show all posts

Saturday 18 September 2021

Felix Jacket made with scraps and Boro stitching


When an idea forms itself and refuses to leave your head, sometimes you just have to go with it and see what happens. 


This jacket started as just that kind of idea. I wasn't quite sure how I wanted it, but I knew I would not be satisfied until I had given it a go.


When I finish a sewing project, any scraps that may be remotely useable are stuffed into one of several scrap boxes and hidden around the house. I'm sure I'm not alone in doing this - well maybe amongst my non-sewing friends, but sewing people will understand! 

I rarely use these scraps, but this was my opportunity! It took me some time to find where I'd hidden them, but I eventually found a couple of boxes and fished out pieces that seemed to go together. I chose lots of different denim scraps and a few other things.


I wanted to use the Felix Jacket by Pattern Union as the simple lines and bound edges were perfect for this project. Also, I have seen excellent reviews of the pattern, so I wanted to try it for myself. 

I decided on a length that was between the cropped and mid-thigh lengths in the pattern and, after a quick adjustment to the pattern pieces, cut out the jacket in a cotton twill fabric. 

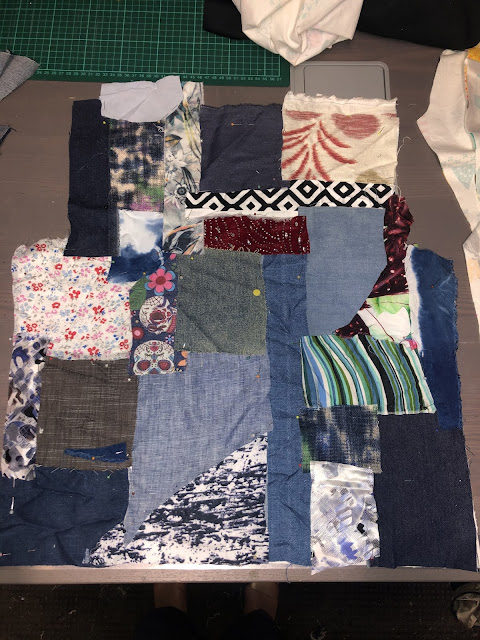
I then laid out my scraps on to each pattern piece until I was happy with the way they looked, then used lots of pins to hold them in place.


Each panel was then stitched individually, while I snuggled in front of the TV during the winter evenings. It probably took about three months to make and I worked on it most evenings during that time.

I had no plan for the stitching, just whatever took my fancy. I am not a good hand sewer, but the process of choosing coloured embroidery threads and sewing down the pieces in different patterns, was very enjoyable and I found it difficult to put it down. It was nice to remember the different things I had previously made with the fabric too. I got my Alabama Chanin stitch book out at one point and did some slightly fancier stitches in one area.

I was inspired by the Japanese technique of Boro stitching, which is a way of visibly mending garments by hand sewing on scraps of fabric.

Here and there I added some personal touches by stitching a word or two and some stick figures of my two boys and my dog. I left frayed edges showing where I could to add interest.

Here is the jacket in progress.


I didn't take many progress photos, but as soon as I finished each panel, including the patch pockets, I couldn't wait to sew them together to slowly see the jacket taking shape. I was very pleased with how the Felix jacket pattern came together.

Once all the panels were hand-stitched and sewn together, I went over the whole jacket again, adding a few more stitches in any bare bits. I used some sparkly gold thread in some places too.

Once I was satisfied, I made a lining from some blue silk that has been in my stash for ever. All the edges of the jacket were then bound with bias binding made from one of my chambray scraps.


I am really happy with this rustic, haphazard jacket. It was so enjoyable to make and it holds lots of memories in its scraps. My family said it was very 'me', which I was pleased to hear.

I wore it yesterday with my Morgan jeans, to Kings Park where I met sewing friends Sue and Katherine. The spring wildflowers were stunning and we enjoyed coffee and a visit to a lovely textile exhibition. Here we are - in our handmade outfits of course!


Tuesday 12 May 2020

Tessuti Knots and Crosses competition - Maisa denim jacket, Flint shorts and Sorrento bucket hat


It's been a very long time since I entered a sewing competition, but when I saw the gorgeous fabrics in Tessuti's 2020 sewing competition, I had to give it a go. The idea was to make any garment from a cotton/linen Broderie Anglaise fabric. The fabric was available in four colours and two different patterns, the 'knots' and the 'crosses'. I chose the 'crosses' fabric in a natural colour. The rules stipulated that only the 'knots' or 'crosses' fabrics could be used as the outside of the garment and could not be dyed or embellished with any other fabric or embroidery. A lining fabric of the sewer's choice was allowed. Entries were to include photos of someone wearing the garment as well as pictures of its construction.


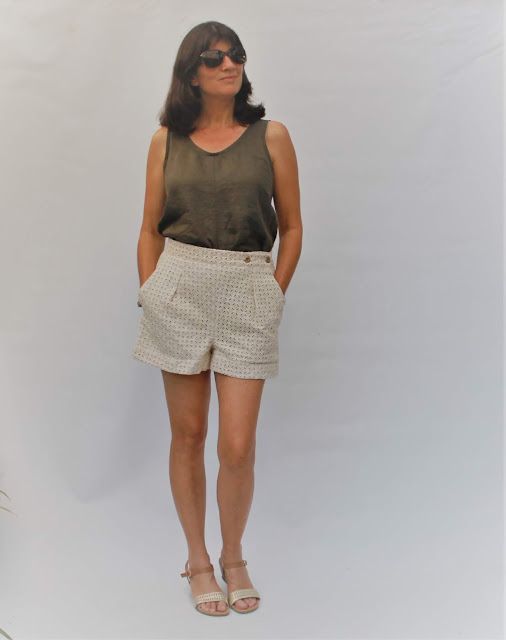
I made three pieces for my competition outfit, all of which I have made before, so I knew they would fit. These were a Named Clothing Maisa Denim Jacket, Megan Nielsen Flint Shorts and, for fun, an Elbe Textiles Sorrento Bucket Hat, which is a free pattern. I am wearing them with a Megan Nielsen Eucalyptus woven tank in khaki. I had decided on the jacket as soon as I heard about the competition, partly because my denim Maisa jacket is probably my most worn item ever and partly because I thought it would be unique to make a Broderie Anglaise jacket. After seeing the other entries, it seems I wasn't so forward-thinking after all as there are some gorgeous jackets among them. Oh well! I had originally planned to make a skirt, but it wasn't working out, so I went with shorts instead after a suggestion from my sewing friend Katherine.


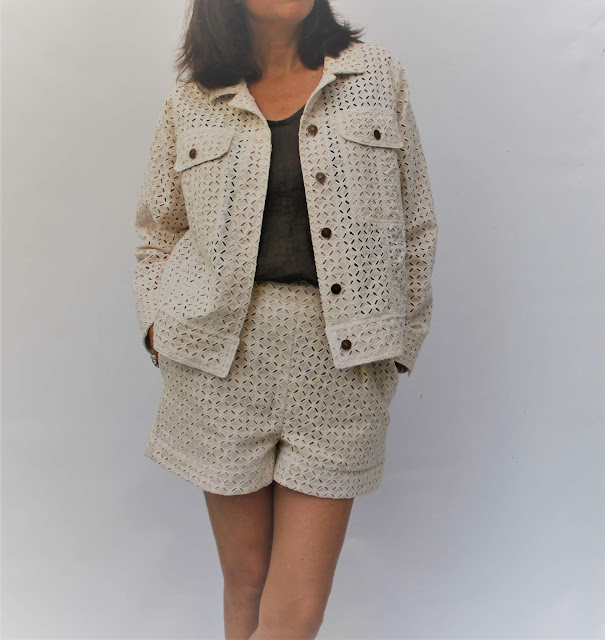
I began with the Maisa Jacket. I wanted to show off the fabric as much as possible, so kept the majority of the jacket unlined. I used a natural-coloured cotton fabric to line just the collar, cuffs, pockets and hem and button bands. I sewed it around the seams (see below) so that the lining and not the seam showed through the eyelet holes on the inside and outside of the jacket. 


It was a slow process getting everything as perfect as possible, but very enjoyable, especially as I have had little time to sew for quite a while now. 


The outer seams are all top-stitched and the jacket is finished off with jeans buttons at the front, pockets and cuffs.


The inside of the pocket has a leather patch with my Meggipeg label and a Tessuti Fabrics label on it.


The next picture shows how the jacket is constructed to allow the light through the main part of it.


Next the Flint shorts. These were lined for modesty, with the lining fabric used as underlining. This meant that the view through the holes was uniform and no seams were visible. I made the style that buttons up, rather than ties, and used metal buttons. These were shortened about 4cm from the pattern after a suggestion from a (male) friend, who insisted they were originally too long! I think he was probably right as the proportions look better with the jacket at the shorter length. 


These shorts are so comfortable to wear and I love them in this fabric.


The Sorrento bucket hat is fun to sew and easy to wear. I lined it to hide the seams again and love how the light shines through the brim lining when it's worn.


I am really happy with all the pieces of this outfit. I know they will all be things I wear a lot and I thoroughly enjoyed the planning and creating of everything. The fabric is gorgeous and I'm very happy to have pushed myself to enter the competition. The closing date is 14th May and it's worth having a look at the other creative entries on Pinterest or Instagram.


Saturday 19 October 2019

Pietra pants, Sadie tunic and Sorrento bucket hat


Summer is on its way and I was determined to find some time to sew. Time to sew, for myself at least, has been rather limited for a while, but it is always such a joy. This outfit began with the Pietra pants by Closet Case Patterns, which I was inspired to make after seeing the gorgeous versions on the Tessuti blog.

I had one metre of navy sandwashed linen from a recent(ish) sale at Morgan and Marks, a local Perth designer who sometimes sells off their excess fabric. There was just enough for these pants with some creative cutting, but I had to use a different navy fabric for the pocket lining, which does not show at all.


This was my second pair of Pietra pants. The first was a wearable toile in beige linen. I made these exactly according to the pattern. They are a bit baggy for my liking and the waist is very high, which I find a bit uncomfortable, possibly because I'm not used to wearing such high waisted pants. For the navy pair, I decided to remove 5cm from the rise of the pants by folding in the front pattern piece at the lengthen/shorten line and folding the top of the back piece, facings and front pocket pieces over by 5cm. 


I feel much more comfortable with the rise of the navy pair. I also took in the side seams of the navy pair for a closer fit.


The blouse is the StyleArc Sadie tunic, which I have made before. Both times I made it I shortened the length, but I can't remember by how much.


This Sadie is made in a light cotton voile with an embroidered flower pattern. I think this fabric came from a designer sale as well, but I've had it for so long I'm not sure!


The top worked quite well in this slightly sheer fabric, but the neck and hem facings are very visible. I was careful to make them as neat as possible! A flesh-coloured bra is also essential.


And finally, the hat. I was recently invited to the launch of an Image Stylist business at Garden City Shopping Centre by B, my friend and ally in all things sewing, fashion and food. B had won tickets to the event and we had a very decadent time drinking pink cocktails and surreptitiously inhaling the grazing table. The stylist, Peta Preston, showed us her picks for the upcoming season, which included a bucket hat! The model is wearing one made from white broderie anglaise, which I may copy. I made mental notes of all the pieces I liked and the patterns I would use to make them. The bias cut skirt (same model) was on my to-make list.  


I used the Sorrento bucket hat pattern, which is free from Perth designer Elbe Textiles and which came to my attention after being made extensively by Sue from Fadanista. This is a fab pattern and I highly recommend it. There will be more! Cheers x


Tuesday 2 July 2019

The Prospects Dress - Naughty Bobbin Patterns


When I was asked to be a pattern tester for the newly released Prospects Dress by Naughty Bobbin Patterns, I said yes immediately! Savage Coco always manages to design something that makes you feel like a million dollars and this is no exception. 


The Prospects Dress is a lined, knit dress with flattering, cut-away shoulders (but not so cut away that you can't wear a bra), a high neckline and a figure-skimming style. It is available as a Print-at-home PDF, a print-at-copy-shop version or a printed pattern, starting at only $5.25. If, like me, you actually enjoy gluing PDFs together (yes I really do), this is a bargain!


I made my dress using a bright red slinky knit fabric that had been in my stash for a very long time. I rarely wear red, but I rather like this shade on me. It certainly ups the va-va-voom-I'm-going-to-strut-about-in-this factor.


The dress is not difficult to make and the instructions guide you through making a beautifully finished dress with no seams showing on the inside. It is also possible to make this entirely on a sewing machine, with no need for an overlocker.

I made a size Medium, according to the size chart, and it fits perfectly.


This is a gorgeous pattern and I love the dress. It really is one of those things that you put on and instantly feel amazing in. It is also incredibly comfortable and easy to wear.

Naughty Bobbin has got lots more exciting things in the works, so keep an eye out for those.


Tuesday 26 March 2019

Not enough fabric for my pattern - what now??


Last year a new, and rather lovely, fabric shop opened up in Myaree, Perth. It is called Woven Stories Textiles and stocks a stunning array of ethically sourced hand woven, hand dyed and hand printed fabrics for sewing and quilting. Being a bit short of money of late I was very restrained and chose just 1 metre of one fabric - this indigo dyed, hand printed cotton.


As we were in the middle of summer, I was hoping to make a simple dress to wear on the hottest days. I needed a pattern that didn't use much fabric and decided on the Eucalypt Dress by Megan Nielsen. I can't remember the width of the indigo fabric, but it was just not quite wide enough to fit the pattern pieces on. Hmmm....


I hunted through my scrap drawers and my stash for a fabric that I could use as a contrasting panel and all I could find was a tiny amount of cotton that I had dyed with indigo a couple of years ago. The cotton had a pattern cut into the fabric and was a good match in colour and rustic-ness (!) for my main fabric. However, there was too little contrasting fabric to use as a panel, so I cut it into uneven rectangles and made a panel with offcuts of my main fabric. I hand stitched around each piece with embroidery thread as an extra little detail.


I had just enough to make contrasting bias binding for the neck and armholes and for a strip around the hem of the dress.


I decided to lengthen the dress slightly more than the original pattern and have a straight hemline.


So there we are - the print doesn't match down the centre due to fabric restrictions, the contrasting fabric is fraying where it was pre-cut and the dress is very rustic and imperfect - but I love it. I adore indigo-dyed fabric and this is so floaty and comfortable to wear. I'm so pleased I was able to think of a way to squeeze this lovely, simple pattern on to my special fabric.

LinkWithin

Related Posts Plugin for WordPress, Blogger...