Showing posts with label meggipeg. Show all posts

Tuesday 29 January 2019

Xerea Dress - Pauline Alice


A while back, a lovely sewing friend gave me a gift voucher for Tessuti Fabrics. One of the things I bought was this Italian designer, stretch denim, panel print called 'Water Wheels' (now sold out). It was $49 for the 1 metre panel, which is rather more than I usually splurge on fabric, so I just got the one panel with no idea of what I would make with it.


I eventually settled on an old favourite pattern - the Xerea Dress by Pauline Alice. When adding this link, I wasn't able to find the pattern in the online shop. I hope it is still available as it's a winner. I have made this pattern a couple of times before and I still wear the dresses a lot. I chose the View A shift dress, but left it sleeveless.


I had to think carefully about cutting this dress. I only had one metre of fabric and the bold print could not be ignored for matching purposes. The large size of the 'wheels' added another cutting challenge as they needed to be centred. In the end I cut front and back pieces with the skirt section slightly narrower than the pattern piece so I could fit them on the fabric with the wheels in the right place. The side panel and internal pocket pieces were cut from a very dark grey ponte. I just squeezed the yoke pieces on and I added black piping between the yoke and main dress pieces for interest. I hemmed the dress with black bias binding as it seemed to need a line of black to balance the colours.


I didn't get an exact print match at the sides, but it's acceptable and seriously, this fabric is so stunning who's going to be looking at the side seams except other sewing people?!


I adore the colours and print of this fabric and the stretch denim was perfect for this style of dress. I do realise I have a target on my stomach, but I give not one hoot.

I was so pleased with this that I wore it on Christmas Day and will certainly be wearing it much, much more.


Saturday 10 November 2018

The Utu skirt - Breaking the Pattern Book


Earlier this year I was a pattern tester for the new book, Breaking the Pattern, by Saara and Laura Huhta of Named Patterns. The book has now been launched and I was lucky enough to be sent a copy for my participation in the testing process!


The book is really lovely. It contains pattern sheets for 20 garments with ideas and inspiration for combining and customising patterns to create many more different looks. The presentation and photos are beautiful and the sewing instructions are clear with many diagrams. I definitely recommend this as one of the best sewing books I've seen.


One of the patterns I tested was the Utu skirt. This is a beautifully shaped, unlined wrap skirt with an attached belt and D-ring fastening at the side. The Utu pattern can also be made as a lined pinafore dress.

The Utu Skirt - Breaking the Pattern

The Utu Pinafore - Breaking the Pattern
I used a 100% cotton, mid-weight upholstery fabric with a blue and white print. The fairly sturdy fabric worked well for this pattern and the skirt sits and fits very nicely.


The belt continues around the back of the skirt through belt loops, which is a nice detail.


The skirt sits high on the waist and is a very flattering shape. The belt holds the skirt firmly over the tummy, which is good for smoothing over any rounded bits!


This skirt style would work well as a casual, work or evening garment. I'm looking forward to wearing mine a lot as the weather warms up.

Wednesday 13 June 2018

Designing fabric with Spoonflower for a Jalie Charlie Bomber Jacket


I was rather thrilled to be contacted by Spoonflower recently and invited to have some fabric printed for a project of my choice. Spoonflower have a massive library of designs to choose from, or you can upload your own design for a completely unique print. 

***DISCOUNT: If you are interested in having fabric, wallpaper or giftwrap printed for your own project, you can get a 10% discount on the Spoonflower website for the next month using the code meggipeg10. The design I created for this jacket can be found here***


I immediately thought I'd like to use my Mum's artwork as the basis for the fabric design. Mum paints a lot of landscapes with a sea of flowers in the foreground. I decided to use just the flowers as the basis for the design and to make a jacket. I chose a painting with lots of blue, khaki and white so it would be wearable with lots of colours of pants and skirts.


I selected an area of flowers and photographed that part of the painting in high resolution using the close-up setting on my camera. I then used that photo to create a repeating pattern with the larger flowers at the top and bottom of the fabric, transitioning to smaller flowers in the middle. If you would like to use this print, you can find it here. I have only just set this up for sharing, so I hope it works. I had the fabric printed on Organic Cotton Sateen Ultra (see fabric types here), which is just a lovely fabric. I prewashed it before making the jacket and the colours held up beautifully.

My design as it would appear on one yard of fabric


The pattern I used was the Jalie Charlie Bomber Jacket. I have made this before in adult and child's sizes and it's a brilliant pattern.   


I added about 4cm to the length, but otherwise chose the size based on my measurements. My tip for the jacket would be that the pocket fabric will show on the outside of the jacket as the welts are cleverly formed from the pocket piece, so it's best not to use lining fabric for the pocket! I chose to use some striped ponte to match the cuffs, neckline and hem band. I love the classic look of striped ribbing on bomber jackets, but it's hard to find and this ponte does the trick just fine.


I decided to line the jacket. The pattern is unlined, but I just used the front, back and sleeve pieces to make the lining and I drew a front facing piece that was cut from the main fabric. I lined the jacket with white cotton that I had dyed blue to match the outer colours. I bagged the lining for a clean finish. There are lots of online tutorials for this.


I used a nice black and silver zip with a fancy pull from Homecraft Textiles to finish it off.


I was very pleased with the print quality and the way the design worked out. I was easily able to cut the pieces so the larger flowers were at the bottom of the jacket. I deliberately made the sleeves slightly different for a more random effect.


I could not be happier with this jacket. I love the print (thanks Mum!) and the colours will make it such a useful piece of clothing. The Jalie pattern is also very comfortable and easy to wear.

Thank you so much to Spoonflower for providing the fabric. This has been a super-fun opportunity and has definitely got my creative juices flowing to create more designs.

Don't forget to use meggipeg10 for a discount if you order from Spoonflower!


Sunday 8 April 2018

Alabama Chanin inspired t-shirt


Last year, before our epic family road trip to the outback of Western Australia, I was looking for projects that I could take in the car to pass the time. Scrolling through the Alabama Chanin website, I came across a t-shirt with hand-beaded text on the front.
Alabama Chanin tee from their website
I decided to make my own version using the free Plantain tee pattern and the word 'Create'. I cut out the pattern from some blue knit fabric and stencilled the word across the front using a handmade stencil, silver acrylic paint and a sponge brush. Then I gathered together some beads, sequins, needles and thread and stuffed everything in a bag for the trip.


I'm not brilliant at looking down while I'm in the car as it makes me car sick, not to mention wanting to keep an eye out for kangaroos etc on the road, but I did manage to get a bit of beading done while we were travelling. After the trip, I carried on over the school holidays at the local theme park.


Finally it was done. I stitched the pattern pieces together by hand and embroidered a decorative stitch down the side seams, shoulder seam and on the neck binding using navy or pink embroidery thread.


Some close-ups:


I love this t-shirt with it's rustic, handmade look and added blingy beads. I wish I had more time to make all the Alabama Chanin things. I love them all!

I'm also wearing my Sasha trousers in these pictures.


Thursday 29 March 2018

Tessuti Skylines Competiton - Burdastyle jumpsuit and Naughty Bobbin Cap


Well this was a slow sewing project if ever there was one! Many hours were spent during the planning, the pattern adjusting, the muslining, the additional adjusting, the cutting and the construction. This is, of course, my entry for the Tessuti Skylines Competiton, where the rules state that this checked fabric alone must be used for the entirety of the outside of the garment.

Choosing the project was fairly easy. I loved the idea of making a special occasion dress in this fabric, but such a thing would never have fitted into my casual lifestyle, so I chose a jumpsuit that I could wear every day. I was inspired by a loose-fitting jumpsuit I saw on Etsy. I perused many patterns trying to find something similar and finally settled on Burdastyle FS/2014 #I. In addition to the jumpsuit, I made a little cap using the Naughty Bobbin Patterns Summer Ensemble Pattern. That pattern for a skirt, top and cap is fantastic btw!

Burdastyle Jumpsuit FS/2014 #I
There were several features of the jumpsuit that I wanted to modify, so I began by making a muslin. I experimented with the bodice, trying a wrap style and a loose bib style, but eventually settled on this sleeveless shirt/boiler suit style.

Here I am wearing a heavily modified muslin and experimenting with sleeves (my family said NO to sleeves!). I made a size 42 according to my measurements, but then took in the sides, took 2cm off the bodice length and altered the back shoulder seam for a better fit. Other changes I made to the original pattern included: raising the neckline and adding a collar - I used the collar and stand from the Named Wenona shirtdress pattern; enlarging the pockets; adding a button placket and press studs instead of the zip - I used the button placket from the Closet Case Patterns Kalle dress and lengthened it so it extended into a fly front; adding back patch pockets; and lengthening the leg 5cm.


I cut the pattern on a single layer of fabric so I could match the print as perfectly as possible in every direction. I made sure the bodice and pants matched for the vertical stripes and that the horizontal stripes matched across the front and on the sides. I cut the shoulders, waistband and button placket on the bias for some visual interest. The stripes also match on the cap as much as possible with a little bias-cut pocket on the side!

Spot the front and back pockets!!


Here are some close ups:

I used press studs instead of buttons for emergency toilet situations...


...and a press stud on the back of the collar (I love the shape of the Named Wenona collar).


Topstitching on the waistband and pockets and the double waistband that hides the belt at the back.


The button placket extends into the pants


and the cap. I love this cap and have worn it every day since I made it.


So there we have it, finally finished! I really enjoyed the challenge of this project and I am very happy with the outcome. This jumpsuit fits perfectly into my casual lifestyle and the cap is so well-fitting and comfortable, not to mention providing lots of shade with the large brim. I'm very pleased I entered the competition as it pushed me to spend time making something I really wanted and love.


There's still time to enter!


Thursday 22 February 2018

StyleArc Sadie Tunic and Closet Case Patterns Sasha Trousers


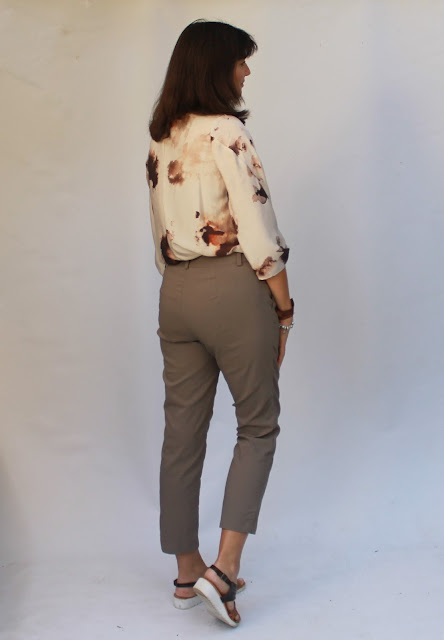
I've had my eye on both these patterns since they were released and they did not disappoint! I bought the StyleArc Sadie Tunic pattern after seeing Blogless Anna's gorgeous versions here and here. I've had this silk for quite some time after snatching it up at a local Morrison sale. I think quite a few of the Perth sewers have the same fabric. It is soft and dreamy to wear. I'm not even going to tell you what my teenage son said about the print. I think it's rather elegant!


The standout feature of this pattern is the sleeve design. It is so cool and interesting and I should have got a better picture of it. I was careful to follow the instructions and it was fairly straightforward to put together.


I also love the curved hem and the neckline and just everything really. The proportions seem to work very well together.


The back has a centre seam to accomodate a button and loop closure at the neckline. I ended up skipping this as I can easily fit the top over my head without it. Next time I may cut the back on the fold.


OK, now I'll just tuck that tunic in so you can see the pants. These are the Closet Case Patterns Sasha Trousers. (Embarrassingly I always have to stop myself saying that name in a Canadian accent since I heard Heather Lou speaking on the 'I love to sew' podcast! By the way, that episode is worth a listen if you haven't heard it yet).


I spent ages examining the sizing of these pants before cutting them out as the ones in the pattern pictures looked too tight to me. I wanted mine fitted, but not super tight. I read the blog posts, I looked at the size charts and got myself into a bit of a tizz. In the end I decided I was overthinking it and just made the size according to my measurements.


I made a toile and did a couple of fit modifications according to this very helpful blog post. I could have been fussier on the fit, but I had had enough of taking back selfies over my shoulder so got started. 


I am very happy with the result. These pants are so comfy and look smart and modern. The fit is just right and the stretchy bengaline allows easy movement. As an added bonus they go with my new blouse. I'm ready for an outing!


LinkWithin

Related Posts Plugin for WordPress, Blogger...