Showing posts with label Pattern Magic. Show all posts

Sunday 4 November 2012

Drape Drape 2, No. 2 and some thoughts on Japanese pattern books


For my birthday this year, my sister gave me a book I had been coveting for some time - Drape Drape 2 by Hisako Sato. It's a Japanese pattern book featuring some interesting and unique, but wearable, clothes. I really like the clean look of many Japanese designs and this book provides traceable patterns and basic instructions on how to create some yourself.

It was difficult to decide what to make first as my mouth was watering as soon as I opened the cover. However, I eventually settled on Pattern No. 2, the one-piece side drape top, which is actually more of a tunic, or even a dress, than a top. Amazingly, it is cut from a single piece of knit fabric and is actually very quick to sew together as it only requires a couple of seams, neck and armhole binding and a hem.


I decided on this pattern, partly because I had an op-shopped maxi skirt that was just big enough to make this from. The skirt was made from a very stretchy, two-way stretch knit. Here it is before I chopped into it.

I cut one skirt side seam completely open and just managed to squeeze the pattern on to the opened-out fabric. I placed the middle of the No. 2 top pattern, which forms the seam-free right hand side of the top, over the intact skirt side seam. I wasn't able to place the pattern grain line marking on the fabric grain as there wasn't enough fabric, but this doesn't seem to have affected the finished top/dress, perhaps because the fabric was so stretchy. Part of the dress hem had to be cut from the waistband of the skirt, so the stripes go in the other direction in this small section. As it turns out, I quite like this little feature!

The photo below shows the right hand side of the top, which is actually the original skirt side seam. You can also see the little inset piece which was originally the skirt waistband. That's my label inserted into the side seam.


I was worried that this 'top' would be too short to wear as a dress as I am about 5'9 tall. However, it seems to have turned out longer than it looked in the book picture and I'm very happy with the length. Again, this may be because my very stretchy fabric was cut off-grain, although it doesn't appear to be pulling downwards at all.


The neckline and armholes are finished with a strip of knit fabric folded over the edges like bias binding.


You may remember my recent struggle with the kakurenbo pattern from Pattern Magic, another Japanese pattern book. If I had to make a comparison of these two books, based on making one pattern from each book (which I know is completely unscientific, but still interesting right?), I would have to say that Drape Drape 2 is definitely the book to start with. A sewist with some experience, particularly with knit fabric as most patterns in this book require knits, could have an enjoyable Sunday tracing, cutting out, sewing and finishing a garment from Drape Drape 2 (probably also Drape Drape, but I haven't actually seen the first book). This is not to criticise Pattern Magic as it contains some really incredible designs. However, at least for the pattern I made, these pose a far greater challenge to make as they require fiddly pattern drafting (no patterns are provided) and much more complex sewing techniques to put together. The time taken to make my Pattern Magic top was closer to a month of Sundays! OK not quite, but you do need plenty of time, experience and patience to tackle Pattern Magic.


What do you think? Has anyone else tried these two books?

Thursday 11 October 2012

Pattern Magic Challenge: a t-shirt with kakurenbo design


So, for the Pattern Magic Challenge, I decided to make this interesting, curved design, called kakurenbo (hide and seek). The flare of the skirt is designed in such a way that parts of it lie (hide) under the curves. The photos from 'Pattern Magic 1' above show this effect very well. A lot better, ahem, than mine does.


As I mentioned in a previous post, I had decided to take a short cut with my version of this pattern, by using an existing pattern as the basis for the design, rather than drafting a block to fit me and then modifying it to make the kakurenbo. I decided to make a t-shirt using Jalie 3132, which I have made before as a t-shirt here and here and a nursing hoodie here. I think this method worked OK, apart from my blunders, on which I will elaborate below.

The instructions seemed very straightforward at first glance and I raced ahead gung-ho, only to find that working out the 'hide and seek' bits was actually pretty tricky. I didn't want my t-shirt to be as full in the flared lower part, so I drew a normal curve (f) in the centre front and 'hide and seek' curves (b, c, d and h, i, j) on either side of it. I used a mirror image of the same design on the back, making six curves altogether. These were drawn below the bustline. The 'hide and seek' bits (b, d, h, j) then needed to be opened out as seen in the lower part of the photo below. 


Next, the lower section of the t-shirt is flared open at strategic points in the curves as shown below. I flared mine much less than the book said as I wanted a softly draping t-shirt.


 I was ready for a stiff drink by this stage, but I pressed on and cut out the pattern pieces. As it turned out, a stiff drink may have been more productive as I left off the seam allowances. Face-palm. Pattern Magic 1 did not mention seam allowances. I blame them.

At this point I screwed the blasted kakumbi-whatsit into a ball and threw it at the wall. And then had my stiff drink.

Some days later I smoothed things back out and carried on. I should note here that usually when I make something I find it hard to tear myself away, beavering on until it's finished. Not so with this particular disaster pattern. Anyway, I didn't have enough fabric to recut the pieces, so I continued with my un-seam-allowanced mess hoping that I could ease some curves from the stretchiness of the knit fabric. I was using a light viscose blend knit from Textile Traders.

I did a bit of pinning...


...and then some stitching. Followed by several days worth of unpicking and restitching every millimetre of every curve. Most of the restitching was done as topstitching, which seemed to reduce sagging within the curves.

I was forcing myself to continue this to the bitter end. However, every now and then I would glimpse it from a certain angle and think that maybe there was some potential there somewhere. Generally, this was soon replaced with despair once again!

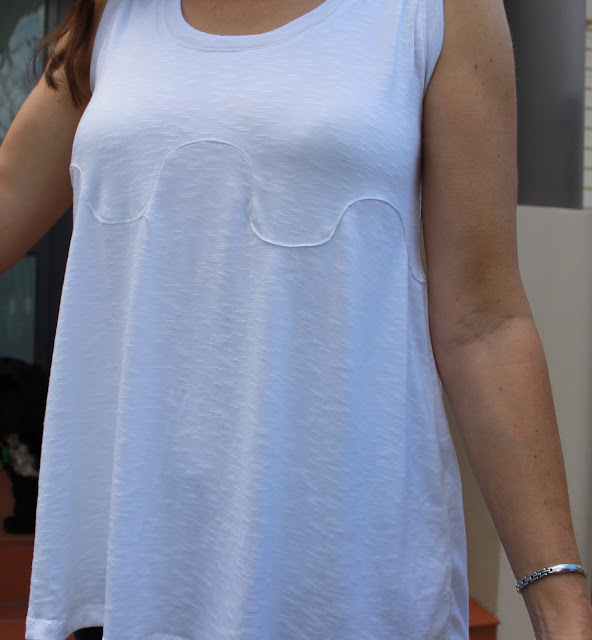
Eventually, I emerged with this:


It's not bad as a little top for summer. The curve is kinda interesting, no?


"But where are the hide and seek bits?" I hear you ask. Well, they sort of got lost with all the unpicking and stretching.


But wait, here's one!


That's it. I'm exhausted!!

Monday 8 October 2012

Pattern Magic Challenge

Pattern Magic Challenge

I check through the latest creations on the Pattern Review website daily. Actually, I skim through, bypassing all the big name patterns and searching for those little gems from the smaller pattern companies and anything a bit unusual like the Japanese pattern books. Ahhh, the Japanese pattern books. I have one myself - Pattern Magic 1. I flick through it often before placing it back in the too-hard basket. The patterns have to be drafted by hand from pattern blocks you have also drafted to fit yourself. I'm all for making my own patterns to copy RTW (ready to wear) clothes or adapting existing patterns to create a different look, but taking all those measurements, making the block then making the pattern just seemed too long winded. I wanted to do it, I admired what others had made from these books (especially the inspirational Carolyn), but I just couldn't quite get around to it. So I took a short cut - well kind of. But more on that later.

Recently, a gorgeous bag caught my eye on Pattern Review. It used the bamboo shoot design from a top in Pattern Magic 1 but incorporated it into a bag instead of a top. A light bulb went on for me right then. I could incorporate Pattern Magic ideas into patterns I already had, rather than making my own blocks etc. That way I could try out some designs quickly before deciding if it was worth the effort to do it properly. Better still, the creator of this fine bag had set a 'Pattern Magic challenge'  to make something from one of the three PM books and get together for a PM 'catwalk' on her blog in mid November. Before I could change my mind I signed up to be part of it, then grabbed PM1 and settled down to decide what to make.

The piece I chose was a vision of softly falling, curved loveliness. The process of making it was anything but lovely. I tore my hair out over it, along with many hundreds of stitches. I did get there in the end. Well, I kind of got there. Somewhere, at least.

Here is a peek


More to come when I have gathered my strength from this ordeal ;)

LinkWithin

Related Posts Plugin for WordPress, Blogger...