Showing posts with label competition. Show all posts

Tuesday 12 May 2020

Tessuti Knots and Crosses competition - Maisa denim jacket, Flint shorts and Sorrento bucket hat


It's been a very long time since I entered a sewing competition, but when I saw the gorgeous fabrics in Tessuti's 2020 sewing competition, I had to give it a go. The idea was to make any garment from a cotton/linen Broderie Anglaise fabric. The fabric was available in four colours and two different patterns, the 'knots' and the 'crosses'. I chose the 'crosses' fabric in a natural colour. The rules stipulated that only the 'knots' or 'crosses' fabrics could be used as the outside of the garment and could not be dyed or embellished with any other fabric or embroidery. A lining fabric of the sewer's choice was allowed. Entries were to include photos of someone wearing the garment as well as pictures of its construction.


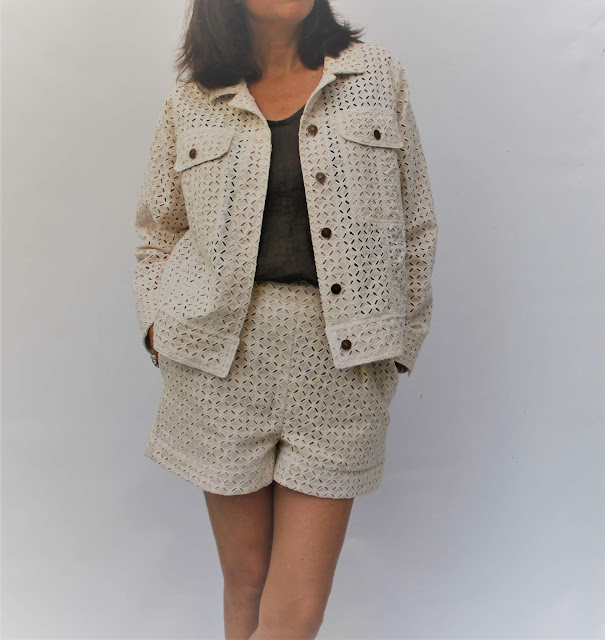
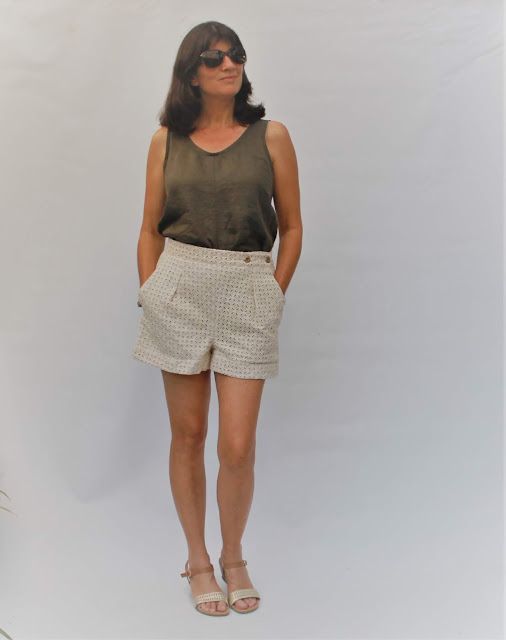
I made three pieces for my competition outfit, all of which I have made before, so I knew they would fit. These were a Named Clothing Maisa Denim Jacket, Megan Nielsen Flint Shorts and, for fun, an Elbe Textiles Sorrento Bucket Hat, which is a free pattern. I am wearing them with a Megan Nielsen Eucalyptus woven tank in khaki. I had decided on the jacket as soon as I heard about the competition, partly because my denim Maisa jacket is probably my most worn item ever and partly because I thought it would be unique to make a Broderie Anglaise jacket. After seeing the other entries, it seems I wasn't so forward-thinking after all as there are some gorgeous jackets among them. Oh well! I had originally planned to make a skirt, but it wasn't working out, so I went with shorts instead after a suggestion from my sewing friend Katherine.


I began with the Maisa Jacket. I wanted to show off the fabric as much as possible, so kept the majority of the jacket unlined. I used a natural-coloured cotton fabric to line just the collar, cuffs, pockets and hem and button bands. I sewed it around the seams (see below) so that the lining and not the seam showed through the eyelet holes on the inside and outside of the jacket. 


It was a slow process getting everything as perfect as possible, but very enjoyable, especially as I have had little time to sew for quite a while now. 


The outer seams are all top-stitched and the jacket is finished off with jeans buttons at the front, pockets and cuffs.


The inside of the pocket has a leather patch with my Meggipeg label and a Tessuti Fabrics label on it.


The next picture shows how the jacket is constructed to allow the light through the main part of it.


Next the Flint shorts. These were lined for modesty, with the lining fabric used as underlining. This meant that the view through the holes was uniform and no seams were visible. I made the style that buttons up, rather than ties, and used metal buttons. These were shortened about 4cm from the pattern after a suggestion from a (male) friend, who insisted they were originally too long! I think he was probably right as the proportions look better with the jacket at the shorter length. 


These shorts are so comfortable to wear and I love them in this fabric.


The Sorrento bucket hat is fun to sew and easy to wear. I lined it to hide the seams again and love how the light shines through the brim lining when it's worn.


I am really happy with all the pieces of this outfit. I know they will all be things I wear a lot and I thoroughly enjoyed the planning and creating of everything. The fabric is gorgeous and I'm very happy to have pushed myself to enter the competition. The closing date is 14th May and it's worth having a look at the other creative entries on Pinterest or Instagram.


Thursday 29 March 2018

Tessuti Skylines Competiton - Burdastyle jumpsuit and Naughty Bobbin Cap


Well this was a slow sewing project if ever there was one! Many hours were spent during the planning, the pattern adjusting, the muslining, the additional adjusting, the cutting and the construction. This is, of course, my entry for the Tessuti Skylines Competiton, where the rules state that this checked fabric alone must be used for the entirety of the outside of the garment.

Choosing the project was fairly easy. I loved the idea of making a special occasion dress in this fabric, but such a thing would never have fitted into my casual lifestyle, so I chose a jumpsuit that I could wear every day. I was inspired by a loose-fitting jumpsuit I saw on Etsy. I perused many patterns trying to find something similar and finally settled on Burdastyle FS/2014 #I. In addition to the jumpsuit, I made a little cap using the Naughty Bobbin Patterns Summer Ensemble Pattern. That pattern for a skirt, top and cap is fantastic btw!

Burdastyle Jumpsuit FS/2014 #I
There were several features of the jumpsuit that I wanted to modify, so I began by making a muslin. I experimented with the bodice, trying a wrap style and a loose bib style, but eventually settled on this sleeveless shirt/boiler suit style.

Here I am wearing a heavily modified muslin and experimenting with sleeves (my family said NO to sleeves!). I made a size 42 according to my measurements, but then took in the sides, took 2cm off the bodice length and altered the back shoulder seam for a better fit. Other changes I made to the original pattern included: raising the neckline and adding a collar - I used the collar and stand from the Named Wenona shirtdress pattern; enlarging the pockets; adding a button placket and press studs instead of the zip - I used the button placket from the Closet Case Patterns Kalle dress and lengthened it so it extended into a fly front; adding back patch pockets; and lengthening the leg 5cm.


I cut the pattern on a single layer of fabric so I could match the print as perfectly as possible in every direction. I made sure the bodice and pants matched for the vertical stripes and that the horizontal stripes matched across the front and on the sides. I cut the shoulders, waistband and button placket on the bias for some visual interest. The stripes also match on the cap as much as possible with a little bias-cut pocket on the side!

Spot the front and back pockets!!


Here are some close ups:

I used press studs instead of buttons for emergency toilet situations...


...and a press stud on the back of the collar (I love the shape of the Named Wenona collar).


Topstitching on the waistband and pockets and the double waistband that hides the belt at the back.


The button placket extends into the pants


and the cap. I love this cap and have worn it every day since I made it.


So there we have it, finally finished! I really enjoyed the challenge of this project and I am very happy with the outcome. This jumpsuit fits perfectly into my casual lifestyle and the cap is so well-fitting and comfortable, not to mention providing lots of shade with the large brim. I'm very pleased I entered the competition as it pushed me to spend time making something I really wanted and love.


There's still time to enter!


Thursday 29 September 2016

PR Sewing Bee Round 3 Challenge - The Colette Rue Dress


I made it to the third round of the PR Sewing Bee! My second round entry is here. The competition is hotting up now and this challenge was a lot harder than the first two. We were to make a Colette Rue dress, but put our own 'spin' on it. This may not sound too bad, but my feeling is that the 'spin' needs to be pretty amazing to make the cut in this round, not to mention the perfect sewing required.

Colette Rue Dress
The Rue Dress is a vintage-inspired design with a fitted bodice and two skirt options. While I love this 40s style on some people, it is not my thing at all. To make this wearable and fitting with my style it needed to be modernised and made into a more flattering shape for my body type. I didn't want to change the pattern too much though. It still needed to retain the essence of the Rue. I thought long and hard about what to do and eventually came up with this design.


I used View B of the pattern with the slimmer skirt. The bodice was redrafted to move the curved pieces away from the centre and towards the sides. The curves were redrawn and the new style lines continued down into the skirt and made into pockets. The sleeves were omitted as we are heading into summer. In addition to the design changes, I needed to make numerous fitting alterations, mainly to the bodice. I wanted the curved pieces below the bust, rather than on it, so that required some fiddling with the two curved pattern pieces and the bust pleats - not easy. I also needed to lengthen the bodice and lower the armholes (complete list of changes available here)

Here are the alterations I made to the two front bodice pieces. This alone took many muslins!


I chose this floral stretch denim fabric bought ages ago from Potter Textiles. The dress is lined with a cream floral cotton voile and the piping is made from polka dot fabric from the shorts I made in Round 1 of the Sewing Bee.


I was as precise and careful as possible with matching the piping at all the seam lines and the neckline. As for the invisible zip, let me just take a bow. I think it's the best I've ever done!


This process was difficult and stressful and took many hours. I often had a houseful of hungry teenage boys and my time limit was reduced by three days as I'm attending a felting course this week. A couple of muslins in, I did contemplate not completing this challenge. I emailed my sister who said that if she'd been doing it, the dress would have been a ball on the floor by now. That suddenly made me realise how long it's been since I hurled a sewing project at the wall (a fairly common occurrence in the early days). My gosh, maybe I have actually come quite a long way, if only in controlling my sewing hissyfits. I was spurred on to finish. Thanks sis!


I am really happy with the finished dress. It is a bit of a departure from my usual style, but still feels like me. My favourite thing is the pockets and how they blend into the new style lines. I am also very proud of the sewing I did here. Fingers crossed I make it to the final round of the competition.

Tuesday 20 September 2016

Patrones magazine bias-cut dress 10/2013 #20 for the Sewing Bee


I have entered the Pattern Review Great British Sewing Bee competition this month*. The first challenge was to make a pair of shorts or capri pants. My polka dot capris will be blogged soon. Suffice to say, they got me through the first round. Challenge number two was a bias cut garment. 

Bias cut? I never make bias cut garments. They have a habit of showing lumps and bumps I'd rather keep well hidden. This was a challenge indeed. After examining and rejecting every pattern in my arsenal I finally turned to my stack of Patrones magazines. I love those magazines, they have interesting and lovely designs. I flicked through the pattern layouts and looked at anything that was cut on the bias. Eventually I settled on this dress.


This is dress number 20 from the October 2013 issue of Patrones Extra Magazine (No 33).  It is completely bias cut, but is not too clingy. The skirt is quite full and the ruffles add some extra interest.


I chose a lovely cotton voile with an abstract print that I had bought from a Morrison (Australian designer) sale a few months ago.


This light fabric required careful sewing and I used French seams throughout (inside picture above). This was tricky as the fabric wanted to gather along every stitching line. I also had big problems working out how to French seam the neckline flounce. It took me three goes before I got the right side showing!


The flounce follows the neckline and then extends past it down the front of the dress. The hem of the flounce and all the other hems of the dress are finished with a rolled hem on the overlocker. The flounce has a bit of hand beading on it too.


The skirt is made up of ten pieces, all different and asymmetrical. There are ruffles along four of the seam lines and the hem dips at the front and back.


The back has a slight racer back, which is nice with the ruffle falling over the shoulders.


This dress was quite involved to make, not least because the instructions were in Spanish so no use at all to me! It took quite some working out just to determine which pieces were meant to go where, let alone how to sew them together. It seemed to work in the end though and I didn't have any pieces left over, so something went right!


 I am very happy with this dress. The bias cut bodice is fitted, but not too tight. The skirt is swishy and cute and the ruffles and print distract from lumpy areas beneath. Now to sew some of those other gorgeous Patrones patterns I've remembered after searching for this one!

*There is no public voting in this competition, a judging panel makes all the decisions. There are four rounds in total.

Saturday 6 August 2016

The refashioners 2016 - Mondrian Dress from jeans


One of my favourite things is seeing the before and after pictures of a good refashion, so I've been gleefully watching the fabulous refashions rolling in on The Makery this month. So good!

This year the Refashioners refashion must use jeans. I've already done a jeans refashion this year and have worn the dress so often, that I thought another denim dress was in order.

The idea for this dress came to me one night as I was drifting off to sleep. I always think about sewing as I go to sleep...


Enter the Mondrian-inspired denim dress AKA the StyleArc Charlotte Dress


I raided my old jeans drawer (after I remembered I had an old jeans drawer) and found three pairs of my old jeans in different coloured blue denim. It took me an entire day to work out which colour to put where, how I was going to fit the pattern pieces on the jeans and then to cut out the dress. 

Annoyingly, when I opened up the side seams to get larger pieces of fabric, the jeans wouldn't lie flat due to the curved bootcut seams. I had to unpick and resew areas of the seams to get a flat piece for my large front and back pieces and even then I had to insert a couple of sneaky darts. 

Where I could I used features of the jeans to add some interest. This was the original back pocket and side rivet.


I cut the front and back dress pieces so the original seams were as symmetrical as possible up and over the shoulders. Where I could I used the original hemlines and frayed them above the hem band.


Once the dress was sewn together, I harvested labels, pockets and buttons from the jeans (my unpicker was working overtime) and sewed them to the dress.


One of the labels got an upgrade!


Back pockets.


A button fly and coin pocket on one side.


A label overstitched to the back shoulder.


I am thrilled with the end result of this dress. I am hoping that I've retained the simple and classic look of the Mondrian design and that the added jeans features add a bit of refashiony coolness. Whatever, I'm going be wearing this a lot and washing it often to get more fraying and fading happening.


Thank you to Portia for the fantastic Refashioners series and competition and to the celebrity refashioners for the sewing eye candy and inspiration.


Chop chop everybody!


LinkWithin

Related Posts Plugin for WordPress, Blogger...