Showing posts with label competition. Show all posts

Saturday 23 April 2016

Baggy jeans refashioned into a dress


These men's, hip hop style, Guess jeans have been languishing in my sewing room forever waiting for a good overhaul. The denim was pretty nice and there was a fair bit of it in those legs, despite the waist almost fitting me. I recall with a smile the skater boys sk8r boyz of the 90s getting about in similar ludicrous styles and thinking they were the beez kneez! It was time to do something with these and with the Aussie Sewing Guild's Castaway to Couture competition currently running, now was the time.


Had I known how much work it was going to be I may not have embarked on this project. I nearly scrapped it halfway through when it was a shapeless, disjointed muddle, but I'm rarely one to give up on a sewing project so I pressed on. It took many hours, but I think it turned out alright in the end. 


I believe that a successful refashion incorporates some features of the original garment into the new one. I wanted to make a dress from my jeans and, after contemplating many options, I decided to use the upper part of the jeans for the skirt and the legs for the bodice. I thought a front-opening bodice would tie in nicely with the skirt and I found this vintage Simplicity pattern with a zip front that I used to start me off. By the way, that small pile of scraps above is all I had left of the jeans when the dress was finished!


My first step was to cut off the legs leaving enough fabric for the bodice and skirt in the two sections. That first cut was a bit scary.


I then cut along the crotch seam so I could start forming the skirt. It ended up being really tricky to get the front and back centre seams of the skirt sitting nicely. I had to unpick nearly all the original seams to finally get it looking ok. Since the original waistband almost fitted me, I left that as it was. I managed to cut the bodice pieces out of the legs and the unpicked jeans cuffs became the collar. You can see the fading where the cuffs were originally turned up.


I adjusted the bodice to fit the waistband, while still fitting me, and sewed the bodice to the skirt. The button stands were cut from small scraps and their insides were pieced together as there weren't big enough pieces left! I redid the unpicked topstitching on the skirt and used similar topstitching on the bodice seams to match the original as closely as I could. The armholes were finished with bias binding, from the op shop of course. The seams above and below the armholes at the back are the original jeans seams.


The final touches were the front snaps and some rustic sashiko-style stitching here and there (with op-shop embroidery thread) for some added interest on the plain denim. The belt is the original jeans belt.

And now for some pictures!


 I just love those deep pockets. I can't keep my hands out of them!


I am so pleased that this competition pushed me into doing this refashion as it's been ages since I did one. I really enjoyed how the process evolved and changed to suit the challenges imposed by fabric quantity and existing seams. I also loved using nearly every last scrap from those jeans and embellishing with recycled bias binding and thread. The five metal snaps are the only new thing I used. I am very happy with the final dress and I look forward to wearing it proudly!

If you would like to enter the competition or see (and vote for) the entries, visit the Australian Sewing Guild Facebook page. You need to like the page to vote. Entries close 31st May 2016.


Sunday 15 March 2015

Biker-style jeans a la Balmain


When I spotted this khaki stretch cotton in Textile Traders last week I knew exactly what I was going to make. Grungy, biker-style jeans, that's what. My inspiration was these jeans by Balmain, recently selling for US$695 at The Store. I bought 1.5m of fabric for $18 and a zip for $3. That's more like it!

Pierre Balmain Military Green Coated Biker Jeans: Source

The features I wanted in my jeans were the front seams, quilted hip panels and partly quilted back pockets. The Jamie Jeans pattern by Named Clothing was a perfect starting point as it has the front seams and two-piece back pockets. I just needed to draw up a diagonal panel for the front quilting.


So, while my fabric was sloshing away in the washing machine, getting all nice and faded, I drew up the pattern pieces I needed. I found a strip that I had cut off a summer-weight bed quilt ages ago and cut the pieces for quilting from that. Two lower pockets and two parallelograms for the front.


I used the outer quilt fabric to keep the wadding in place.


Here are my quilted front pieces. The one on the right has been trimmed down ready to turn the long edges under and topstitch on to the side front jeans piece.


This is how the fabric looked after one wash - just how I wanted it.


Once the quilting was done and sewn in place, these were straightforward to make. I've made this pattern a few times now and it is my very favourite jeans pattern. I just made some minor fitting adjustments and added some extra leg length at the cutting-out stage. The fit isn't perfect with a few wrinkles at the back, but I'm happy.


 My finishing touch was this rectangle of leather that I stamped with my life's philosophy!


 Phew! Done in a day and a half, ready for a last-minute entry in the Pattern Review Jeans Contest.


$695 jeans for $20? Don't mind if I do!


The tank is self-drafted and made from bits and pieces from my stash. The front is a lovely soft print remnant from Potter's Textiles.


I'm rather pleased that the direction of the quilting lines match on the pockets and front panel. Completely intentional of course ;)


Overall thoughts: love, love, love these!

2015 Jeans Contest

Tuesday 27 January 2015

A pinch and a punch - modified Jalie jeans and Burdastyle top (07/2013 #103)


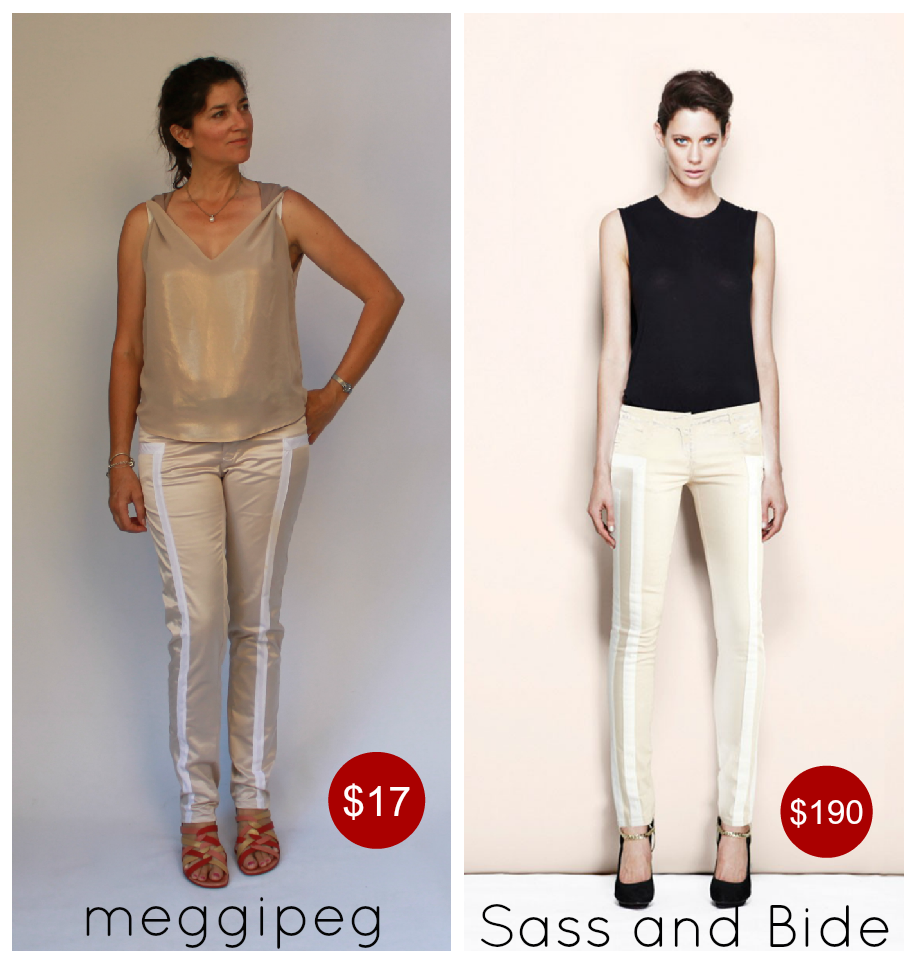
One of my favourite Aussie designers is Sass and Bide (no special links, I just like them). Now and then I will waft around their airy shop, touching and examining and committing to memory my favourite designs, not to mention feeling horrified at the price tags! A couple of years ago I saw some skinny jeans called 'The Pinch'. All S&B clothes have arty farty names. I liked the interesting lines created by the white stripes. Anyway, when I saw that Pattern Review were holding a Bargainista Fashionista contest involving the creation of a garment inspired by RTW (ready to wear), I decided to have a go at making a Pinch, or perhaps a pair of Pinches, of my very own.

Picture saved from Sass and Bide website. No longer available.

Were $190 on Polyvore
I didn't want these super skinny, so I went back to an old favourite pattern, Jalie 2908. I used a modified version of the jeans which I have made before (changes explained here) and which I wear often.


I used a stretch sateen for the jeans and shop-bought bias binding for the stripes. The total cost was $17, so a saving of $173 on the original!

Just imagine the photobombing dog is a luxurious rug!
I had to think about the placement of the stripes and change the order of construction a bit so they went where they were supposed to go, under the back pockets and, the trickiest bit, across the side seams. I also redid the front stripe as I didn't like the placement when I first tried the jeans on. It was difficult to get the stripes in the same place on each leg, but I got pretty close in the end. 


The shiny fabric highlights all the wrinkles, but I quite like the effect actually.

Still imagining that rug?

I'm pretty happy with the fit, although I think my Jamie jeans provide a smoother and better fit overall, for me anyway. I'm just hoping that those stripes lengthen the legs rather than widening the hips!


Once the jeans were done, I needed to find something to wear with them. What goes with gold? Why more gold of course! Enter the twisted tank from Burdastyle 07/2013 (#103). This pattern caught my eye when I first received the magazine, but it's taken me over a year to make it.

Burdastyle Twisted Tank
Part of the dilemma involved the fabric choice. The top required two layers of light fabric. I eventually settled on the gold with a nudy brown colour for the under layer, which peeks out at the shoulders, along with my bra straps. Both fabrics are polyester chiffon.


I had read on other reviews of this pattern that the construction could be a bit tricky. I just followed the instructions and didn't have any problems. The only issue I had was that my fabrics are so delicate. This top is only for gentle outings!


I am naming this 'The Punch' to remind me not to punch anyone while wearing it and because it goes well with 'The Pinch'.

A pinch and a punch for the first month of the year. Or something.


I am very happy with both items, apart from the top being a bit delicate. I definitely feel more of a fashionista than a bargainista in this outfit. I just hope I'm getting away with it!


Thursday 6 November 2014

Triple denim and a Bee - Vogue 1247 skirt and Bellini blouse


Lots to talk about today and lots of pictures. It all started with the Surprise Sewing Bee contest on Pattern Review. This is a fun competition based on the 'Great British Sewing Bee' series shown on the BBC. Each week, for four weeks, the Pattern Review website will announce the garment to be made for that week. The entries will be judged and eliminated from the competition, presumably if they don't follow the specifications of the particular garment.

For week 1 of the competition, contestants were required to make an A-line skirt with a zip, lining, button or hook closure, waistband and hem.


I decided to go with Vogue 1247. I used this cotton fabric, made of pieced strips with lace detail, that I bought in Bali years ago. I decided not to include the skirt pockets to keep the stripes neat and to make sure I was adhering to the competition rules.

I was really careful making this to keep everything neat. I cut the back first, then lined up the front to match the stripes. I pinned the upper and lower pattern pieces together and cut as one piece (below).


I even went to the bother of binding all the raw inside edges!


I lined it too!


Here are the pictures of the finished skirt:


I matched all the stripes as best I could, but the way the fabric was made meant that it wasn't possible to get this completely neat. The lace had been sewn on a bit wonky by the manufacturer (I unpicked and redid part of it) and the check pattern was not even. Still, I am really pleased with the way it turned out. 


Sheer, cotton lining with folded darts.


Now it just so happened that I had found this washed out chambray, denimy fabric at Remida recently that just so happened to match the skirt fabric rather well! I immediately thought of the Bellini blouse pattern by Capital Chic that I won in the Refashion Contest by Sew Amy Sew (thank you Amy and Sally). I decided that my stripy skirt would not be complete without the Bellini. In fact, I became obsessed with the thought and cancelled all engagements (except my Melbourne Cup lunch) so I could make both this week.


The Bellini has two collar options. I went with the scalloped one to fancy up my plain fabric.


The Bellini was a joy to make. I followed Sally's sewalong, which I expected to be just for beginners, and was quite amazed at how helpful it was. I even watched the pressing videos with rapt attention! My blouse turned out so neat and tidy with French seams and everything.


It's a simple pattern, but cleverly thought out so it looks far more complicated than it really is. The pattern pieces go together like a dream. I am really pleased with this blouse and highly recommend the pattern.


To top it off, I wore denim shoes for the photos.


If double denim is a fashion faux pas, I don't know what this is!


I rather like it. It makes me feel like a cowgirl.


 Oh yeah, a cowgirl....


 YEE HA!!!


LinkWithin

Related Posts Plugin for WordPress, Blogger...