Showing posts with label Activities for kids. Show all posts

Saturday 10 October 2015

I'm late, I'm late!


My eldest son was recently invited to the 13th birthday party of a girl at school. It was to be a Mad Hatter's Tea Party and every guest was instructed to dress as a particular Alice in Wonderland character. Mr 12 was assigned 'The White Rabbit'. 


If I was feeling less than excited about conjuring up a white rabbit costume, it didn't last long. I heard a sentence from my son that I have waited twelve years to hear: "Mum, can you teach me how to sew so I can make a white rabbit costume?" Music to my ears!


The first step was a visit to Remida creative reuse centre in Perth to gather supplies. I took both my boys and their friend since it was school holidays. I love seeing their inspiration being fired up as they imagine what they could make from all the goodies there. The problem is holding them back so we can fit it all in the car!

We managed to find everything we needed for the costume apart from the ears, glasses and red binding for the tunic, all of which we had at home. That means this costume was essentially free, apart from my yearly membership fee of course.


The tunic is made from strong, white nylon fabric. We folded it over, cut the top a bit wider than my son's shoulders and tapered out slightly to just below hip level. We cut another piece the same and made a hole through both pieces just big enough to get his head through. These were sewn together (by my son) at the neckline, then one piece pulled through to give a clean finish. We used wadding at the front between the two layers. I sewed the cross on the front and bound all the edges with red lycra binding from my stash.


While I was doing that, my son used a heart template to trace and cut out the small hearts from red sticky paper. The larger heart was traced on the computer screen from one we found on the internet. The paper wasn't sticking strongly enough to the fabric so I stitched around each one to hold it in place. The sides of the tunic were held together with a small line of stitching.


The ruffle was made from four long strips of net curtaining, approximately 15cm wide. We cut a piece of 1cm wide elastic a bit longer than my son's neck measurement. The net strips were placed on top of one another, the elastic stretched to maximum capacity and sewn with zig-zag down the centre of the strips. We then joined the ends of the ruffle together and it could be easily put on over the head.


Next the clock. We used a piece of plastic poster board and drew two circles to cut out with a scalpel. The top and back of the clock was covered in gold stickers. I cut the numbers freehand from black stickers. Red arrows for hands and done!


We were both thrilled with the way the costume turned out and we had such a nice time together sewing, sticking, chatting and laughing. The party was last night. All the characters looked fantastic and it was reportedly "The best party ever and no one believed we'd made the costume!" Success all round I'd say.


Wednesday 13 March 2013

A birthday present for Grandad


I always struggle to find presents for my Dad, but this year I did have an idea. My sister and I had bought him an ipad for Christmas, so I decided to make him a bag to carry it around in when he went on holiday or to the cafe.


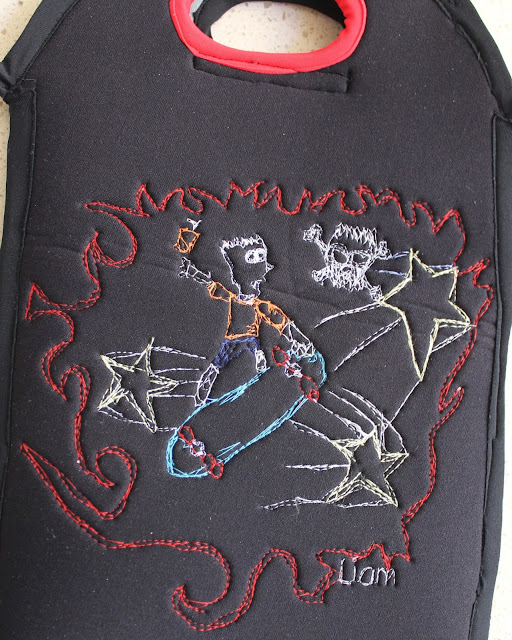
To make the bag more personal I got my boys to draw a picture each and I transferred the pictures to the bag using free-motion sewing. Unfortunately the boys are going through a Bart Simpson phase so the pictures were not quite what I had envisaged, but that's what they wanted to draw for Grandad, so that's what I used. It's funny how children don't quite see things the same way as we do!

I made the bag from an old diving wetsuit made from very thick neoprene. It is nicely padded, but was a nightmare to sew. I am not happy with the seam finishes but they were the best I could do after several attempts. I decided to put together a tutorial for this as I did work out some tips for sewing with neoprene. So here goes.

I folded the top of the wetsuit with side seams together so I could avoid the zips and joins as much as possible. I then drew around the ipad to get the right size and shape for the bag.


This is what it looked like opened out with holdes cut for the handles.


I used this striped fabric to cover up the wetsuit logo.


I traced the main lines of each drawing on to baking paper (or use tissue paper) placed the paper on to the neoprene fabric and stitched along the lines using appropriately coloured thread.

Needle and thread: I found the best needle to use was a very thin (70-75) ball point needle for knit fabric. All the other needles I tried caused skipped stitches. Poor quality thread also resulted in some skipped stitches, but sometimes you just have to use what you have in the right colour.


Once I had the basic outline (above), I set the machine up for free motion sewing (lowered feed dogs, darning foot) and 'drew' and 'coloured in' the rest of the picture. I love the freedom of this type of sewing. It's really fun to see what appears as your hands move the fabric.


Once the pictures were done on both sides, I used a strip of lycra, 2.5cm wide. to bind the inside of the handles. After several attempts, I found the best result was obtained by stretching the lycra quite taut as it was stitched in place. I also sewed a strip of velcro below each handle to hold the ipad inside.

Next it was time to sew up the sides. I used lycra strips again. This time, I sewed one edge of the lycra approximately 1cm from the edge of the neoprene (on the right side) for the full length of each side from a point level with each handle.


The bag was then folded right sides together and the lycra strip was sewn together close to the neoprene. I used the zipper foot to get as close to the edge as possible.


The sides were sewn this way because the neoprene was too thick to fit two layers under the presser foot. This method avoids sewing the neoprene, only the lycra is sewn. Below, each vertical side seam is lycra sewn to neoprene and the centre seam is lycra to lycra.


Lastly, the top edge of the bag was bound all around with lycra, stretching as it was sewn in place.


It's not perfect, but it has character and Dad loved it (once I'd told him what it was)!


I have done two other projects involving free motion sewing, a cushion cover and some boys pyjamas.

Thursday 13 December 2012

School Christmas markets

'You won't let me have fairy floss Mummy, so I'm buying it with my own money!'
Every year, my son's school has a Christmas market. It is a lovely idea that takes place in the evening a few days before school finishes for the year. Anyone who wants to (from the school community) can have a stall for only $5. Lots of children get busy making things or finding their old toys to sell. Mums and dads also get busy, sometimes making traditional food from their country of origin, making crafts (guess who) and helping the children get their stalls ready.

I have had a stall for the last four years selling children's clothes, jewellery and other crafts that I have made. This year, my boys were keen to get involved for the first time so half of my table was donated to their cause. We had a whole load of fart bombs, practical jokes in little packs and plastic cockroaches (as you do), which we had accumulated somehow, mostly as surplus goodies from the little bags we gave to friends at birthday parties. The boys were super-keen to sell these and also made some paper ninja stars to supplement their income.


Learning from experience, we got everything ready beforehand. We made the labels and packed things into containers which could just be opened and displayed on the table.

My merchandise consisted of simple bracelets, necklaces, baby tutus, baby ruffle pants and vest sets,  girls' clothes, fabric flowers and Christmas fairies (get the tutorial here). The best sellers at these school markets are things that appeal to children spending 50c to $2 of their pocket money. The mums sometimes buy a more expensive item, but mostly it's just the cheap rubbish stuff that sells. 


In the past, I have used a proper clothes rail for my display. This time I wanted to be able to set up and pack away quickly and carry things easily to and from the car, so I used my camera tripod. I adjusted the legs so it sat on the table perfectly and it packed away to nothing.


I covered a cork pinboard with fabric to display the jewellery and other knick knacks. This could be taken straight out of a bag and propped up on the table.


So, once all the merchandise was ready, I just needed a sheet for the table, a float in a lidded container, spare labels, sticky tape, pens, scissors and a money belt. At the last minute I grabbed snacks and water and I borrowed a trestle table from a friend. I didn't bring a chair as you tend to be standing up at these things anyway.


I used strong bags with handles, bought very cheaply from Ikea, to pack everything into so it was easy to carry.


We only had about 15 minutes to set up the stall as we were rushing there from the boys' guitar lesson. All the preparation paid off. We carried everything over in one trip and set up with time to spare. Stress-free marketing!

Here we are in business! Despite a rainy evening, the market was packed with people and we sold lots of stuff. As predicted, the fart bombs were the biggest hit. We had crowds of boys, girls and dads (!) around the stall buying them up. Later in the evening, loud bangs and dubious smells were emanating from all corners of the market!!


The boys earned $20 each for their hard work. LJ did ten minutes of busking with his guitar and was thrilled to get $3 from that! I sold a few things and generally had a fun time watching the children and soaking up the atmosphere. All in all, a very successful evening.

Quote of the day:

JJ (aged 7): 'What happens if Father Christmas is watching you on the toilet?'
Me: 'Oh, he doesn't watch people on the toilet. He doesn't want to see that'
JJ: 'But what if you are being bad on the toilet??!'
Me: 'Errr, well....(help!)'

Monday 1 October 2012

Tumble dying with a stencil to make a cool t-shirt


After watching me making my ombre dyed, polka dot t-shirt, my boys were desperate to get in on some Tumble Dye action. After some discussion, they decided on a Party Rock Gym design. There are images all over the internet for this and, after looking at a few, I came up with this design of my own using MS Word and Powerpoint.

If you would like to use my design, you can download it here and resize as necessary.

I printed the design on to normal paper, covered it in clear Contact plastic film (only to keep it strong enough to be used more than once) and cut out the lines with a scalpel.


The inside bits of the letters are saved and stuck to the bottom corner of the stencil. If you can, I would recommend cutting out letters as I've done for the circular part of the design, leaving a bit of paper to hold any middle bits in place, as for the 'P', 'A', 'R' etc. The little connector bits hardly show in the finished product.

After being asked at least 67 times if it was ready yet, I finally finished cutting out the stencil! It was then laid on to a square of t-shirt fabric, placed outside on newspaper and I let the boys loose with the dye spraying!


They were actually really careful and loved doing it.

My tips for children using these dyes would be:

  • Make sure the nozzle is pointing in the direction you want the dye to go (yes, we learned this the hard way!); 
  • Spray approximately 10cm from the fabric;
  • Don't saturate the fabric with dye as it will run under the stencil, just gradually build up to the intensity you want; 
  • You can mix colours to get fantastic effects, but be careful not to mix more than two colours or you get muddy brown.
  • It's worth dyeing a square of fabric, rather than the actual t-shirt in case of mistakes and resulting meltdowns (we had both!).


When the dyeing was finished, we blotted off excess dye that was pooling on the stencil using paper towel and carefully lifted the stencil away from the fabric. I ironed the designs to set the dye, trimmed the edges, then stitched them on to t-shirts (which I'd also made, it was a busy day!) for the boys.


I used a strip of the trimmed fabric to sew a zig-zag along the side of the t-shirt for extra coolness!! I've been saving all my dye-covered scraps to use as embellishments for future projects.


The boys are SO thrilled with their t-shirts. They wore them to their hip hop class and proudly announced that they'd made them themselves when the teacher admired them!

A very rewarding project, which could be adapted for varying ages.

Monday 9 July 2012

The Mud Monster - bringing a child's drawing to life


She screamed as she glanced back and saw the terrifying creature rising out of the mud...

I've had my nine year old home sick for the last few days. Desperate to get him away from the TV, I finally convinced him to do some craft. I've seen various blogs posting about making children's drawings come to life in the form of a stuffed toy so we decided to have a go.

I started by getting LJ to draw his design and plan colours etc.


I then gathered my (rather large) stash of scrap fabrics, strings, ribbons, buttons etc. LJ chose the fabrics while I worked out the pattern. He was so particular about the exact colours he wanted, so this took some time. It wasn't difficult to make the pattern. I used a cone shape for the body, a circle gathered into a ball for the head and some brown fleece fused to interfacing for the mud. I drew the arms based on his design. Just remember to add seam allowances. I let LJ do some of the sewing on the machine. Then it was all stuffed and hand stitched together. LJ wasn't keen on hand sewing as it took too long for his liking, so he worked on the details of the design while I did the main construction.


LJ cut out the mud globules, mouth, teeth and debris from felt and fleece (non-fraying fabrics are good). We used a straw covered in grey fabric for the pipe and coloured string for the eyes. All of this was glued on with fabric glue (PVA would also work).


That was it. A very enjoyable couple of hours spent creating a really cool little character. I'm all for getting boys to sew. LJ was very pleased with his efforts. His next question "Mum, can I watch TV now?" Aaaarrgghh!


Monday 14 May 2012

Let's make the bed


Yes, I mean literally!

As I've mentioned before, my boys' bedrooms were in desperate need of attention. I decided that this year I would make the effort to sort them out. At the beginning of this year, we bought JJ (aged 6) a cabin bed. It was one of those that's high up with lots of storage and a cubby house underneath. We hoped that this would encourage him to sleep in his own bed all night. I put the bed together on my own while Mr Meggipeg was in Canada. Now, call me strange, but I love flatpacks. Well I did until I attempted this one. It nearly killed me, but I wrestled and swore and finally put it together. Standing back to admire my handiwork, I decided there and then that I hated that bed. It was enormous. There was no room left to play in. The boys liked the cubby, but getting in there with the vacuum cleaner was nigh on impossible. Eventually I gave up cleaning the room altogether and it ended up like this:


Ugh. Shudder. Let's say no more about it. But at least JJ was sleeping in his bed all night, right?

Wrong. Total disaster.

Plan B. Obviously the new bed had to go, but it took me a while to convince JJ of this. Despite refusing to sleep in it, he didn't want to let it go. In the end I promised to keep it forever so his children could sleep in it. Without wasting a moment, I wrenched the thing apart and bundled it into the garage. It's currently advertised on Gumtree. Any takers?

So, we needed a replacement bed. As luck would have it, our area was having a verge rubbish collection and I spied an old wooden bed a couple of streets away. JJ and I inspected it and he gave it the thumbs up. While he was at school that day I put on some dark sunglasses and drove round to get it. After much heave-hoing I finally got it into the back of the car (seats down). I would like to say that no one saw me doing this but, despite nonchalantly leaning on a nearby tree whenever a car went past, I think I may have been spotted once or twice.

That weekend, the boys and I set to work doing up the 'new' bed. The idea was that we would shorten it to maximise the space in the bedroom.

JJ did a great job undoing the screws. We measured the long side pieces and cut them off to fit the kids mattress I'd bought from Ikea. LJ was so keen to help, he didn't even change out of his pyjamas (meggipeg ones of course).


After a quick break for a babycino...


...we painted the whole thing fire engine red.


Then we put it all together again.


I love it! JJ kind of loves it, but still pines slightly for the old bed. This is such a cute little bed now. It is about 1.5 feet shorter than a standard single bed so it would suit a child up to about 8 or 9 years old. It takes up about a third of the space of the old hulking bed (and cost a tenth of the price for the mattress and the paint!!) so I can face cleaning the room again...sometimes...when I haven't got an exciting sewing project on the go.

To make it even cosier, I made a red curtain to hang over/around the bed (tutorial to come).


And I'm happy to say that JJ sleeps in this bed (quite) often. The boys had a blast doing all the woodwork and painting, so I'd say this was a win :)


This tutorial is part of the
Click for more

LinkWithin

Related Posts Plugin for WordPress, Blogger...