Showing posts with label Girls. Show all posts

Sunday 22 November 2015

Megan Nielsen Mini Tania Culottes


Living in a house full of boys, I don't get many chances to sew girly clothes. However, I do have two nieces, so when Megan Nielsen was looking for pattern testers for her new girls collection, I jumped at the chance.


These are the Mini Tania Culottes - little shorts that look like skirts. Girly and practical, the perfect combination.


The Mini Tania pattern comes in three lengths, short, above the knee and below the knee. I made the shortest length and I think it's just right, cute without being too short.


I have made Megan Nielsen patterns before for myself and have always been impressed. The instructions are very clear and the patterns are well drafted and carefully thought out. The children's patterns are made to the same high standard. These culottes were super easy to make and the instructions gave enough information for a beginner to achieve a professional result.


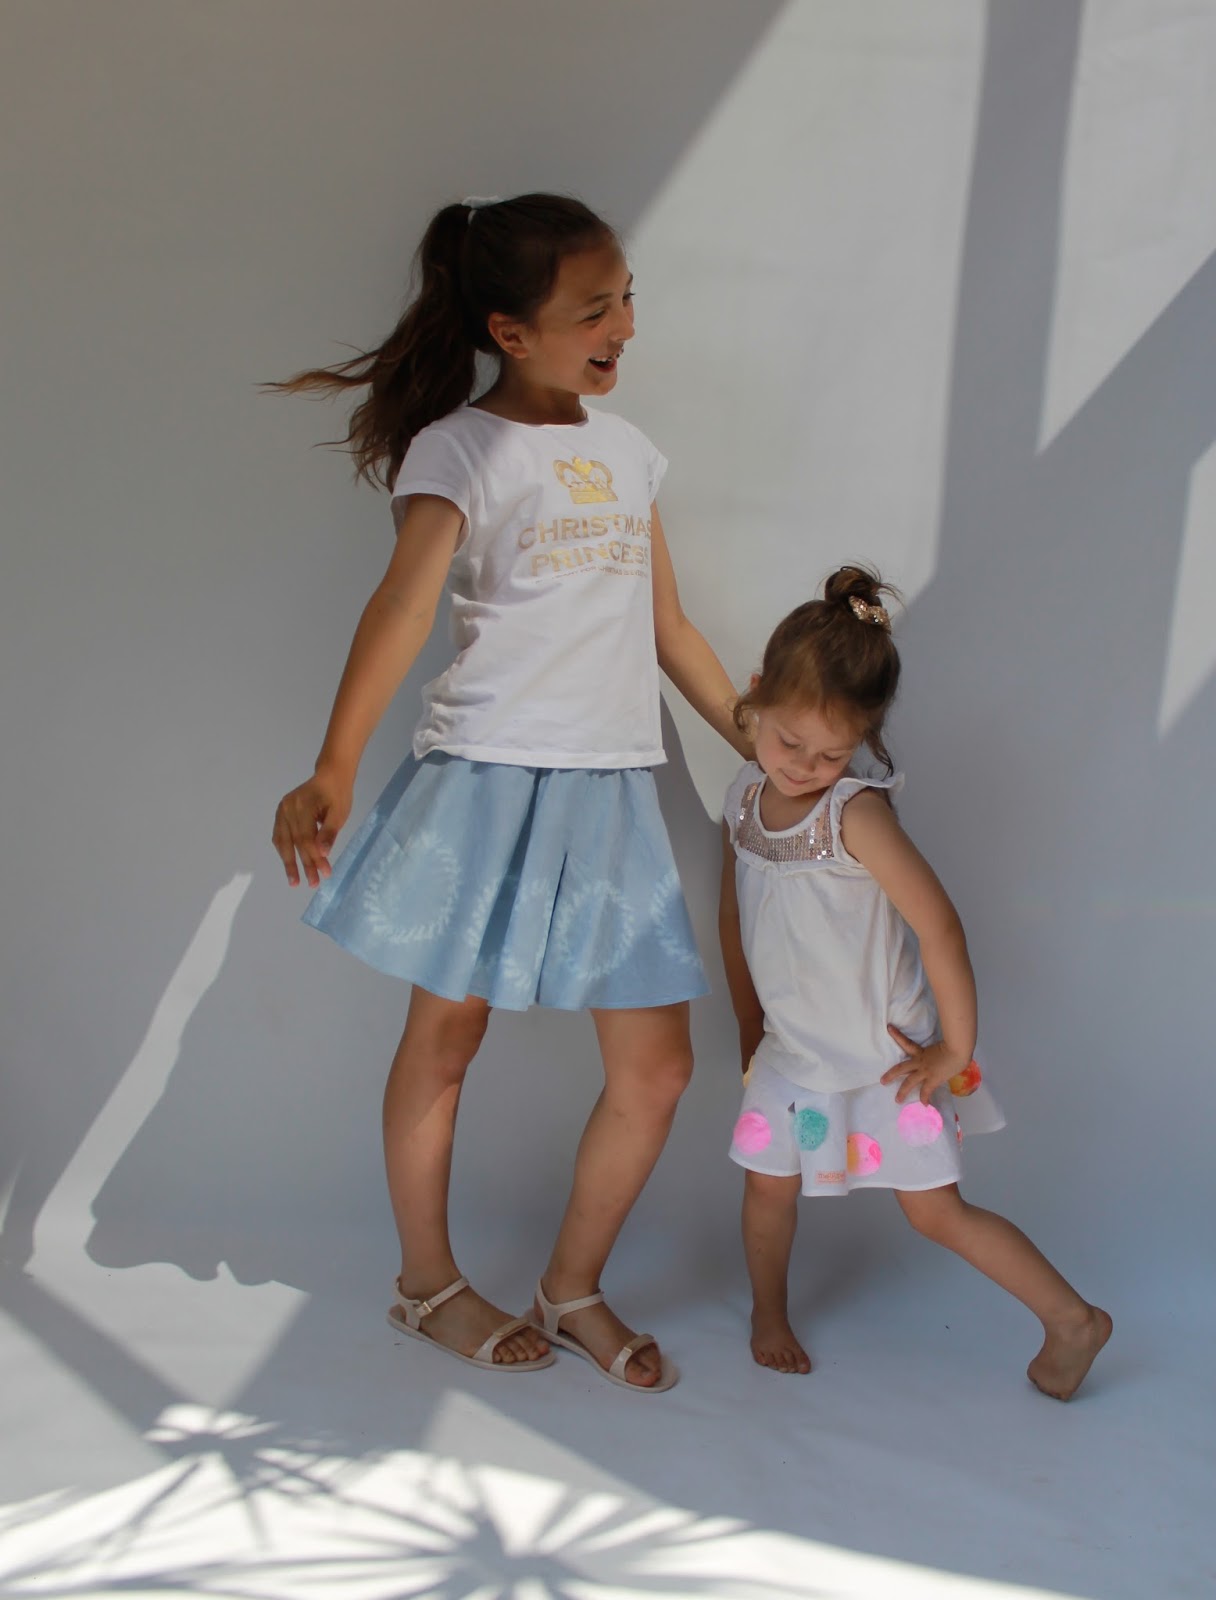
I chose the sizes based on the girls' measurements and they were spot on for their ages. The fit is perfect.


I made both these pairs from white cotton calico. The smallest pair was embellished with circles of calico that I had sprayed with Tumble Dye, cut out then sewn on to the culottes. The Tumble Dyes were bought from Dharma Trading.


The blue pair were shibori dyed in navy blue dye that had been used a few times for other things, so it gave a pale denim colour. The circles were produced by stitching, a method I found in my book 'The Modern Natural Dyer' by Kristine Vejar. I love this book as a very practical introduction to natural dyeing.


The front and back of the garment was pinned together and stitched as one piece to save on sewing. I drew circles with disappearing ink and pinned the two layers together.


I then stitched around each circle, with the stitches extending about 1cm inside the circle. Once complete, the thread was pulled tight and knotted ready for dyeing.


I was really pleased with the effect this produced.


The girls loved their culottes and have worn them a lot since they were made a couple of months ago.


 They also enjoyed the photoshoot!


Such little cuties.


I've got lots more girly sewing planned for Christmas prezzies. Hello Mini Briar tee and Mini Virginia leggings!

Sunday 24 August 2014

Meet Edward Tulane


Not long ago, the delightful teacher of my younger son's class came to me with a proposition. She was planning to read 'The Miraculous Journey of Edward Tulane' to the class and wanted a stuffed rabbit to use for associated activities. She had searched everywhere for a rabbit that was distinguished enough to use as Edward, but had not found anything. Well, it seems that word of my sewing addiction has reached the school as the teacher asked me if I could make something that would fit the bill.


I don't make many toys, but creating this adorable rabbit was certainly a project I could enjoy. I googled as many images from the book as I could find. I also found a lady who has posted pictures of her own beautiful Edward Tulane stuffed rabbits. I found a book in the library ('Creative soft toys to sew' by Creative House) with a rabbit pattern that I thought I could modify to look the part. 


I decided to make everything from materials I already had, which was not difficult given the resources in my bursting-at-the-seams sewing room.

The main body is made from a lovely off-white cotton (op shopped) and the ears are made from scraps of white fur fabric left over from dance costumes. The clothes are also made from scraps. I used felt for the eyes and nose.


After I had made and stuffed the head, I slimmed down Edward's face with hand-stitched darts below the ears. I wanted the ears to stand up as in the book illustrations so inserted copper wire into each one. I used long wire so it also ran through the head and down into the chest area to provide head support.


I layered the parts of the eyes and handstitched each layer together before sewing the eyes to the head. I thought that was safer than trying to embroider the eyes straight on.


The clothes were made using a pattern for baby clothes, which I modified to fit Edward. I tried to make the colours of the clothes and the lace embellishments as authentic to the book illustrations as possible. I also added some hand stitches on the hands and feet to make rabbitty fingers and toes.


I loved this project and was over the moon with the final result. I think my Edward turned out a lot like the rabbit in the book and, although I am not a soft-toy fan, I was a bit sad to have to let him go!


I took him to JJ's class the day after I finished him. Since then, I have had so many children come up to me and say how much they love Edward. The teacher is reading the book to the class at the moment and the children get to take turns holding Edward during the story. It makes me all glowy every time I think about it. The class also made me a lovely card and the teacher bought me a beautiful scarf to say thank you. Thank YOU Mrs G for all you do for the children and for involving me in this fun project.

Monday 13 January 2014

My handmade Christmas Prezzies 2013


I was very busy sewing this Christmas, mostly for my youngest niece who is 18 months old.

I made her a runway collection!


This consisted of:
Blue tank top, flowered and green pants/shorts and flowered cross-over top (flower fabric from Spotlight) - Butterick 3846, size L;
Pink dress - The Warhol dress, free pattern from MADE with an added ruffle at the hemline;
Flower print sun jacket - Kwik Sew 2596, View C, with added sleeves, no peplum and altered at the front so it is open and cool;
Ruched leggings - also Kwik Sew 2596 with a piece of elastic stretched and sewn at the lower outside seam to create the ruching.

Here she is in some of the pieces:

Kwik Sew 2596 (altered)

Kwik Sew 2596 (altered)

Butterick 3846

Butterick 3846

The Warhol dress- MADE

I also made owl cushions for both nieces. I looked at Google images and came up with my own design. I can't find the photo I took of the finished cushions, but here is Miss 18 months unwrapping hers (yes, she is always the centre of attention!):


and again later at home


For my older niece, I made this dress from light and airy, blue patterned cotton. I used Patrones magazine 30 (a recent edition full of children's patterns), dress No. 2. I had purchased the fabric for me, but thought it would be perfect for Miss 8, which it was. I raced back to Textile Traders for some more at the first opportunity!


The neckline and armholes are bound with a strip of lycra, folded in half, stitched to the inside of the dress first and then folded over the edge and stitched again, a variation on this method. The same turquoise lycra is used for the ruching.


I also made a skirt for my sister (not photographed) and these shoe bags for my (hard to buy for) brother-in-law.


Everyone seemed very happy with their meggipeg prezzies and the hard work was all made worthwhile (actually it made my year) when I received this letter from my niece with a picture of her wearing the blue dress and hi-top sneakers I also got for her.


Wednesday 18 September 2013

Baby car seat blanket and toddler circle skirts


I indulged in a bit of baby sewing recently. The first item was this car seat blanket for a friend's new baby. I followed the tutorial by 'Running with scissors', which was excellent. This picture is not taken of the blanket on a pregnant belly, but rather on a cushion to try to represent the baby!


The blanket is made in the shape of a rounded plus sign. It has three slits for the car seat straps. Once baby is in, the bottom and sides of the blanket fold over to keep him/her nice and warm.


I used green flannelette and pink cotton for the front and back. The sides were finished with a folded lycra strip used as piping and the same lycra was used to bind the edges of the slits.


This was something I would have liked when my boys were babies, so hopefully my friend thought it was useful. I'll be checking her car seat next time I see her!


The other project I whipped up was this circle skirt. I have made lots of children's circle skirts, but I saw this idea on 'Polkadot Overload' and, as suggested, used the circle skirt calculator by 'The Snugbug'. This calculator intrigued me and I wanted to see if it worked on very mini sizes. I can happily report that it does and was so fast and easy that I made two skirts in quick succession for my niece, aged 16 months.


One skirt was made with red panne velvet, to which I added randomly applied ribbon detail, and the other was made with four sample pieces of velvet from one of those sampler things you get/scavenge from posh upholstery shops. The waistband was made from purple knit fabric. Both skirts fit really well, even though one is knit and one is woven (apart from the waistband). 

 I finished each with a rolled hem.

Speaking of those sampler things, I have lots because I am a hoarder and I can't help myself when I get the chance to help myself to outdated ones. They are perfect for small projects like this and some interesting effects can be obtained when they have pieces in graduating colours like these pinks. Some even have larger pieces of fabric big enough to make a women's top or shorts. Yay for upcycling!

Wednesday 24 April 2013

Little sweetie turns 1


My sweet, little niece turned one this week and, of course, I had to indulge in some rare little girl sewing - living, as I am, in a house full of boys :)

The little, soft shoes are from the 'Make it Perfect' book by Toni Coward. I made them as she's just walking and might need something warmer than bare feet as winter approaches. Here in Oz, many children go barefoot most of the time, which I think is just fantastic, although I know some frown on the practice! I have trouble getting my boys to wear shoes at all.


The shoes/slippers are made with faux silver leather with a thicker brown vinyl sole. They are lined with red panne velvet.


I made size 1 and the fit is perfect. I left off the front strap as it didn't seem to fit such a small shoe. The 'leather' would not ease to fit the sole, hence the gathers. I think they look ok actually and the shoes stayed on all through the rigours of a first birthday party so I was impressed with the pattern.


Next was this all-in-one rain suit. As far as I know, these waterproof suits are not available in Australia, but I did see them in the UK when we lived there (at great expense I might add!)...


...and they didn't have ears on the hood or bling on the sleeves!


I used this pattern, Simplicity 7807 for a fleece all-in-one. I made size 18 months so it would last hopefully two winters.I changed the sleeve and ankle cuffs to be elasticated instead of covered over.


It is a tad roomy!


Ahh, that's better :)


This is made with waterproof fabric from Homecraft Textiles. The fabric has a coating on the inside, but is soft enough to use without lining. It never gets that cold in Perth, so I opted not to line it.


I added the silver ribbon to the sleeves and zip pull and self-made gingham bias binding to the inside of the hood.


These little hip hop-style pants were a last minute addition to the present pile as a request from my sister. I copied them from a pair of well-fitting RTW (ready to wear) pants. They are made from panne velvet and are comfy and cosy and practical. 


Here, being modelled with Grandad while playing with the mini kitchen/hairdressing salon we also got for her.


 Aww, the girliness, it just kills me!

LinkWithin

Related Posts Plugin for WordPress, Blogger...