Showing posts with label accessories. Show all posts

Tuesday 22 March 2016

Little leather bag


I have been making little leather bags for a while, but have never blogged them before. My last one recently needed replacing so I thought I'd take some photos of the process I used to make this one.


This bag measures 18 x 22cm and is small enough to hang over my wrist so I have both hands free for important things like walking the dog and rummaging in op shops and fabric sales. 


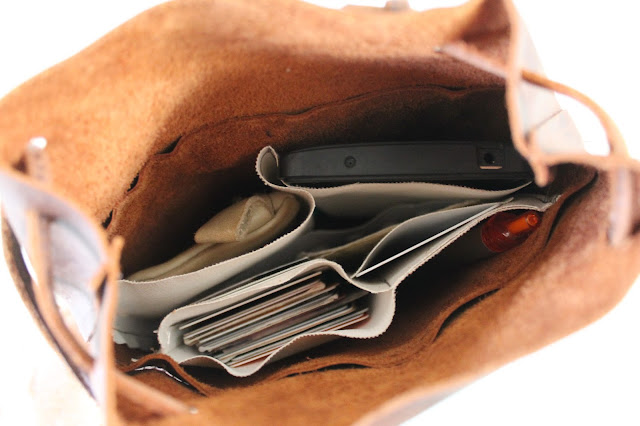
The inside is completely custom designed to fit my personal things. I have larger pockets for my purse, phone and general cards and additional pockets for frequently used cards, my sewing pattern wishlist, headache tablets etc. 


As soon as the bag is picked up by its handle, the top pulls closed and holds everything inside.

This clever design is based on a tutorial by jujumade. She makes the most stunning bags accented with ceramic beads. My first bag was made by following her tutorial, but I have evolved my process since then to suit my needs.


This is not really a tutorial, I just took a few progress pictures. Using leather scraps from Remida Creative Reuse Centre, I cut two rectangles. One was approximately 22cm wide and 15cm high* and the other was 22cm wide with some excess at the base to form the bottom of the bag. These were machine sewn together along one side. Using canvas, also from Remida, I sewed pockets for cards and things (above left) and larger pockets for my phone and money (right).

*I ended up deciding this was not deep enough for the bag and I added another 8x22cm piece on top of each side.


Once the pockets were sewn in place (using minimal stitching so it would look nice from the outside), I needed to close up the second side of the bag. This had to be hand sewn, so I ran the leather through the machine without thread first to create the holes. That made the hand sewing much easier and neater (above).


Next I determined where to cut the base, which was the excess of one side folded under. After cutting, I held it in place with clips and sewed it by machine.


I made the strap by sewing a 1cm wide strip of leather in half lengthways. Holes were made in the top of the bag with a leather punch (four holes on each side) and the strap threaded through and knotted in place.


Lastly I added my little purse that I'd made to go with my last bag. It has been well used and is a bit grubby, but still perfectly functional.


Voila. A cute and very practical new bag with a special place for everything I need. I have been taking this everywhere since I made it and it's perfect.

Thursday 8 October 2015

Bowls and rugs from scraps


In a departure from my usual sewing of clothes, I've had a brief foray into homeware. I saw these rope bowls popping up here and there and thought I'd give one a go. Rather than using plain or dyed rope, I raided my remnant bin and found some bits I liked. I tore or cut the scraps into strips about an inch wide and wrapped them around the rope as I sewed. The rope is 100% cotton, approximately 7mm in diameter, from Bunnings.


I used a zig-zag stitch for the sewing, the longest and widest on my machine. I began sewing a spiral and just shaped the size of the base and the shape of the bowl as I went. As I came to the end of a wrapped strip of fabric, I just overlapped the next one slightly and carried on. The stitches hold the wrapping in place.


I like how the torn and frayed edges add texture to the bowl and I also like the bits and pieces of sparkly fabric I included as they catch the light.


I have this sitting near my computer and currently use it to store all the ear phones that used to disappear up the vacuum cleaner. I find myself gazing at it often. It's not perfect, but it makes me happy.


The other things I've been making are patchwork throw rugs.


Look at those jewel colours and lovely fabrics. 'They must have cost a fortune', I hear you exclaim! Well no they didn't because look!


All free upholstery samples that are no longer needed by the fancy shops. What's more, they are already grouped in coordinating colours and like fabrics and cut into rectangles ready to stitch together! I got these samples from Remida creative reuse centre in Perth.


I'm no quilter and this is supposed to look rustic (that's my excuse and I'm sticking to it). I just arranged the colours in a pleasing way and sewed them together, first by sewing strips and then sewing the strips to each other.


The larger pieces in the sample packs tended to be darker colours and I used these for the back of the rug, just piecing, then trimming, until I had the right size. Next I did stitch-in-the-ditch quilting along the front stitching lines to hold the front and back pieces together. Finally, I cut wide bias strips from burgundy corduroy and used that to bind the edges.


This throw rug, my second and better attempt, was tied up with a bow to form part of the present I gave my parents for their recent golden wedding anniversary.

Here is the first rug I made:


This one looks lovely in my house and feels very nice to sit on.


It goes well with my bowl too!

Monday 21 July 2014

My Fabulous Hat!

Gaya Island, Sabah

I was recently inspired by the hat-making adventures of Savage Coco (here and here) to embark on my own foray into millinering (is that a word?). And what better occasion for a new hat than an impending holiday to Borneo?


Upon consultation with Coco, I was informed that I should use Vogue 7600 in 'fat-headed diva' size. I chose view B, for maximum sun coverage.


 After pondering my stash at length, I decided upon this brown lace for the hat. I had bought it as a $2 remnant from Textile Traders, so nothing lost if I didn't like it. The brim is made from a double layer of my thickest interfacing, which I heat-fused together. I sewed the lace directly to the interfacing brim so the white showed through the lace. The crown is lined with white cotton fabric to match the white of the interfacing. The join of the crown and brim is neatened with a wide ribbon, which doubles as an adjustable elastic casing.


The hat was straightforward and enjoyable to make, although the rows of stitching around the brim (1cm apart) took a lot longer than expected. The interfaced brim holds well when folded up around the outer edge as shown, but did tend to droop a bit with wear (and water - explained later), requiring adjustment. I would probably add a third layer of interfacing next time. The hat also folded neatly into quarters for storing in a bag without damage, which was very handy for travel.


The verdict: I love this hat. I really like the uniqueness of the lace and the brim provides wonderful sun coverage. My sons, however, were less than complimentary about it. To cause them maximum embarrassment (isn't that what mums are for?), I began referring to it as 'my fabulous hat' and made sure I strutted about in it at every opportunity. I was doing just this on our first day in Kota Kinabalu, when the brim drooped and I walked headlong into a small and dainty local lady. LJ, aged 11, practically wet his pants at this and brought it up every half hour for the rest of the holiday for renewed hilarity.

Shortly after the collision incident - Kota Kinabalu waterfront markets
A few days after that we headed up Mount Kinabalu for the day. Unfortunately it rained, but my fabulous hat provided splendid shelter for the five of us (my mum came on holiday too). Eventually though, the torrential downpour proved even too much for the fabulous hat. All were downcast at the hat's demise, except my mum who's $2 plastic bag raincoat kept her drier than any of our hi-tech raingear!


I'm happy to report that the hat is now restored to its former glory after a quick dry on the clothesline. I wonder what adventures I will have in it next!

Wednesday 13 March 2013

A birthday present for Grandad


I always struggle to find presents for my Dad, but this year I did have an idea. My sister and I had bought him an ipad for Christmas, so I decided to make him a bag to carry it around in when he went on holiday or to the cafe.


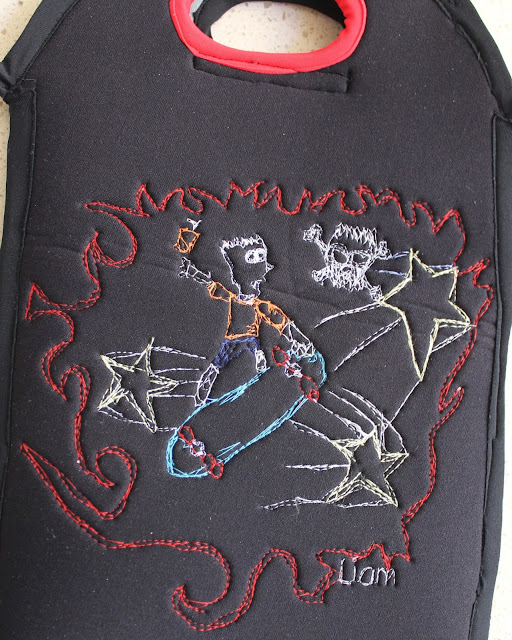
To make the bag more personal I got my boys to draw a picture each and I transferred the pictures to the bag using free-motion sewing. Unfortunately the boys are going through a Bart Simpson phase so the pictures were not quite what I had envisaged, but that's what they wanted to draw for Grandad, so that's what I used. It's funny how children don't quite see things the same way as we do!

I made the bag from an old diving wetsuit made from very thick neoprene. It is nicely padded, but was a nightmare to sew. I am not happy with the seam finishes but they were the best I could do after several attempts. I decided to put together a tutorial for this as I did work out some tips for sewing with neoprene. So here goes.

I folded the top of the wetsuit with side seams together so I could avoid the zips and joins as much as possible. I then drew around the ipad to get the right size and shape for the bag.


This is what it looked like opened out with holdes cut for the handles.


I used this striped fabric to cover up the wetsuit logo.


I traced the main lines of each drawing on to baking paper (or use tissue paper) placed the paper on to the neoprene fabric and stitched along the lines using appropriately coloured thread.

Needle and thread: I found the best needle to use was a very thin (70-75) ball point needle for knit fabric. All the other needles I tried caused skipped stitches. Poor quality thread also resulted in some skipped stitches, but sometimes you just have to use what you have in the right colour.


Once I had the basic outline (above), I set the machine up for free motion sewing (lowered feed dogs, darning foot) and 'drew' and 'coloured in' the rest of the picture. I love the freedom of this type of sewing. It's really fun to see what appears as your hands move the fabric.


Once the pictures were done on both sides, I used a strip of lycra, 2.5cm wide. to bind the inside of the handles. After several attempts, I found the best result was obtained by stretching the lycra quite taut as it was stitched in place. I also sewed a strip of velcro below each handle to hold the ipad inside.

Next it was time to sew up the sides. I used lycra strips again. This time, I sewed one edge of the lycra approximately 1cm from the edge of the neoprene (on the right side) for the full length of each side from a point level with each handle.


The bag was then folded right sides together and the lycra strip was sewn together close to the neoprene. I used the zipper foot to get as close to the edge as possible.


The sides were sewn this way because the neoprene was too thick to fit two layers under the presser foot. This method avoids sewing the neoprene, only the lycra is sewn. Below, each vertical side seam is lycra sewn to neoprene and the centre seam is lycra to lycra.


Lastly, the top edge of the bag was bound all around with lycra, stretching as it was sewn in place.


It's not perfect, but it has character and Dad loved it (once I'd told him what it was)!


I have done two other projects involving free motion sewing, a cushion cover and some boys pyjamas.

Sunday 1 July 2012

Hair bun using a DIY hair doughnut/donut...and a hip hop concert


I am going to show you how to do this super-easy hair bun. I am the world's worst at doing my own hair, but I did this style in a couple of minutes. I can still hardly believe it! It is all thanks to a 'hair doughnut'.  Now I know I'm not the first to make or use one of these but I couldn't find another tutorial like mine so I thought I'd post it here.


Now, before we go any further, I must apologise for the poor quality of these pictures. That is because they weren't taken for the hair at all, they were just snapped during...wait for it...my first ever hop hip dance performance!!!!!

Yes people, you are never too old to get your funk on in a pair of high top sneakers and I am living proof. I danced with a group of teenagers and I haven't had so much fun for ages. Here we are doing our thang (me at centre front pulling a silly face).


My two gorgeous boys were also performing in the same concert. They were both brilliant. Here we are ready to go:


My only chance to get make-up and hair gel on my children, since I have no daughters!

Speaking of hair, let's get back to the doughnut.

Here is how I made it:

I started with a rectangle of old t-shirt fabric. Use a colour as close as possible to your hair. I have long hair so I made a larger doughnut. My starting rectangle measured 26x12cm.


Fold in half lengthwise and stitch, leaving a couple of centimetres unstitched at each end.
 Turn right side out. Open out the edges, fold rectangle in half left to right (i.e. the two visible unstitched ends together) and pin right sides together. Sew along the whole unfinished edge. Sew slowly, opening out as you go (apologies again for the blurry photo below).


Turn that seam inside and stuff the doughnut. Finish the hole with some handstitching.


That's it.


To wear it, put your hair in a ponytail and secure quite tightly. Put the whole ponytail through the middle of the doughnut. With the doughnut next to your head, lean forwards and arrange your hair all around the doughnut to cover it. Place a hair elastic over the doughnut and next to your head to secure. You will now have some loose ends. Leave sticking out, tuck in, or wrap them around the bun and secure with clips or pins as I have done.

With JJ on stage after the show
This was my hair after a rehearsal and two shows. It stayed perfectly in place! 


Get down in da house!

PS. I am still not using shampoo. It's been over 2 months now. I'll post an update soon.

LinkWithin

Related Posts Plugin for WordPress, Blogger...