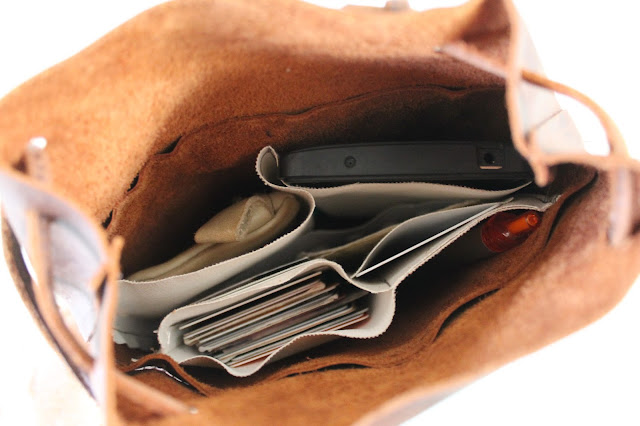
I have been making little leather bags for a while, but have never blogged them before. My last one recently needed replacing so I thought I'd take some photos of the process I used to make this one.
This bag measures 18 x 22cm and is small enough to hang over my wrist so I have both hands free for important things like walking the dog and rummaging in op shops and fabric sales.
The inside is completely custom designed to fit my personal things. I have larger pockets for my purse, phone and general cards and additional pockets for frequently used cards, my sewing pattern wishlist, headache tablets etc.
As soon as the bag is picked up by its handle, the top pulls closed and holds everything inside.
This clever design is based on a tutorial by jujumade. She makes the most stunning bags accented with ceramic beads. My first bag was made by following her tutorial, but I have evolved my process since then to suit my needs.
This is not really a tutorial, I just took a few progress pictures. Using leather scraps from Remida Creative Reuse Centre, I cut two rectangles. One was approximately 22cm wide and 15cm high* and the other was 22cm wide with some excess at the base to form the bottom of the bag. These were machine sewn together along one side. Using canvas, also from Remida, I sewed pockets for cards and things (above left) and larger pockets for my phone and money (right).
*I ended up deciding this was not deep enough for the bag and I added another 8x22cm piece on top of each side.
Once the pockets were sewn in place (using minimal stitching so it would look nice from the outside), I needed to close up the second side of the bag. This had to be hand sewn, so I ran the leather through the machine without thread first to create the holes. That made the hand sewing much easier and neater (above).
Next I determined where to cut the base, which was the excess of one side folded under. After cutting, I held it in place with clips and sewed it by machine.
I made the strap by sewing a 1cm wide strip of leather in half lengthways. Holes were made in the top of the bag with a leather punch (four holes on each side) and the strap threaded through and knotted in place.
Lastly I added my little purse that I'd made to go with my last bag. It has been well used and is a bit grubby, but still perfectly functional.
Voila. A cute and very practical new bag with a special place for everything I need. I have been taking this everywhere since I made it and it's perfect.


6 comments:
Nice. I like that you don't go anywhere without your sewing pattern wishlist. You don't have it saved on your phone? Too valuable to lose, I suppose, if your phone is stolen.....
Did you have to use special needles on your machine to sew the leather? I've got two leather skirts, both too small for me, and have been toying with making a frankenskirt.
That reminds me, I need to make backup copies of my pattern wishlist! I use leather needles, but you could just try your thickest needles on the skirts if you don't have leather ones. Go for it!
Such a great idea to create a truly unique bag customised to suit your needs exactly. The added bonus is that it looks great too. Well done and thanks for sharing the construction process.
This is absolutely adorable Megan! I love how well thought-out it is, with all those useful and perfectly sized pockets for all your things. And the leather you used is gorgeous!! I really should tag along with you to remida one of these days *begging* :)
I'm surprised you haven't made bags yet, Carolyn. Or maybe you have and I just haven't noticed on your site.
The bag is lovely, Megan. Just a perfect size and shape for a few essentials, and no room for the bottomless pit. :)
Nice bag. I like it, Thanks for sharing.
Non woven bags making machine
Post a Comment