Showing posts with label Named patterns. Show all posts

Tuesday 12 May 2020

Tessuti Knots and Crosses competition - Maisa denim jacket, Flint shorts and Sorrento bucket hat


It's been a very long time since I entered a sewing competition, but when I saw the gorgeous fabrics in Tessuti's 2020 sewing competition, I had to give it a go. The idea was to make any garment from a cotton/linen Broderie Anglaise fabric. The fabric was available in four colours and two different patterns, the 'knots' and the 'crosses'. I chose the 'crosses' fabric in a natural colour. The rules stipulated that only the 'knots' or 'crosses' fabrics could be used as the outside of the garment and could not be dyed or embellished with any other fabric or embroidery. A lining fabric of the sewer's choice was allowed. Entries were to include photos of someone wearing the garment as well as pictures of its construction.


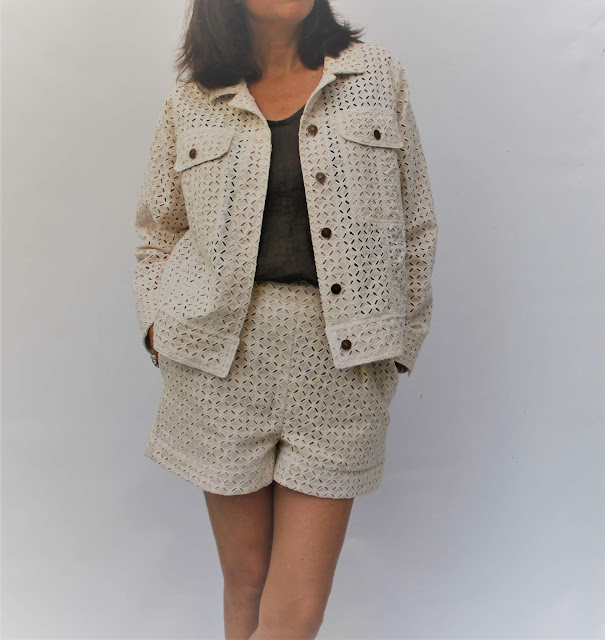
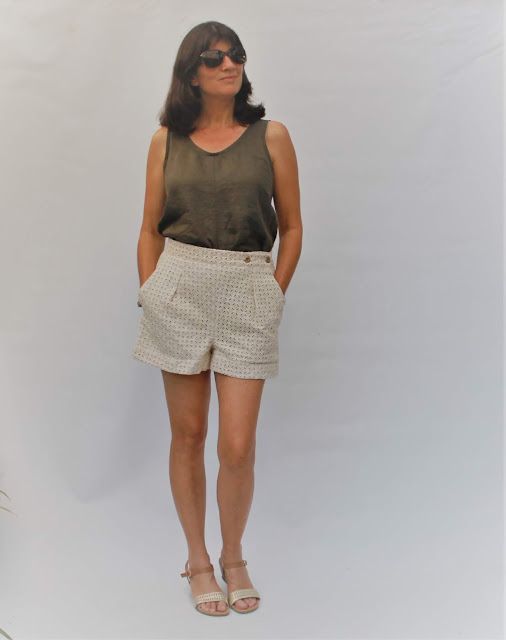
I made three pieces for my competition outfit, all of which I have made before, so I knew they would fit. These were a Named Clothing Maisa Denim Jacket, Megan Nielsen Flint Shorts and, for fun, an Elbe Textiles Sorrento Bucket Hat, which is a free pattern. I am wearing them with a Megan Nielsen Eucalyptus woven tank in khaki. I had decided on the jacket as soon as I heard about the competition, partly because my denim Maisa jacket is probably my most worn item ever and partly because I thought it would be unique to make a Broderie Anglaise jacket. After seeing the other entries, it seems I wasn't so forward-thinking after all as there are some gorgeous jackets among them. Oh well! I had originally planned to make a skirt, but it wasn't working out, so I went with shorts instead after a suggestion from my sewing friend Katherine.


I began with the Maisa Jacket. I wanted to show off the fabric as much as possible, so kept the majority of the jacket unlined. I used a natural-coloured cotton fabric to line just the collar, cuffs, pockets and hem and button bands. I sewed it around the seams (see below) so that the lining and not the seam showed through the eyelet holes on the inside and outside of the jacket. 


It was a slow process getting everything as perfect as possible, but very enjoyable, especially as I have had little time to sew for quite a while now. 


The outer seams are all top-stitched and the jacket is finished off with jeans buttons at the front, pockets and cuffs.


The inside of the pocket has a leather patch with my Meggipeg label and a Tessuti Fabrics label on it.


The next picture shows how the jacket is constructed to allow the light through the main part of it.


Next the Flint shorts. These were lined for modesty, with the lining fabric used as underlining. This meant that the view through the holes was uniform and no seams were visible. I made the style that buttons up, rather than ties, and used metal buttons. These were shortened about 4cm from the pattern after a suggestion from a (male) friend, who insisted they were originally too long! I think he was probably right as the proportions look better with the jacket at the shorter length. 


These shorts are so comfortable to wear and I love them in this fabric.


The Sorrento bucket hat is fun to sew and easy to wear. I lined it to hide the seams again and love how the light shines through the brim lining when it's worn.


I am really happy with all the pieces of this outfit. I know they will all be things I wear a lot and I thoroughly enjoyed the planning and creating of everything. The fabric is gorgeous and I'm very happy to have pushed myself to enter the competition. The closing date is 14th May and it's worth having a look at the other creative entries on Pinterest or Instagram.


Saturday 10 November 2018

The Utu skirt - Breaking the Pattern Book


Earlier this year I was a pattern tester for the new book, Breaking the Pattern, by Saara and Laura Huhta of Named Patterns. The book has now been launched and I was lucky enough to be sent a copy for my participation in the testing process!


The book is really lovely. It contains pattern sheets for 20 garments with ideas and inspiration for combining and customising patterns to create many more different looks. The presentation and photos are beautiful and the sewing instructions are clear with many diagrams. I definitely recommend this as one of the best sewing books I've seen.


One of the patterns I tested was the Utu skirt. This is a beautifully shaped, unlined wrap skirt with an attached belt and D-ring fastening at the side. The Utu pattern can also be made as a lined pinafore dress.

The Utu Skirt - Breaking the Pattern

The Utu Pinafore - Breaking the Pattern
I used a 100% cotton, mid-weight upholstery fabric with a blue and white print. The fairly sturdy fabric worked well for this pattern and the skirt sits and fits very nicely.


The belt continues around the back of the skirt through belt loops, which is a nice detail.


The skirt sits high on the waist and is a very flattering shape. The belt holds the skirt firmly over the tummy, which is good for smoothing over any rounded bits!


This skirt style would work well as a casual, work or evening garment. I'm looking forward to wearing mine a lot as the weather warms up.

Friday 17 August 2018

Named Anni Building Block Pattern


I haven't had much time for sewing or blogging lately. Life has been complicated and time has been short. However, I was thrilled to have the opportunity to pattern test the newest Named Anni pattern. This was a special pattern released in celebration of Named's 5th anniversary. It includes pieces to make a huge variety of styles including a dress, jumpsuit and playsuit, each with multiple bodice, neckline and sleeve options.


With it being winter here in Perth, I went for a long sleeved dress with bell cuffs. Although I usually go for lower necklines, I couldn't resist making the diamond cut-out neckline and I was not disappointed. The construction is really cool and not too difficult (just be as precise as possible) and the result is lovely. The picture below has been lightened to try to show the seamlines. You might just be able to see the inset piece above the V neckline that creates the diamond.


The dress is made from a wool blend fabric that I got free in a warehouse smash and grab earlier this year. A local clothing manufacturer, Morris and Co., had shut up shop in the 80s and the warehouse hadn't been touched since. Just before renovations commenced this year, a few sewing ladies were allowed in to take what we wanted. It was a quite amazing (and dusty) array of fabrics, zips, industrial sewing machines and equipment, school and nursing uniforms, hats etc. I got a few handfuls of zips and buttons and a bit of fabric, including a massive roll of this black wool, which just about killed me as I struggled out of there and back to the car park!


The fabric was easy to work with and I love how the dress turned out. The style is elegant and flattering and it fits like a glove. The only issue I have is that the zip at the back is difficult to do up on my own. This is fine for the dress, but I'm not sure how I would manage in the bathroom if I'd made the jumpsuit!


This is a lovely pattern and I highly recommend it. It has unique details and the proportions are spot on. The number of options is also quite amazing, making this pattern excellent value for money. I am very keen to try a few more of the styles...when I have time!


Monday 4 December 2017

Named Wyome Boyfriend Jeans and StyleArc Brooklyn Knit Top


About three years ago I made a couple of pairs of Named Wyome Boyfriend Jeans. Those were made in a size 38 and were quite close-fitting. This time I wanted a looser fit like the cool kids I see on Pinterest. So, for this pair I went up two sizes to a size 42.

Screenshot from Pinterest 'Boyfriend Jeans'


For my previous, tighter pairs I had altered the crotch curve for a better fit. This time I didn't make any alterations to see if the original cut would give that classic boyfriend look in the larger size. I think it did! The only changes I made this time were to enlarge the back pocket and use a zip, rather than a button fly.


To achieve that faded, worn-in look, I used a gorgeous enzyme washed denim from Tessuti, purchased with a gift voucher from the best internet sewing friend ever. This colour denim doesn't seem to be available any more. It is soft and gorgeous and perfect for these jeans. I topstitched with gold Rasant thread from Homecraft Textiles and added a leather tag. I managed to stamp the B on backwards, but you'd have to be looking way too closely to notice when I'm wearing them.


Jeans topstitching is one of my favourite things to do. So satisfying!


These photos were taken months ago when it was cold enough for snuggly jumpers. I don't know where the time has gone. This particular snuggly jumper is the Brooklyn Knit Top by StyleArc. I've made this one in a quilted knit fabric from Textile Traders. It's a simple pattern with pockets and a roll neck and the resulting jumper is cosy and slouchy. I wore this a lot over the winter.


Now I can slouch about with the best of them!


I love both these patterns and I am very happy with the looser fit on these jeans compared to the previous pair I made in my 'proper' size. I have worn these so much since making them as they always feel so comfortable and fashionable. The colour also goes with everything.


Monday 23 October 2017

Gaia Quilted Coat - Named 'Earth Science' Collection


The second pattern I tested for their new 'Earth Science' Collection was the Gaia Quilted Coat. This is a loose-fitting coat with panels perfect for playing with different fabrics. The Named sample coat uses quilted fabric for some of the panels. I thought I didn't have any suitable fabric in my stash until I checked my drawer of upholstery fabrics and found some offcuts that looked like they would work together. These are from Remida recycling centre and consist of a velvety olive green fabric, a velvety floral fabric and a textured blue fabric.


The panelling on the coat is very attractive. I particularly like the criss-cross junction of four panels at the shoulder. The olive velvet was very drapey and doesn't hold its shape quite as it should on the sleeve, but it is lovely to wear.


The coat is fully lined and closes with three large press studs. I found mine at Spotlight.


As always, the instructions were clear and included tips for creating a lovely finish on the coat, inside and out. Most sewers with some experience, and the willingness to be slow and accurate, could make this. I was also very pleased that the PDF printed on the pages in such a way that they did not require trimming. That was a very welcome surprise!


Named patterns have a modern, flattering and polished design and this is no exception. The seamlines, shape and finish of this coat make it very cool to look at and easy to wear. Those deep pockets are irresistable for warming cold hands.


Coat season doesn't last long in Perth, but I will be reaching for this whenever I get the chance.


Thursday 14 September 2017

Named Earth Science Collection - Beryl Bomber Dress


This was, without a doubt, my favourite pattern when I first saw the new Named Earth Science Collection. I was a pattern tester for this, the Beryl Bomber Dress, as well as for the Gaia Coat (review coming soon). I love how unique this dress is and the cool, casual vibe of the pattern. The lightened photo below shows some of the features including the bomber jacket style ribbed collar, the elasticated waistband and cuffs, big pockets, front zip and slit at the hem.


The sleeves are integrated into the front and back yoke, which is another lovely feature. I made a mistake on this version and cut the back yoke in two pieces instead of on the fold, so had to insert a 'design feature' to cover the error. I was already adding more topstitching than the pattern indicted, so I think I got away with it. The little tab on the back yoke is also a cute feature of this pattern.


I made this dress from non-stretch denim in a medium weight. I like to cut patterns out with absolute minimal fabric wastage and found the fabric requirements in the pattern to be spot on, which was great. Parts of this pattern were a bit tricky, but the instructions and diagrams were very good.


The denim was possibly slightly heavy for the style as the front doesn't sit quite flat below the front yoke. The layers of fabric in this area were quite thick as I used very sturdy ribbing for the collar in addition to the thick denim. I could also have done with wearing a more supportive bra, but I was in a hurry to get the pictures done! I think in a softer fabric, this would not be an issue. Otherwise I love this dress. It feels completely comfy, cosy and very stylish. It is so refreshing to see a completely different style of dress pattern and this one is right up my street. Definitely check out the new Named collection for some other unique designs.


LinkWithin

Related Posts Plugin for WordPress, Blogger...