Showing posts with label Refashion. Show all posts

Thursday 25 May 2017

Refashioned StyleArc Ziggi Leather Jacket


I love a good refashion and was inspired to do this one when I read about the Australian Sewing Guild's 'Castaway to Couture' competition. The idea is to refashion up to three secondhand garments into one new wearable garment with minimal waste. The competition closes on 31st May and is open to Australian residents, so get in quick!


I wanted to make a leather jacket and the StyleArc Ziggi was the obvious choice. I have made it before in two tone brown leather and I love the fit and style. This time I wanted a classic, black, leather jacket.


I started off with a leather jacket that my grandmother bought for me many years ago and which I no longer wear. It was made with lovely soft, thick leather, but there wasn't enough leather in it to make the Ziggi, which did surprise me a bit. I cruised the op shops and found a second leather jacket for $20 and a silk, leopard print maxi dress for the lining for $8. Interestingly, op shop leather jackets vary hugely in price, even between stores in the same chain. Also, I really struggled to find a silk dress. In the end I just went down the dress rail looking at every label until I finally found one that said it was silk. 


Next came the planning. The Ziggi jacket has 23 pattern pieces, 14 for the main fabric and 9 for the lining. This part took absolutely ages. I wanted to try to avoid holes made by the original stitching and buttons and to minimise the wastage. I planned to cut all the main body pieces from the thicker leather jacket and the sleeves, large front facings and other bits from the thinner one. I also wanted any original seamlines to be symmetrical in the new jacket. I had to draw a rough diagram to remember the layout. As luck would have it, the collar from one jacket was exactly the right size and could be re-used intact. 


Next, I unpicked the original jackets to give me large enough pieces from which to cut my new pattern. I got impatient a couple of times, but that resulted in tearing the leather, so I was forced to go slowly! I was then ready to cut everything out. I ended up having to make some changes to my first cutting plan, partly because I forgot to mirror the side front piece and cut two the same and partly because I did a last minute broad back adjustment, but I eventually got there. The dress was not quite enough for all the lining pieces, so I cut the midsection of the sleeves from some of the original polyester jacket lining. This doesn't show in the finished jacket.


I topstitched any remaining seams from the original jackets and all the new seams so they would match and look intentional. Those blasted side fronts didn't have their original seams matching after my cutting error, but all the other pieces did. The lower edge showed some original stitching holes, but these were hidden once the hem was folded under.


 I decided to quilt the upper sleeves like some jackets I'd seen online. I was very happy to have found the wadding at Remida recycling centre, so that was also saved from landfill. The only thing I bought new were the zips. They were from Homecraft Textiles.


I inserted sleeve gussets that weren't in the Ziggi pattern. For the sleeve gussets, and the pocket zips, I used tutorials by Shams of 'Communing with Fabric'.


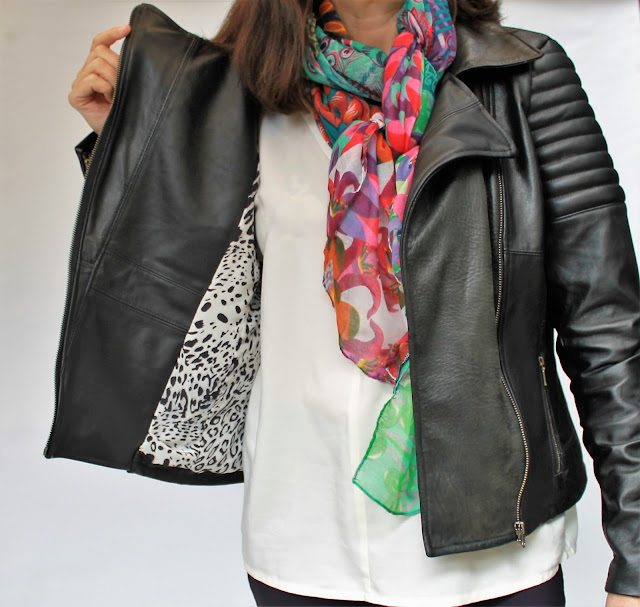
Leopard print is not really my style, but I quite like it as jacket lining. The silk feels lovely to wear. You might just be able to see the original hanging loop (below) that I saved and restitched into the new collar seam. You can also see the original seamlines in the leather front facings. These are mostly hidden when worn.


 The finished jacket, which is completely recycled except for the zips:


I like how the original seamlines add extra detailing to the new jacket.

And here is what was left over from the project. Some leather scraps that I will save to make something else, most of the original linings and tiny scraps of the dress.


This has been one of the most ambitious projects I've ever done and the whole process was incredibly time consuming. I really had to think carefully and go slowly the whole time to avoid silly mistakes. It was incredibly enjoyable and satisfying though and I have ended up with a jacket that I absolutely love. The fit is excellent and the leather and silk are soft and comfortable to wear. I will be wearing this at every opportunity. I am also very happy to have breathed new life into my treasured, but long unworn, jacket from my dear old Nan.


This is the collage I put together for my entry. Voting for the competition begins next week on the 1st of June. If you are an Australian resident with some spare time over the next few days, get refashioning and enter yourselves. There are some great prizes on offer.

Saturday 6 August 2016

The refashioners 2016 - Mondrian Dress from jeans


One of my favourite things is seeing the before and after pictures of a good refashion, so I've been gleefully watching the fabulous refashions rolling in on The Makery this month. So good!

This year the Refashioners refashion must use jeans. I've already done a jeans refashion this year and have worn the dress so often, that I thought another denim dress was in order.

The idea for this dress came to me one night as I was drifting off to sleep. I always think about sewing as I go to sleep...


Enter the Mondrian-inspired denim dress AKA the StyleArc Charlotte Dress


I raided my old jeans drawer (after I remembered I had an old jeans drawer) and found three pairs of my old jeans in different coloured blue denim. It took me an entire day to work out which colour to put where, how I was going to fit the pattern pieces on the jeans and then to cut out the dress. 

Annoyingly, when I opened up the side seams to get larger pieces of fabric, the jeans wouldn't lie flat due to the curved bootcut seams. I had to unpick and resew areas of the seams to get a flat piece for my large front and back pieces and even then I had to insert a couple of sneaky darts. 

Where I could I used features of the jeans to add some interest. This was the original back pocket and side rivet.


I cut the front and back dress pieces so the original seams were as symmetrical as possible up and over the shoulders. Where I could I used the original hemlines and frayed them above the hem band.


Once the dress was sewn together, I harvested labels, pockets and buttons from the jeans (my unpicker was working overtime) and sewed them to the dress.


One of the labels got an upgrade!


Back pockets.


A button fly and coin pocket on one side.


A label overstitched to the back shoulder.


I am thrilled with the end result of this dress. I am hoping that I've retained the simple and classic look of the Mondrian design and that the added jeans features add a bit of refashiony coolness. Whatever, I'm going be wearing this a lot and washing it often to get more fraying and fading happening.


Thank you to Portia for the fantastic Refashioners series and competition and to the celebrity refashioners for the sewing eye candy and inspiration.


Chop chop everybody!


Thursday 2 June 2016

Brief thoughts on Me Made May 2016

StyleArc Toni dress made as a top with StyleArc Elle pants / Named Jamie Jeans with Burdastyle 06/2014#114 jumper / Vogue 1378 pants with Megan Nielsen Briar tee made as a jumper / StyleArc Lola pants with Deer and Doe Plantain tee and Paprika Patterns Opal cardi / StyleArc Mara Shirtdress / Pauline Alice Xeria dress with Megan Nielsen Virginia leggings / Vogue 1378 pants with Burdastyle 11/2012#128 top / Refashioned dress from jeans
Like me, you are probably ready to forget Me Made May for another year. However, I thought I'd just have a quick look through the handmade clothes I wore in May 2016 and see what was popular in my wardrobe.

May 2016 in Perth was, weatherwise, pretty similar throughout. Most days were in the low to mid 20s with a couple of rainy days. This meant that hardly any of my warm and cold weather gear was seen at all, which was a bit of a shame.

Patrones army jacket with StyleArc Elle pants and Named Wenona shirt / Patrones jacket in black with khaki StyleArc Lola pants / Deer and Doe Plantain tee with black StyleArc Lola pants / Named Jamie jeans with Paprika Patterns Jasper sweater / Named Jamie jeans with StyleArc Amber top / Vogue 1313 dress with Closet Case Files Nettie bodysuit / StyleArc Estelle jacket, Paprika Patterns Jade Skirt and SavageCoco Patterns Presto top / Named Inari Tee dress / StyleArc Estelle jacket, Patrones blouse and silk StyleArc Lola pants.

MY MOST POPULAR PATTERNS IN MAY 2016

Pants: StyleArc Elle and Lola pants (some of the Lola pants were altered to have an elasticated cuff and front and back patch pockets) and Named Jamie jeans.

Tops: Burdastyle jumpers and Deer and Doe Plantain tees.

Jackets: Patrones jackets in black and khaki, StyleArc Estelle jacket.

Dresses and skirts: my refashioned denim dress from jeans was the only dress or skirt I wore more than once. I always wore my Megan Nielsen leggings to stay warm. I love all the dresses and skirts I wore in May.

The pattern companies I wore most things from were StyleArc, Paprika Patterns and Named Clothing. I think I use mostly patterns from these companies year round actually.
StyleArc Estelle Jacket almost finished! / Named Wyome jeans, Paprika Patterns Zircon sweater / Named Wenona shirtdress / Victory Patterns Hannah dress, Closet Case Files Nettie bodysuit / Burdastyle jumper and StyleArc Elle pants / Refashioned dress from jeans / Patrones jacket, StyleArc Lola pants, indigo dyed Plantain tee / Vintage pattern jumper with Megan Nielsen Virginia leggings in ponte / Burdastyle jumper, Named Jamie jeans
So there we are. Thank you to all who followed my progress on Instagram and made lovely comments. I loved seeing what everyone else was wearing day to day too.

Saturday 23 April 2016

Baggy jeans refashioned into a dress


These men's, hip hop style, Guess jeans have been languishing in my sewing room forever waiting for a good overhaul. The denim was pretty nice and there was a fair bit of it in those legs, despite the waist almost fitting me. I recall with a smile the skater boys sk8r boyz of the 90s getting about in similar ludicrous styles and thinking they were the beez kneez! It was time to do something with these and with the Aussie Sewing Guild's Castaway to Couture competition currently running, now was the time.


Had I known how much work it was going to be I may not have embarked on this project. I nearly scrapped it halfway through when it was a shapeless, disjointed muddle, but I'm rarely one to give up on a sewing project so I pressed on. It took many hours, but I think it turned out alright in the end. 


I believe that a successful refashion incorporates some features of the original garment into the new one. I wanted to make a dress from my jeans and, after contemplating many options, I decided to use the upper part of the jeans for the skirt and the legs for the bodice. I thought a front-opening bodice would tie in nicely with the skirt and I found this vintage Simplicity pattern with a zip front that I used to start me off. By the way, that small pile of scraps above is all I had left of the jeans when the dress was finished!


My first step was to cut off the legs leaving enough fabric for the bodice and skirt in the two sections. That first cut was a bit scary.


I then cut along the crotch seam so I could start forming the skirt. It ended up being really tricky to get the front and back centre seams of the skirt sitting nicely. I had to unpick nearly all the original seams to finally get it looking ok. Since the original waistband almost fitted me, I left that as it was. I managed to cut the bodice pieces out of the legs and the unpicked jeans cuffs became the collar. You can see the fading where the cuffs were originally turned up.


I adjusted the bodice to fit the waistband, while still fitting me, and sewed the bodice to the skirt. The button stands were cut from small scraps and their insides were pieced together as there weren't big enough pieces left! I redid the unpicked topstitching on the skirt and used similar topstitching on the bodice seams to match the original as closely as I could. The armholes were finished with bias binding, from the op shop of course. The seams above and below the armholes at the back are the original jeans seams.


The final touches were the front snaps and some rustic sashiko-style stitching here and there (with op-shop embroidery thread) for some added interest on the plain denim. The belt is the original jeans belt.

And now for some pictures!


 I just love those deep pockets. I can't keep my hands out of them!


I am so pleased that this competition pushed me into doing this refashion as it's been ages since I did one. I really enjoyed how the process evolved and changed to suit the challenges imposed by fabric quantity and existing seams. I also loved using nearly every last scrap from those jeans and embellishing with recycled bias binding and thread. The five metal snaps are the only new thing I used. I am very happy with the final dress and I look forward to wearing it proudly!

If you would like to enter the competition or see (and vote for) the entries, visit the Australian Sewing Guild Facebook page. You need to like the page to vote. Entries close 31st May 2016.


Thursday 28 August 2014

Scrapbusting and repurposing - Vogue 1316


With a habit of saving every fabric scrap and a sewing room that is bursting at the seams (haha, pun intended), it was time for me to take action. Ok, this project did require the acquisition of some new fabric and a pattern, but Spotlight were having a sale and patterns don't take up much room and I think overall I saved a few square centimeters of space. Anyway, I got a new dress so that's always a positive!

Here's what I started with:

- a pair of track pants in charcoal knit
- a long, thin strip of chevron print upholstery fabric from Remida (creative reuse centre)
- leftover scraps from my polka dot Jamie jeans
- some pale grey ponte knit from Spotlight
- some brown lining fabric that I bought for another project and didn't use (not pictured).


And, of course, the pattern - Vogue 1316

Source
I really liked the grey print, so wanted that to feature centre front and centre back. I attacked Isobel (my dressform) with pins and did some experimenting until I had a combination I was happy with!


I had to fiddle with the chevron print as the pattern was off centre. I sewed two lengths together to achieve the pattern placement I wanted before cutting my centre back and front pieces. There were a LOT of pattern pieces in this dress, so I tried to stay organised and not lose any. 


The instructions have you piecing together all the little front bodice pieces, which have lovely shaping built in to them, then the skirt front. It was so exciting to see it all come together and I just couldn't bear to stop sewing until I'd reached a point where I could hold it up in front of the mirror and prance about a bit. I love the front of this dress.


 Oh yeah, and I added pockets. I used the pictures and explanation by Carolyn and did exactly the same. It was actually Carolyn's beautiful version of this pattern, made from old corduroy jeans, that inspired me to make it in the first place. The pockets were a bit fiddly and there are a few wrinkles behind them, but I'm very happy I added them to the dress.


As I mentioned, I wanted the grey print at the back, which was not how the colours were arranged in the pattern. According the the pattern, I should have used the grey polka dot for the centre back. Looking at the dress now, I think the polka dot would have been preferable, but a) I didn't have enough and b) it is really not enough of an issue to worry about. It does go to show how well thought out the use and placement of contrasting fabrics is in this pattern though. I used an invisible zip at the back instead of a normal zip.


I made this dress in a size 12, which is one size down from that indicated by my measurements on the Vogue pattern. The fit is snug, but perfect. No tight spots and the wrinkles on the sides are from the pockets, not fit issues.


As I mentioned, it was a joy to see this dress come together. My main struggle was with the lining. It didn't want to sit where it should, out of sight, even though I tried to understitch and press it into submission. In the end, I tacked it down here and there with hand stitches, kept invisible by placing them in the seamlines.


 So there we are. A dress I love made from some old pants and a few scraps. Fan-bloomin-tastic!

PS. I have entered this dress in the Repurpose, Reuse, Refashion challenge with Sew Amy Sew. Check out the Flickr group for some great refashioning ideas.

LinkWithin

Related Posts Plugin for WordPress, Blogger...