Showing posts with label Refashion. Show all posts

Saturday 21 September 2013

Quick fixes: boot refashion


The idea for this refashion had been knocking around in my head for a few weeks. Then, one day we were getting ready for a day out when I realised that I NEEDED a pair of ankle boots to go with my outfit! Chop, chop, sew, sew and, 20 minutes later, I had my ankle boots. See how those slim-fitting pants sit nicely over the boots in the bottom, right picture.

It was so easy to make these. I simply drew a line on the boots at the height I wanted, made sure the zip was undone to BELOW this line and cut around the boots with scissors, zip and all. Next I got some foldover elastic (but a strip of lycra would also work) folded it in half lengthwise and zig-zag stitched it around the top edge of the boots, leaving a short length (about 1cm) at the ends. This extra length was folded over to the inside and stitched in place to neaten the edges and prevent the zip-pull coming off at the top. I used a strong needle and the sewing was a breeze, no problem getting through the leather.

Done! A forgotten pair of boots given new life.

Tuesday 9 April 2013

Refashion flared pants into skinny cuffed capris - a tutorial


It's been a while since I did a refashion, but when I spied these lime green, ankle-freezer, flares in the op shop for only $4, I saw potential!

I have turned pants into shorts before...(brown ones, blue ones, black ones)


...but previously I have always added a stretch knit fabric for the cuffs. This is actually what I had planned to do this time, but when I checked my ribbing stash, nothing matched the green. 

Bummer.


After some thought I decided to use the fabric that I cut off the bottom of the pants to make cuffs. I did some googling and found this useful tutorial for lengthening boy's pants with cuffs. 

Here is what I ended up doing:

First, cut the pants just below the knee (or 2cm below the length you want the finished shorts to be). Save the scraps.


Try on the shorts inside out and pin where you want to take them in so they fit nicely (and skinnily) on your legs. Stitch your new side seam(s). Depending on the seam finishing and topstitching you may only be able to neatly take in one side seam, not both. Take in the seam with no topstitching. I was able to take in both sides. You can see my new seams below.


Cut off the excess fabric, leaving approximately 1cm seam allowance. Neaten with an overlocker or zig-zag stitch if desired.


Measure the lower edge of the shorts where your cuff will go. Make sure the fabric is lying flat. Mine measured 21cm.


Using your cut-off piece of fabric, line up any centre or side seams and mark lines showing the width of the cuff (21cm in my case).


Cut, then sew along your marked lines. The seam allowances should be the same as your shorts so the cuff is still the same size as the lower edge of the shorts. I kept the original hem on my cuffs as I wanted them fairly wide. The total height of my cuff piece is 20cm.


Fold the cuff in half with wrong sides together. Now the height of mine will be 10cm.


Now, with your shorts right side out, and cuff with original hem side up, pin and sew the cuff to the shorts as shown. Don't worry, this seam and the original hem stitching will be hidden inside the cuff.


The inside of your shorts will look like this.


Press seams and cuff to neaten. Yes my iron is held together with masking tape coz I dropped it!


Then fold back the cuff to the outside of the shorts. Voila!


This is what it should now look like. The cuff should be folded back approximately 1cm below the seam you have just sewn.


To hold the cuffs in place, stitch in the ditch along the side seams of the cuff on the right side of the shorts. This will hide the stitches.


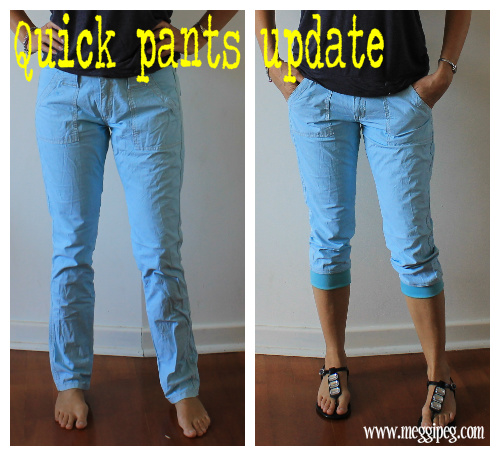
Wear your stylish new shorts with pride!


I had a bit of an embarrassing experience while I was making these. It was Easter holiday Monday and I had finally got Mr Meggipeg and the boys out of my hair around 4pm (I sent them to the skateboard park). Getting into my sewing groove, I had just put on my lime green, too short flares, so I could plan my refashion, when the doorbell rang. Thinking the boys must have forgotten something, I opened the door to see their young, 'I'm with the band' guitar teacher standing there! I looked at him in horror. The flares! What was he doing here on Easter Monday?? I had to invite him in while I rang Mr M (who'd left his phone at home), all the while, flitting quickly across the room  (in the hope of becoming an indistinguishable green blur) and hiding behind the kitchen bench. I finally managed to propel the guitar dude out of the front door great speed, with him probably thinking that I was a complete basket case. The following Monday (yesterday) I wore my new cuffed shorts for him and strutted about. Funny, that he didn't comment....

Tuesday 2 April 2013

Scrappy skirt


Just the teeniest-weeniest touch of a chill in the air inspired me to make something for the autumn. I've made this skirt (Burdastyle 11/2012 #124) before in blue cotton lycra for summer and I've worn it and worn it. It's so comfortable and (I think) flattering.

The skirt is supposed to be made from woven fabric, but I used knit for my first version (see my blog post for how I accidentally got this to fit perfectly) and wanted the same zip-less, comfy style for this skirt. I spent some time searching through my rather extensive stash and found some scraps of black and white checked fabric left over from this baby blanket and toy. Perfect!

But it was woven...and there wasn't enough to make the skirt :(

I thought about piecing it with some other fabric. I looked for black and found this textured knit fabric left over from my Metalicus knock-off gathered dress. Hum diddly hum hum, what to do....


...aha, I know!

I rifled through my sewing books and emerged with 'Improv Sewing' by Nicole Blum and Debra Immergut. This was a Christmas present from my parents. In the book is this cool idea for making a woven skirt with stretch side panels so it can be pulled on, without the need for a zip. Yay - the answer to my dilemma!


So, without further ado, I made one.


I used the Burdastyle 11/2012 #124 pattern (without the front welt pockets and without seam allowances). I cut a nice rectangle of checked fabric for the front and back, keeping the pattern fairly symmetrical. Then I laid this on my pattern piece and cut the black knit fabric with some to spare. I stitched the knit to the woven (and topstitched), checked the size against the pattern and trimmed the excess fabric.


Then zoom, zoom, stitched the sides together, whacked on the knit fabric waistband, hemmed it and was wearing it in less than a hour.

Worn (above) with 'Flannel' silk-sleeved t-shirt refashioned by me by adding shirring to the hem and (below) with 'Witchery' chain-embellished top and 'Rubi' shoes.

Love a quick and dirty project :)

Monday 14 January 2013

Hemlines: the long and short of it


I had two dresses in my wardrobe that I wasn't wearing, well actually there are more, but cleaning out the wardrobe is such a dreary task so we'll just concentrate on these two for now. One dress was too short and the other two long. What to do?

The too short: the khaki dress was from the op shop. I thought I'd wear it as a tunic with leggings in the winter, but the fabric was too flimsy and summery and just didn't go with leggings. It was too short to wear as a summer dress and I didn't even wear it over bathers. 


I decided to add two fabrics at the hemline to fit in with the colour blocking trend of the minute. The red fabric was left over from a sheet I had cut up to fit a toddler bed. It was lightweight cotton, similar to the dress fabric, so looked right with the rest of the dress. I sewed this directly to the hem of the dress. Then I sewed on the strip of blue stretch knit to cover the join. Done!

Perfect for a casual summer outing.


The too long: the second dress was also op-shopped. It is made from lovely quality, very stretchy knit fabric so I couldn't resist it, even though it was an unflattering length on me (no 'before' pic, sorry).

Rather than just chopping a bit off and re-hemming, I decided to make a feature of the shortening process by adding horizontal pintucks to the lower edge of the dress.

I wanted three tucks, so I determined the amount I wanted the hem taken up and divided that number into six (eg. to take the hem up by 18cm, divide 18 by 6 to get 3cm. Each tuck is 3cm wide from the fold to the stitching, or 6cm wide in total if opened out). I carefully measured, folded and sewed the tucks, one at a time, by folding the fabric wrong sides together and stitching 3cm from the fold. I chose to have them next to each other, but you could leave gaps in between.

Here are the tucks from the outside of the dress showing the undersides of the tucks on the right of the photo:


The inside of the dress, showing the three seams:


 And the finished dress. Yes, the beach was stunning that day. You can see my boys having their swimming lessons in the background. I have my self-drafted bathers on underneath  :)


These were both very quick refashions which give a little extra interest to the dresses. I wear both dresses a lot now.

What are you doing with your hemlines?

Monday 3 December 2012

Can you make me 23 charleston dresses in 48 hours???


The doorbell rang on Friday morning and in came my dance teacher laden with sequin fabric and a last minute request for the concert on Sunday! Could I make 20s style dresses for the teens, just 23 of them!!! Luckily she'd bought the dresses and I just had to sew on the fringes...except that there weren't actually any fringes, I had to create those too  :-o

After making the 27 circle skirts for the younger girls in the concert, I knew I had to work FAST to get these done. I took some photos along the way to describe what I did, just in case anyone else is in need of a quick and dirty way of mass producing flapper dresses!


Ideally, these dresses would have been made with ready-made fringing, sewn on in rows. Unfortunately, because we needed so many dresses, the shop didn't have enough fringing and the dance teacher bought this gorgeous sequinned fabric instead. Having to cut the fringing added significant time to the making of these, but they did look fantastic when they were done.

First I cut the fabric across the rows of sequins into rows. Each row was 17cm long and went the width of the fabric (150cm). I needed approximately 1.5 rows per dress. The dresses were simple, black, stretchy dresses in a fitted, t-shirt style.

Cutting the strips of fabric
I laid out each dress and marked with dressmaker's chalk where the strips of fabric needed to be stitched on. I marked the first line just below the underarms and neckline and the other rows in 16cm  increments down the dress. This meant that the 17cm strips would overlap slightly down the dress and hang just below the hemline at the bottom.


Then I got stitching! Luckily the mesh backing of the sequin fabric was stretchy so I could just sew it on to the stretchy dresses using a simple zig-zag stitch without any stretching adjustment. If you were sewing non-stretch trim to stretchy dresses, you would need to stretch the dress as the trim was being sewn on to it. The needle mostly went through the sequins without any trouble and I only broke two needles in making all the dresses - not bad.


Here is a dress with the rows of fabric stitched in place. When I reached the end of a strip of fabric, I just butted the next strip up to it and carried on sewing (see join in second row from top). I only did the front of the dresses and left the backs plain.


Here is a close-up to show how the rows overlapped.


Next the cutting. At this point it was necessary to call in the volunteers. There is no way I could have got these dresses done in two days without helpers to cut the fringes as it was taking around 45 minutes per dress to cut it properly. What we did was to cut along every third gap between the rows of stitching that were holding the sequins in place. We avoided cutting the sequins or the stitching holding them on so as to maximise the number of sequins left on the fabric, rather than on the floor! However, one of my lovely helpers took more of a shortcut and didn't worry too much about these rules. She ended up getting a lot more dresses done in the time and I don't think you could really see the difference in the end ;)


Thank you so much to my wonderful helpers. Between us we performed a miracle and got the dresses done!


Here are some of the gorgeous girls backstage ready to perform. I am told that the dresses looked incredible under the stage lights - Yay!


Monday 26 November 2012

Quick fixes: DIY shorts update


I found these shorts during a recent op shop shopping spree for $5. They are made by Country Road (read $$) and are lovely quality so I had to take them home, even though the cut of the legs was rather unflattering, to say the least.

I tried them on at home and played around with pins and elastic tied in various ways down my legs - rest assured I was in the sewing room, nothing kinky I promise! Eventually I decided that a slimmer leg with a ribbed cuff was the way to go. I have done this before with knit and woven fabric (click on the pictures below to read all about it) and posted a tutorial. I do like this look on me, so I repeated the procedure keeping the leg slightly longer this time.

DIY cropped shorts in knit fabric DIY cropped shorts in woven fabric 

 Basically, what I did was to wear the shorts inside out and pin the side seams in to where I wanted the new seams. I took in both side seams, but if one had had top-stitching, I would have only taken in the other and left the top-stitching intact so it looked properly finished. I then laid the shorts out flat and marked where to sew the new side seams, adjusting as necessary to get both legs the same. Once the side seams were done, I just found matching ribbing (I have a large ribbing stash, also op-shopped and always coming in handy), cut it to fit my calf and sewed it on as described in the yoga pants tutorial.

Much improved shorts :)


I kept the original hem on these as I liked the detail. I top-stitched on the shorts fabric side of the cuff seam for a more polished finish. It's difficult to see in these photos, but you can just about see it here.


I wore these on the weekend when we visited Santa Land in Myer, Perth. Father Christmas was very impressed :)


It was a hot day, and the boys had a great time playing in the new water playground in the city...


...and yes, I made their swim shorts. Speaking of swimwear, I have finished my new bathers and will be posting pictures as soon as I can get to the beach and take some!

LinkWithin

Related Posts Plugin for WordPress, Blogger...