Showing posts with label Alabama Chanin. Show all posts

Sunday 8 April 2018

Alabama Chanin inspired t-shirt


Last year, before our epic family road trip to the outback of Western Australia, I was looking for projects that I could take in the car to pass the time. Scrolling through the Alabama Chanin website, I came across a t-shirt with hand-beaded text on the front.
Alabama Chanin tee from their website
I decided to make my own version using the free Plantain tee pattern and the word 'Create'. I cut out the pattern from some blue knit fabric and stencilled the word across the front using a handmade stencil, silver acrylic paint and a sponge brush. Then I gathered together some beads, sequins, needles and thread and stuffed everything in a bag for the trip.


I'm not brilliant at looking down while I'm in the car as it makes me car sick, not to mention wanting to keep an eye out for kangaroos etc on the road, but I did manage to get a bit of beading done while we were travelling. After the trip, I carried on over the school holidays at the local theme park.


Finally it was done. I stitched the pattern pieces together by hand and embroidered a decorative stitch down the side seams, shoulder seam and on the neck binding using navy or pink embroidery thread.


Some close-ups:


I love this t-shirt with it's rustic, handmade look and added blingy beads. I wish I had more time to make all the Alabama Chanin things. I love them all!

I'm also wearing my Sasha trousers in these pictures.


Thursday 2 March 2017

Named Maisa Denim Jacket - the Playground Collection


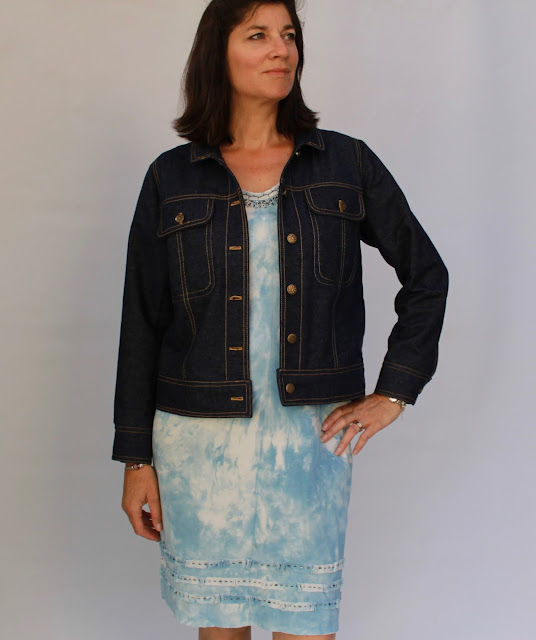
Look at this. A denim jacket! I absolutely love this jacket and it has been the most exciting thing I've made for some time. It was so much fun planning, sewing and watching it come together.


The Maisa Denim Jacket is from the SS17 collection by Named, which was released yesterday. This collection has some lovely pieces and I will be blogging, in the next few days, about two other patterns from this collection that I also tested.


The sample jacket from the collection was made from recycled jeans, which I considered using for my jacket. However, I had some remnant pieces of this dark denim from Remida and I decided to use those in the end. It is a medium-light weight denim with no stretch and was a perfect choice for a comfortable jacket.


I have made many Named patterns before and completely trust their quality and sizing, so I decided to do some Sashiko stitching on the back panel before sewing up the jacket. I found a tutorial online and got to it.


I drew the grid on my fabric with a chalk wheel pen and sewed two stitches per square for durability, following the plan in the tutorial. It was very satisfying watching the pattern emerge. I was sewing this around Christmas during the summer school holidays, so took it with me to a waterfront cafe and stitched while the children played in the water.


Once the Sashiko was finished I sewed the rest of the jacket. I lined the back panel with some cotton chambray to hide the knots from the Sashiko. The instructions are great for this pattern and produce a very neat inside for this unlined jacket.


I used rust-coloured thread for the topstitching and added little red bar tacks at the opening of the sleeve vents. The buttons are jeans buttons from Spotlight that are hammered into place.


This jacket is completely comfortable with no pulling at the shoulders when I stretch forward (a problem I have with some jackets). I have already worn it many times since I made it as it goes with everything. The proportions all seem spot on to me and I just love everything about it.


In the spirit of hand sewing, I'm wearing the jacket with my indigo dyed Alabama Chanin style StyleArc Tammy dress.

Here are a few more pictures:


Thank you to Named for the opportunity to test this pattern. I love everything about it and, as always, their pattern testing procedure was professional and lots of fun.

Wednesday 13 April 2016

StyleArc Tammy Dress, handstitched Alabama Chanin style


This project has been on the go for a while, which is exactly how I like it. I really enjoy having a little something to work on in the evenings or while on holiday.


I dyed the fabric, a white 100% cotton knit, with indigo last year at the studio of Trudi Pollard. In my enthusiasm, I forgot to pre-soak the fabric in water and added it dry to the dye pot. This is not recommended as it introduces air into the vat. However, it did produce this lovely splotchy blue and white pattern as the dye penetrated the scrunched up fabric.


I just love that faded denim colour.


I used the StyleArc Tammy dress pattern as it's one of my favourite patterns. I used two layers of fabric in the dress, the blue on the outside and the same fabric in plain white on the inside. They were treated as one piece and handsewn together to create the dress. This gives the dress more structure. I used navy blue embroidery thread for the topstitching.


The neckline is finished with a strip of fabric folded over the raw edge and stitched in place with a decorative stretch handstitch. I have taken to basting the neckband on by machine before the hand sewing as I find it easier to stretch the band while machine sewing it. It's quite hard to stretch the band enough while hand sewing. This way the band sits nicely and doesn't flip out. I removed the machine basting afterwards.


The neckline is also embellished with tiny blue and white beads sewn in a random pattern. I had to hunt down my tiniest needle to fit through the beads. The beads are sewn all the way around the neckline, none of that RTW only-on-the-front nonsense!


The sleeves were finished by turning under and hand stitching in place.


The hemline edge was left raw and I stitched three narrow strips of fabric above the hem with little pleats here and there and a few beads to catch the light. This ruffled technique is one I've long admired from Natalie Chanin's books.


I was rather sad when this project came to an end. I kept thinking of new embellishments I could add, but decided that there was enough going on as it was. This was very quick for an Alabama Chanin project as there was no applique. I have done a reverse applique project before but I think this plainer design probably suits my lifestyle better. It doesn't stop me drooling over Alabama Chanin applique though, most notably Carolyn's beautiful outfit she posted a few days ago, which is probably the best I've seen anywhere.

Happy Stitchin!

Sunday 24 May 2015

Alabama Chanin skirt and top


This has been a long time in the making and an even longer time in the blogging pile. It's an Alabama Chanin outfit, that was not really planned as an outfit, just worn as such for this blog post.


Both pieces are made from patterns found in the Alabama Chanin books. The skirt is from 'Alabama Studio Sewing and Design' and is a simple, four panel skirt. The top is from 'Alabama Studio Style' and is a more fitted style with princess panels and a flared hemline. The edges are encased with a folded strip of fabric hand stitched in place and the hemlines are left raw.


I used two different Alabama Chanin stencils. The top is made with the 'Large Medallion' stencil and the skirt with the 'Bloomers' stencil. 


The top was made with two layers of white knit fabric. The stencil was applied using watered down acrylic paint and a sponge brush. I used mostly grey thread for the stitching, with the occasional bit of orange thrown in when I got bored. I did the stitching with a double strand of thread and used a running stitch for the reverse applique and the seams. A criss-cross stretch stitch was used for the neckline and armhole binding.


I initially didn't like the fit of the top as the lower half was quite tight and unflattering. I eventually unpicked the stitches and redid them making the seams as tiny as I dared. It now flares out more and I'm happier with the fit.


I made the skirt before the top and used two colours of knit fabric, purple underneath and grey/black on top. I used black thread and wished later that I'd chosen a contrasting colour for more interest. I also only used a single strand of thread for the applique and I worry that the skirt is too delicate to wear. 


The 'Bloomers' stencil was far more labour intensive than the 'Medallion' pattern, but I happily sewed it on holiday last year and enjoyed the process. I always think it's funny how AC garments don't pattern match at the seams when usually, we sewing bloggers, do our utmost to get that pattern spot on!


I really like the slight A-line shape of the skirt. It is very comfortable to wear.


I have had both pieces finished for ages and have never worn either of them. I feel like I should save them for a special occasion in case they fall apart after the first outing. I would be interested to hear how others have fared in their Alabama Chanin garments. Do they stand up to real life wear? It does seem a shame not to wear them after the hours of work put into the making.

Friday 1 May 2015

Jasper Sweater crossed with Alabama Chanin with some natural dyeing thrown in


I had agreed with myself not to buy any more patterns for a while and then, what do I see, but this gorgeous Jasper Sweater by Paprika Patterns. Well, I couldn't help myself and, what's more, I don't regret it!


The main fabric I used for this was hemp/cotton knit, bought on a recent excursion to the Margaret River Hemp Co. in Fremantle with the One Year One Outfit (OYOO) Perth crew. This fabric has a lovely natural colour and feel. Unfortunately it doesn't pass muster for the OYOO challenge as poorly thought out local laws don't allow hemp to be grown here. I hope this changes as hemp is fantastically sustainable and has a very low environmental impact. The fabric is also really nice and smoking it doesn't get you high, or so I'm told. This one metre length cost me $12.95. It wasn't quite enough for the Jasper, especially after some pre-washing shrinkage, so I hunted around and found a piece of cotton knit fabric that I had dyed with Eucalyptus leaves during a natural dyeing course some time ago.

During the dyeing process the fabric was folded, clamped with popsticks (from ice creams) then dyed, Shibori style, in a pot of boiling eucalyptus leaves (species unknown). I forgot to take a photo of the uncut piece, but it was similar to this onion skin-dyed sample I made on the same day:


I used the dyed fabric for the collar, the welt pockets and as a backing for some Alabama Chanin style reverse appliqué on the back of the jumper. I used ribbing fabric for the cuffs and bottom band.


I used the Angie's Fall stencil from the Alabama Chanin website. When I last looked it was free to download, but it now costs $8. I traced a flower from my computer screen at the size I wanted, cut the stencil, then placed it here and there on my back pattern piece. I used watered-down acrylic paint applied with a sponge brush to stencil the pattern on the fabric. This is a quick method that I've used before with good results.


I took the back piece on holiday with me recently and stitched away in a very relaxed manner with coffee or local wine to keep me going. Lovely! I used a double strand of brown thread for the stitches. It was fun to cut away the appliqué and see the Shibori pattern emerging underneath.


Once the back was done and I was home again, I made up the jumper. I was impressed with the drafting and the instructions and I'm pleased with the fit.


The epaulet on the collar is a nice touch. I found a handmade clay button in my button drawer that was perfect. I can't remember where that came from, but possibly my Mum made it during her pottery spree.

You can see the eucalyptus dyed fabric on the collar in these pictures. I'm hoping it doesn't look like I spilt my breakfast.


So, a new pattern, unfamiliar hemp fabric, natural dyeing and reverse appliqué. So much creative fun packed into one garment! Sewing is the best.

LinkWithin

Related Posts Plugin for WordPress, Blogger...