Showing posts with label fabric flowers. Show all posts

Wednesday 13 June 2018

Designing fabric with Spoonflower for a Jalie Charlie Bomber Jacket


I was rather thrilled to be contacted by Spoonflower recently and invited to have some fabric printed for a project of my choice. Spoonflower have a massive library of designs to choose from, or you can upload your own design for a completely unique print. 

***DISCOUNT: If you are interested in having fabric, wallpaper or giftwrap printed for your own project, you can get a 10% discount on the Spoonflower website for the next month using the code meggipeg10. The design I created for this jacket can be found here***


I immediately thought I'd like to use my Mum's artwork as the basis for the fabric design. Mum paints a lot of landscapes with a sea of flowers in the foreground. I decided to use just the flowers as the basis for the design and to make a jacket. I chose a painting with lots of blue, khaki and white so it would be wearable with lots of colours of pants and skirts.


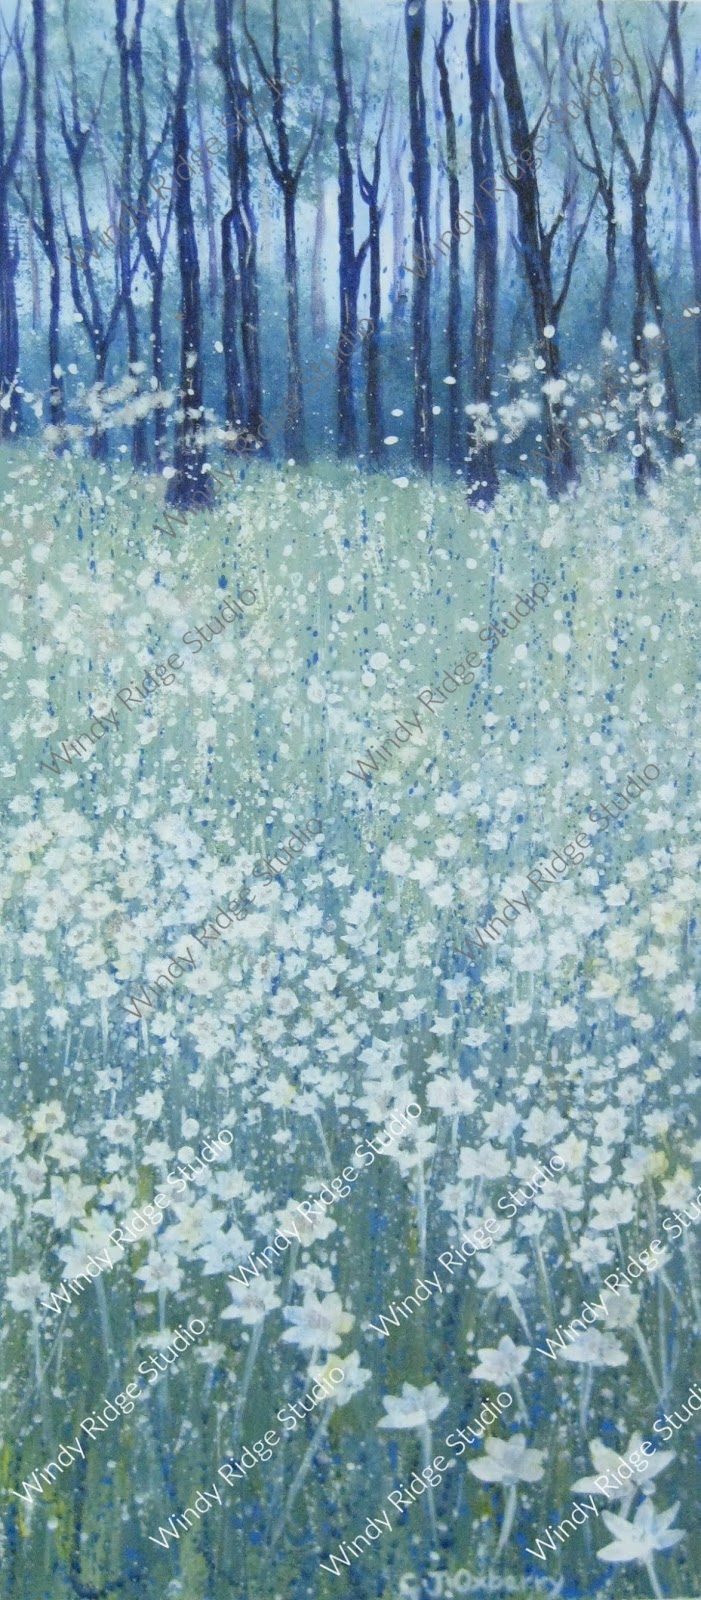
I selected an area of flowers and photographed that part of the painting in high resolution using the close-up setting on my camera. I then used that photo to create a repeating pattern with the larger flowers at the top and bottom of the fabric, transitioning to smaller flowers in the middle. If you would like to use this print, you can find it here. I have only just set this up for sharing, so I hope it works. I had the fabric printed on Organic Cotton Sateen Ultra (see fabric types here), which is just a lovely fabric. I prewashed it before making the jacket and the colours held up beautifully.

My design as it would appear on one yard of fabric


The pattern I used was the Jalie Charlie Bomber Jacket. I have made this before in adult and child's sizes and it's a brilliant pattern.   


I added about 4cm to the length, but otherwise chose the size based on my measurements. My tip for the jacket would be that the pocket fabric will show on the outside of the jacket as the welts are cleverly formed from the pocket piece, so it's best not to use lining fabric for the pocket! I chose to use some striped ponte to match the cuffs, neckline and hem band. I love the classic look of striped ribbing on bomber jackets, but it's hard to find and this ponte does the trick just fine.


I decided to line the jacket. The pattern is unlined, but I just used the front, back and sleeve pieces to make the lining and I drew a front facing piece that was cut from the main fabric. I lined the jacket with white cotton that I had dyed blue to match the outer colours. I bagged the lining for a clean finish. There are lots of online tutorials for this.


I used a nice black and silver zip with a fancy pull from Homecraft Textiles to finish it off.


I was very pleased with the print quality and the way the design worked out. I was easily able to cut the pieces so the larger flowers were at the bottom of the jacket. I deliberately made the sleeves slightly different for a more random effect.


I could not be happier with this jacket. I love the print (thanks Mum!) and the colours will make it such a useful piece of clothing. The Jalie pattern is also very comfortable and easy to wear.

Thank you so much to Spoonflower for providing the fabric. This has been a super-fun opportunity and has definitely got my creative juices flowing to create more designs.

Don't forget to use meggipeg10 for a discount if you order from Spoonflower!


Thursday 9 November 2017

A new Amare Dress for a Melbourne Cup lunch


This week it was that time of year again when the ladies of Oz grab their finery and fascinators and sashay off to a fancy lunch for some horse race or other. These days the Melbourne Cup lunch is the fanciest event I attend all year, so I decided a new dress was in order.

Enter the Amare Dress by Naughty Bobbin Patterns!


I have made this dress before (back when Naughty Bobbin Patterns was Savage Coco Patterns) and I wore it to a Melbourne Cup lunch, but it's such a lovely pattern that it was my first choice for this year's do. The dress has a closely-fitting wrap style bodice and a tea length circle skirt. I had bought two metres of this floral fabric for $20 in a local designer's closing down sale. It was apparently Italian in origin and I loved the print and drape, which I thought was perfect for this dress.


The problem was (gasp) that two metres wasn't really enough fabric. After playing around with the pattern pieces I decided that I could make it work by cutting the dress from the opened-out fabric, rather than on the fold, and by slashing and squeezing the skirt pattern piece just enough to get it to fit. This involved making several evenly spaced cut lines fanning out from the waist to the hem and overlapping them just a bit at the hemline to bring in the hem without affecting the waist size. I also made a couple of minor fitting adjustments to the bodice based on my last version. The resulting skirt was less than completely circular but it's not noticeable.


I had happily spent a morning adjusting the pattern and laying it out for cutting. I took my time and enjoyed the process. Then, almost as my scissors were poised for the first cut, the doorbell rang. It was my bossy sister, who beetled in and told me she needed me to trim her hair. On her way to find a suitable hairdressing chair, she spotted my fabric on the table. I held my breath hoping she wouldn't ask about it. No such luck. "What are YOU making?" she demanded. I showed her the pattern hoping she wouldn't utter her famous words. "Nope, it's all wrong" she pronounced. "It's the wrong style, the wrong length and it won't look good on you. You should wear shorter dresses and show off your legs". She then held up the fabric, scattering pattern pieces in her wake, to demonstrate how wrong it all was. Feeling a bit crushed, I suggested that we do her hair. The haircut proceeded much as the fashion advice had done, with my sister instructing me on every cutting detail and airily waving away any suggestions from me. Against my better judgement, I dutifully cut some layers into her long hair, which turned out to be a bad idea. I offered to fix it but that was declined. Eventually, after perusing a few more dress patterns and making sure I had taken her advice on board, it was time for her to go. "Bugger off then" I called as I closed the gate. "I'm glad I ruined your hair!"*

As a result of this encounter I bundled the pattern and fabric into a ball and went back to the drawing board. I then spent countless hours looking through my patterns, pinterest and the Burdastyle website. Nothing appealed to me. After a couple of weeks of this I bravely decided to ignore my sister and continue with my original plan. My inner serenity began to return as I smoothed out my fabric and pressed the pedal to sew those first few stitches. Then, as I tried on the almost finished dress, I knew I'd made the right decision. Hooray for following your heart and ignoring bossy sisters!

*She knows I love her really!


As is customary for race attire, a hat or fascinator was in order. I decided upon the latter and set to work making a fabric peony with some scraps from the dress and other remnants that seemed to coordinate. I used a tutorial I found online with a free pattern that I used without adjusting the size. I added a couple of dried flower things from an arrangement in my lounge room, sewed on a hair clip and that was done. It turned out rather well I thought and a nice size for a fascinator.


Also, while on the subject of accessories, I made a matching Harriet Bra! Well, why not?


So, after my false start with the dress, I was off and racing to my lunch. It was lovely spending time with some great friends in a beautiful location and much fun was had admiring everyone's outfits. My dress got many compliments and the overwhelming verdict was that I was right and my sister was wrong. Ha!


Sunday 26 June 2011

Ribbon roses tutorial


Yesterday I was immersed in creating a very girly present for my niece (this is a sneak peek, more later) when I realised I hadn't bought any little ribbon roses to put on it. Oh no! OK, deep breath, think....I can make those, surely! They weren't too hard at all. Here's what I did:

First I took some ribbon (this one is about 7mm wide, I also used very narrow ribbon to make smaller roses, see pictures at the end of this post), folded over the end and pinned it as shown.


Then I began to wind the ribbon around the pin, sometimes twisting it to give it more bulk and interest.


When I was happy with the size and shape, I cut off the ribbon and glued the end in place with a glue gun. I removed the pin and glued the base of the flower too so it wouldn't unravel.

Then I got a piece of green ribbon and made it into a figure of 8 shape, glued it in place on the base of the flower and that's it. You could also use PVA glue or sew the ribbon in place, but if it doesn't need to be washed, a glue gun is super fast and easy.


Hooray! On with the pink and frilly creation. Can't wait to show you...


Thursday 17 February 2011

Cravat for Matt

Ahoy Masterchef fans! I know this is slightly out of date but I just came across some photos of my entry for the 'Make a cravat for Matt' Aussie Masterchef competition last year. This was to be a cravat for the ever colourful Masterchef judge Matt Preston, who always wears a cravat (necktie thingy). Here he is:


So, I thought I would enter. The cravat had to be made from Handee Ultra paper towel as they were sponsoring the competition. I decided to make a huge flower and dye it with food colouring.


I dyed the tie part with watered down food colouring and decorated it with Masterchef logos, which I had photoshopped on to a background in the same pink colour. I dyed the flower with darker pink colouring and used more concentrated dye on the tips  to define them. I then sewed a knife, fork and spoon from the paper towel and dyed them green to make the 'leaf'. It was good fun to do and I really liked the way it turned out. I was hoping that there wouldn't be too many people interested in creating something elaborate for the competition and I might be in with a chance of winning. This was sadly not to be - there were loads of entries and some were absolutely amazing. I really enjoyed looking at the website to see the new ones that were being added all the time. It seems that there are a lot more people out there who sew and craft than I thought. This makes me happy as I worried for years that we were a dying breed and eventually the fabric shops would all close down, as many did in Perth. But now, the trend seems to be reversing and there some lovely fabric shops around. Yay!

Sunday 10 October 2010

Flowers in a pocket


I made this little jacket for a friend's 6 month old baby as a thank you present for a dog rescue mission we went on - long story!

Thursday 22 April 2010

Raspberry velvet


Part of the Meggipeg winter range, this skirt is made from stretch crushed velvet with a tulle-edged underskirt. It features a rollover waistband and three flower brooches made from velvet and tulle. This particular skirt was made for a prize in the Mother's Day raffle at my son's kindergarten. I am planning to make one or two more for general sale.

Monday 19 April 2010

Flower girl dresses


I made two little flower girl dresses for a friend from silver satin with ribbon tie, applique flower and flower wristband in navy blue ribbon. This is the smaller dress for the two year old. They wore them with silver sequin shoes - adorable!

Sunday 21 March 2010

Silver fairy skirt


This is a custom design for a friend. It has a silver skirt with a pink tulle underlay and a fold-over cotton spandex waistband (grows with your child). It is decorated with pink tulle flowers. The largest flower (pictured) is a brooch which can be pinned anywhere. This is a 'one-off design. No longer available. Please contact me if you would like something similar.

Thursday 18 March 2010

Orange blossom

This skirt has a satiny orange floral skirt with a green soft tulle underlay and a fold-over cotton spandex waistband (grows with your child). The matching t-shirt has orange applique flowers. This is a 'one-off design. Size 2-3. Available. Price AU$60.

LinkWithin

Related Posts Plugin for WordPress, Blogger...