Showing posts with label StyleArc. Show all posts

Saturday 19 October 2019

Pietra pants, Sadie tunic and Sorrento bucket hat


Summer is on its way and I was determined to find some time to sew. Time to sew, for myself at least, has been rather limited for a while, but it is always such a joy. This outfit began with the Pietra pants by Closet Case Patterns, which I was inspired to make after seeing the gorgeous versions on the Tessuti blog.

I had one metre of navy sandwashed linen from a recent(ish) sale at Morgan and Marks, a local Perth designer who sometimes sells off their excess fabric. There was just enough for these pants with some creative cutting, but I had to use a different navy fabric for the pocket lining, which does not show at all.


This was my second pair of Pietra pants. The first was a wearable toile in beige linen. I made these exactly according to the pattern. They are a bit baggy for my liking and the waist is very high, which I find a bit uncomfortable, possibly because I'm not used to wearing such high waisted pants. For the navy pair, I decided to remove 5cm from the rise of the pants by folding in the front pattern piece at the lengthen/shorten line and folding the top of the back piece, facings and front pocket pieces over by 5cm. 


I feel much more comfortable with the rise of the navy pair. I also took in the side seams of the navy pair for a closer fit.


The blouse is the StyleArc Sadie tunic, which I have made before. Both times I made it I shortened the length, but I can't remember by how much.


This Sadie is made in a light cotton voile with an embroidered flower pattern. I think this fabric came from a designer sale as well, but I've had it for so long I'm not sure!


The top worked quite well in this slightly sheer fabric, but the neck and hem facings are very visible. I was careful to make them as neat as possible! A flesh-coloured bra is also essential.


And finally, the hat. I was recently invited to the launch of an Image Stylist business at Garden City Shopping Centre by B, my friend and ally in all things sewing, fashion and food. B had won tickets to the event and we had a very decadent time drinking pink cocktails and surreptitiously inhaling the grazing table. The stylist, Peta Preston, showed us her picks for the upcoming season, which included a bucket hat! The model is wearing one made from white broderie anglaise, which I may copy. I made mental notes of all the pieces I liked and the patterns I would use to make them. The bias cut skirt (same model) was on my to-make list.  


I used the Sorrento bucket hat pattern, which is free from Perth designer Elbe Textiles and which came to my attention after being made extensively by Sue from Fadanista. This is a fab pattern and I highly recommend it. There will be more! Cheers x


Thursday 22 February 2018

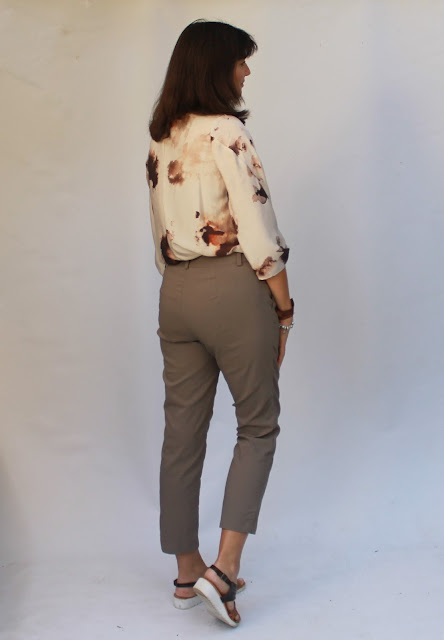
StyleArc Sadie Tunic and Closet Case Patterns Sasha Trousers


I've had my eye on both these patterns since they were released and they did not disappoint! I bought the StyleArc Sadie Tunic pattern after seeing Blogless Anna's gorgeous versions here and here. I've had this silk for quite some time after snatching it up at a local Morrison sale. I think quite a few of the Perth sewers have the same fabric. It is soft and dreamy to wear. I'm not even going to tell you what my teenage son said about the print. I think it's rather elegant!


The standout feature of this pattern is the sleeve design. It is so cool and interesting and I should have got a better picture of it. I was careful to follow the instructions and it was fairly straightforward to put together.


I also love the curved hem and the neckline and just everything really. The proportions seem to work very well together.


The back has a centre seam to accomodate a button and loop closure at the neckline. I ended up skipping this as I can easily fit the top over my head without it. Next time I may cut the back on the fold.


OK, now I'll just tuck that tunic in so you can see the pants. These are the Closet Case Patterns Sasha Trousers. (Embarrassingly I always have to stop myself saying that name in a Canadian accent since I heard Heather Lou speaking on the 'I love to sew' podcast! By the way, that episode is worth a listen if you haven't heard it yet).


I spent ages examining the sizing of these pants before cutting them out as the ones in the pattern pictures looked too tight to me. I wanted mine fitted, but not super tight. I read the blog posts, I looked at the size charts and got myself into a bit of a tizz. In the end I decided I was overthinking it and just made the size according to my measurements.


I made a toile and did a couple of fit modifications according to this very helpful blog post. I could have been fussier on the fit, but I had had enough of taking back selfies over my shoulder so got started. 


I am very happy with the result. These pants are so comfy and look smart and modern. The fit is just right and the stretchy bengaline allows easy movement. As an added bonus they go with my new blouse. I'm ready for an outing!


Monday 4 December 2017

Named Wyome Boyfriend Jeans and StyleArc Brooklyn Knit Top


About three years ago I made a couple of pairs of Named Wyome Boyfriend Jeans. Those were made in a size 38 and were quite close-fitting. This time I wanted a looser fit like the cool kids I see on Pinterest. So, for this pair I went up two sizes to a size 42.

Screenshot from Pinterest 'Boyfriend Jeans'


For my previous, tighter pairs I had altered the crotch curve for a better fit. This time I didn't make any alterations to see if the original cut would give that classic boyfriend look in the larger size. I think it did! The only changes I made this time were to enlarge the back pocket and use a zip, rather than a button fly.


To achieve that faded, worn-in look, I used a gorgeous enzyme washed denim from Tessuti, purchased with a gift voucher from the best internet sewing friend ever. This colour denim doesn't seem to be available any more. It is soft and gorgeous and perfect for these jeans. I topstitched with gold Rasant thread from Homecraft Textiles and added a leather tag. I managed to stamp the B on backwards, but you'd have to be looking way too closely to notice when I'm wearing them.


Jeans topstitching is one of my favourite things to do. So satisfying!


These photos were taken months ago when it was cold enough for snuggly jumpers. I don't know where the time has gone. This particular snuggly jumper is the Brooklyn Knit Top by StyleArc. I've made this one in a quilted knit fabric from Textile Traders. It's a simple pattern with pockets and a roll neck and the resulting jumper is cosy and slouchy. I wore this a lot over the winter.


Now I can slouch about with the best of them!


I love both these patterns and I am very happy with the looser fit on these jeans compared to the previous pair I made in my 'proper' size. I have worn these so much since making them as they always feel so comfortable and fashionable. The colour also goes with everything.


Thursday 25 May 2017

Refashioned StyleArc Ziggi Leather Jacket


I love a good refashion and was inspired to do this one when I read about the Australian Sewing Guild's 'Castaway to Couture' competition. The idea is to refashion up to three secondhand garments into one new wearable garment with minimal waste. The competition closes on 31st May and is open to Australian residents, so get in quick!


I wanted to make a leather jacket and the StyleArc Ziggi was the obvious choice. I have made it before in two tone brown leather and I love the fit and style. This time I wanted a classic, black, leather jacket.


I started off with a leather jacket that my grandmother bought for me many years ago and which I no longer wear. It was made with lovely soft, thick leather, but there wasn't enough leather in it to make the Ziggi, which did surprise me a bit. I cruised the op shops and found a second leather jacket for $20 and a silk, leopard print maxi dress for the lining for $8. Interestingly, op shop leather jackets vary hugely in price, even between stores in the same chain. Also, I really struggled to find a silk dress. In the end I just went down the dress rail looking at every label until I finally found one that said it was silk. 


Next came the planning. The Ziggi jacket has 23 pattern pieces, 14 for the main fabric and 9 for the lining. This part took absolutely ages. I wanted to try to avoid holes made by the original stitching and buttons and to minimise the wastage. I planned to cut all the main body pieces from the thicker leather jacket and the sleeves, large front facings and other bits from the thinner one. I also wanted any original seamlines to be symmetrical in the new jacket. I had to draw a rough diagram to remember the layout. As luck would have it, the collar from one jacket was exactly the right size and could be re-used intact. 


Next, I unpicked the original jackets to give me large enough pieces from which to cut my new pattern. I got impatient a couple of times, but that resulted in tearing the leather, so I was forced to go slowly! I was then ready to cut everything out. I ended up having to make some changes to my first cutting plan, partly because I forgot to mirror the side front piece and cut two the same and partly because I did a last minute broad back adjustment, but I eventually got there. The dress was not quite enough for all the lining pieces, so I cut the midsection of the sleeves from some of the original polyester jacket lining. This doesn't show in the finished jacket.


I topstitched any remaining seams from the original jackets and all the new seams so they would match and look intentional. Those blasted side fronts didn't have their original seams matching after my cutting error, but all the other pieces did. The lower edge showed some original stitching holes, but these were hidden once the hem was folded under.


 I decided to quilt the upper sleeves like some jackets I'd seen online. I was very happy to have found the wadding at Remida recycling centre, so that was also saved from landfill. The only thing I bought new were the zips. They were from Homecraft Textiles.


I inserted sleeve gussets that weren't in the Ziggi pattern. For the sleeve gussets, and the pocket zips, I used tutorials by Shams of 'Communing with Fabric'.


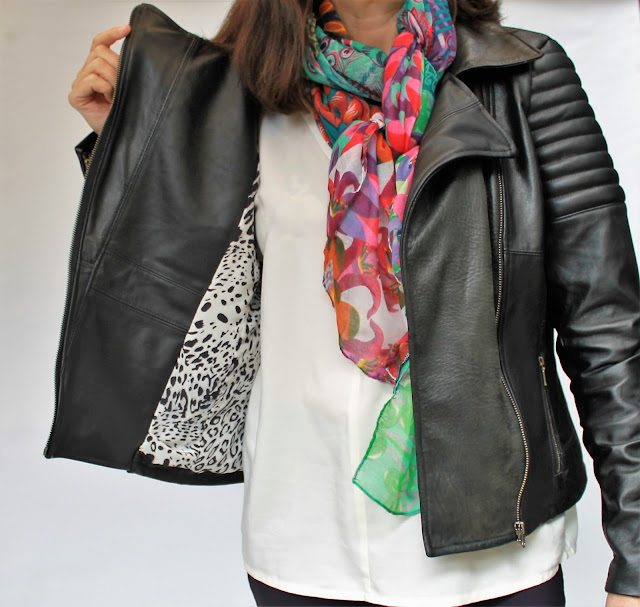
Leopard print is not really my style, but I quite like it as jacket lining. The silk feels lovely to wear. You might just be able to see the original hanging loop (below) that I saved and restitched into the new collar seam. You can also see the original seamlines in the leather front facings. These are mostly hidden when worn.


 The finished jacket, which is completely recycled except for the zips:


I like how the original seamlines add extra detailing to the new jacket.

And here is what was left over from the project. Some leather scraps that I will save to make something else, most of the original linings and tiny scraps of the dress.


This has been one of the most ambitious projects I've ever done and the whole process was incredibly time consuming. I really had to think carefully and go slowly the whole time to avoid silly mistakes. It was incredibly enjoyable and satisfying though and I have ended up with a jacket that I absolutely love. The fit is excellent and the leather and silk are soft and comfortable to wear. I will be wearing this at every opportunity. I am also very happy to have breathed new life into my treasured, but long unworn, jacket from my dear old Nan.


This is the collage I put together for my entry. Voting for the competition begins next week on the 1st of June. If you are an Australian resident with some spare time over the next few days, get refashioning and enter yourselves. There are some great prizes on offer.

Monday 8 May 2017

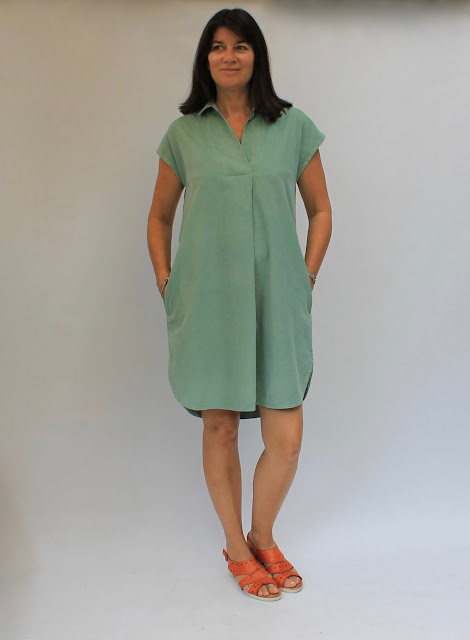
StyleArc Autumn Dress


I was drawn to the StyleArc Autumn Dress pattern as soon as I saw it and grabbed it in a recent Etsy sale. I love the deep overlap at the neckline that extends into a front pleat, the loose fit and the curved hem. The back pleat is also an interesting feature - more on that later. 


Since we are now in the season of autumn, I chose a lightweight corduroy for this dress. The fabric came from Remida as an unwanted factory offcut so I'm doing my bit for sustainability! I wasn't sure about the colour at first, but it's grown on me and now I rather love it.


This dress is not difficult to sew and the front came together quickly. That neckline and collar are so lovely.


The back, however, caused me a few problems. Despite following the diagram in the instructions, I just could not get it folded correctly. I tried to match the folded back with the width of the yoke, but still could not work it out. I tried for over an hour, studying the website photo and drawing diagrams, before giving up and going to bed. I pondered it overnight and went straight to it again in the morning. After almost another hour, I finally got it. I can't remember the last time I got so confused over a simple bit of folding!


I drew a diagram each time I thought I'd got it right. The one at the top is the correct one. It's a bit messy but may help someone. It's also quite different from the diagram in the instructions, which is more like my discarded diagrams.


From then on, it was smooth sailing again and I'm so happy with the way the dress turned out. As always, StyleArc's drafting and fit is spot on and this is a gorgeous pattern.


LinkWithin

Related Posts Plugin for WordPress, Blogger...