Showing posts with label Burdastyle. Show all posts

Thursday 29 March 2018

Tessuti Skylines Competiton - Burdastyle jumpsuit and Naughty Bobbin Cap


Well this was a slow sewing project if ever there was one! Many hours were spent during the planning, the pattern adjusting, the muslining, the additional adjusting, the cutting and the construction. This is, of course, my entry for the Tessuti Skylines Competiton, where the rules state that this checked fabric alone must be used for the entirety of the outside of the garment.

Choosing the project was fairly easy. I loved the idea of making a special occasion dress in this fabric, but such a thing would never have fitted into my casual lifestyle, so I chose a jumpsuit that I could wear every day. I was inspired by a loose-fitting jumpsuit I saw on Etsy. I perused many patterns trying to find something similar and finally settled on Burdastyle FS/2014 #I. In addition to the jumpsuit, I made a little cap using the Naughty Bobbin Patterns Summer Ensemble Pattern. That pattern for a skirt, top and cap is fantastic btw!

Burdastyle Jumpsuit FS/2014 #I
There were several features of the jumpsuit that I wanted to modify, so I began by making a muslin. I experimented with the bodice, trying a wrap style and a loose bib style, but eventually settled on this sleeveless shirt/boiler suit style.

Here I am wearing a heavily modified muslin and experimenting with sleeves (my family said NO to sleeves!). I made a size 42 according to my measurements, but then took in the sides, took 2cm off the bodice length and altered the back shoulder seam for a better fit. Other changes I made to the original pattern included: raising the neckline and adding a collar - I used the collar and stand from the Named Wenona shirtdress pattern; enlarging the pockets; adding a button placket and press studs instead of the zip - I used the button placket from the Closet Case Patterns Kalle dress and lengthened it so it extended into a fly front; adding back patch pockets; and lengthening the leg 5cm.


I cut the pattern on a single layer of fabric so I could match the print as perfectly as possible in every direction. I made sure the bodice and pants matched for the vertical stripes and that the horizontal stripes matched across the front and on the sides. I cut the shoulders, waistband and button placket on the bias for some visual interest. The stripes also match on the cap as much as possible with a little bias-cut pocket on the side!

Spot the front and back pockets!!


Here are some close ups:

I used press studs instead of buttons for emergency toilet situations...


...and a press stud on the back of the collar (I love the shape of the Named Wenona collar).


Topstitching on the waistband and pockets and the double waistband that hides the belt at the back.


The button placket extends into the pants


and the cap. I love this cap and have worn it every day since I made it.


So there we have it, finally finished! I really enjoyed the challenge of this project and I am very happy with the outcome. This jumpsuit fits perfectly into my casual lifestyle and the cap is so well-fitting and comfortable, not to mention providing lots of shade with the large brim. I'm very pleased I entered the competition as it pushed me to spend time making something I really wanted and love.


There's still time to enter!


Monday 17 July 2017

Burdastyle Jumper Dress 10/2016 #117


I was all set to make the dungaree dress from the April 2017 issue of Burdastyle, when I saw this one in the October 2016 magazine. I decided this pattern offered something a bit unique, so I changed my plans. 


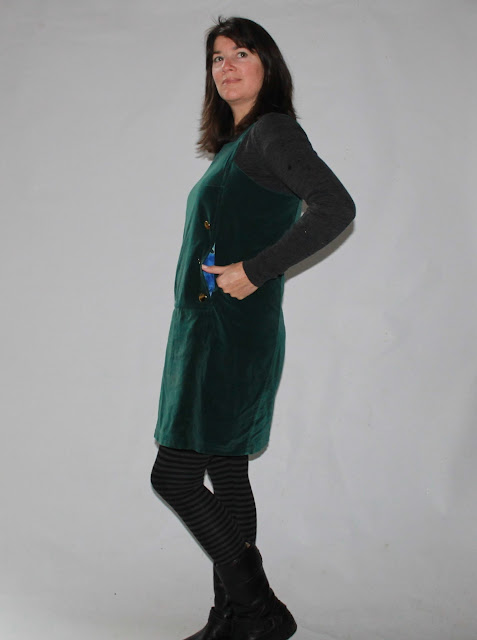
This is the 'Jumper Dress' from the October 2016 Burdastyle magazine. It has interesting seaming at the front with pockets at the waist.

Burdastyle 10/2016#117
I used cotton velvet fabric for this that I acquired in a closing down sale recently. The business selling it made set designs for stages and elaborate parties. They had almost sold all their fabric, but I got this velvet in green and some more in black. While I was there, I got chatting to the guy about their business. He showed me some massive pieces of red and blue fabric that had been used to decorate the house of Australia's richest woman for a party a few years ago. I mentioned that my son's primary school was doing a musical and wondered if they could use the fabric. He immediately beetled off and showed me some huge wooden stage backdrops. He said they would be perfect for the school and, before I knew it, I'd somehow agreed to having six of them strapped to my roof rack. I tentatively drove along the highway to the school, warning the music teacher of the impending arrival of the enormous backdrops (not texting and driving, of course). Then, she and I attempted to unload them. This was easier said than done. We were huffing and puffing after moving just one. Fortunately there were some road workers nearby and one was more than happy to ditch his Stop sign and help the young and attractive music teacher heave the rest of them into the school hall. Traffic chaos ensued, but eventually my car was unloaded and I scurried home with my velvet.


When I make Burdastyle patterns, I do try to follow the instructions, but almost always end up doing my own thing. This pattern was no different, but was fairly straightforward to make. The back has an invisible zip, which is positioned on my back in a place that is almost impossible to reach. Luckily I can get this on and off without using the zip.


The pockets are inserted into the seams of the side panel. I didn't have enough fabric to line them with the velvet, so they show a bit from the side, but that's ok.


The dress turned out a bit loose, so I took in the side seams a bit. I also needed to lower the darts. The gold buttons are decorative and just sewn in place without buttonholes.


This fabric is really difficult to photograph, but it is really quite nice. The dress is cosy and I love the style. I'm wearing it here with a cashmere jumper from Potter Textiles (RTW from a fabric shop isn't really RTW, you know) and Megan Nielsen Virginia leggings.

Thursday 20 October 2016

Jumpers - Burdastyle 02/2016 #121, Named Talvikki and Vogue 8962


As we approached the end of winter in Perth, I was all ready to begin my summer sewing. However, the cold weather dragged on and on through spring this year, so I decided to make just one four more jumpers to wear. I'm so pleased I did, these have been worn constantly over the last few weeks.


First up, this one from the February 2016 issue of Burdastyle magazine. This is the 'High Collar Sweatshirt', No. 121. I loved this design in the magazine and was so keen to make it, when I rediscovered it recently, that I did so despite the fact that I didn't have the collar zips. I assume the zips are there as a practical and decorative feature. Luckily, I can easily get the jumper on and off without having the zips there.

Burdastyle 02/2016 #121

I used oatmeal marle fleece fabric from Fashion Fabrics Club that has been in my fleece drawer for quite some time. It's lovely and cosy. The cord for the drawstring was saved from a boutique paper bag. I always save the cord handles from bags and knew I'd find a use for them one day!


Apart from omitting the zips, the only change I made was to lengthen the cuffs slightly. I used silver grommets for the cord openings.


I was so happy with this jumper that I immediately made another. This time I bought the collar zips and used a striped silver and blue cotton fabric I found on sale in Spotlight. 


I pattern matched the pockets and made a feature of the front panel by offsetting the stripes. The cuffs and hem band are made from navy ribbing.


I was expecting that the addition of the zips to this would enable the top to be worn with different collar variations. However, I don't really like the unzipped look. I don't know if it's the fabric, but it reminds me of the 80s and not in a good way. I don't bother to open the zips when putting this on or off either, so if I made this again it would be zipless.


One last word on the zips - if I were to put them in again, I would probably turn them over so the right side of the zip pulls showed then the collar was turned down. This is personal preference though.


I'm happy with this, but I prefer the plain fleece one.


Next we have another Named Talvikki (my first is blogged here). I love this pattern with the cool neckline darts and side splits. It is also very quick and easy to make.


This one is made from Fleece from Spotlight. I added cuffs with some pale blue piping just for a change.


This has been such a useful addition to my wardrobe. It goes with everything and I love it.


Finally, I made another Vogue 8962 tunic. My first was made with knitted fabric and looks completely different. This one was made with Spotlight fleece that I found reduced from about $25/m to $5/m. It's not my usual style, but it's lovely and soft inside.


I wanted to practise my coverstitching on this pattern as I'm on a mission to get decent coverstitching. It seems to be a skill that is very hit or miss. Coverstitching always seems to work better on thicker or more stable fabric and I had quite good results this time.


I chose orange thread to match the background of the fabric and highlighted the design lines and hems with coverstitching.


I lined the collar with turquoise fabric to match the cheeks of the faces on the fabric.


Although this fabric isn't quite me, the bold print is fun and the style of the tunic is great to wear. I've worn this a lot more than I expected.


OK, I think I've fulfilled my winter quota of sewing now and got good wear out of everything. Now it's time to bring on summer. Come on Perth!

Tuesday 9 August 2016

Burdastyle Parka 01/2016 #124


As soon as I saw this coat in the January 2016 Burdastyle magazine, I knew I had to make it. I loved the casual, oversized style and all the detailing. I filed the idea away in my head for six months until winter in Perth, then dug out the magazine and got to work.

Burdastyle 01/2016#124
I love the khaki version in the magazine, but I made myself a khaki coat last year from a Patrones magazine pattern so another colour was required. I decided that this coat was going to be bright orange and utilitarian. My other coat was slim-fitting, so this one had to be roomy and perfect for layering over bulky jumpers. I didn't make the fur-lined vest part as it's just not cold enough here.


The fabric is ripstop cotton from Fashion Fabrics Club in the US. I bought it as part of my prize way back for the jeans contest on Pattern Review. I love this fabric.


I made the jacket exactly according to the pattern in my usual Burdastyle size 40. It has just the right amount of ease for the style. I followed the instructions as best I could, but there were large swathes of information missing on how to neatly finish the side zips, front hood etc. that I had to work out for myself as I went along. Much unpicking took place at all stages of construction!

Here are some of the details of the jacket.

Upper welt pocket and two lower welt pockets with flaps, drawstring waist, front zip and snaps, hood lined with khaki knit fabric (outer edges lined with main fabric):


Longer back section with drawstrings, lower side zips:


and elbow patches:


Despite the missing instructions, I was very impressed with this pattern. The attention to detail in the design is fantastic and the drafting was spot on. It has a very ready-to-wear feel. The fit is also really good on the jacket and the hood.


I struggled to find anyone who had made this pattern on the internet. There were a few examples on the Russian Burdastyle site (always my first port of call for finding real life examples of Burdastyle patterns), but they tended to be very padded, winter versions. While the pattern is challenging and not for the faint-hearted, I think it's fantastic and well worth the effort.


I couldn't be happier with this coat. It feels very comfortable and stylish to me and has the added bonus that my children will never lose me in a crowd. I can stride off towards a distant fabric sale and they'll spot me at 500 paces.


Win!

Monday 26 October 2015

Indigo dyed twisted dress (Burdastyle 06/2014#102)


I loved the Japanese-influenced patterns from the June 2014 issue of Burdastyle and have finally got round to making something from the collection. This is the 'twisted cap-sleeve dress', so called because the side seams and sleeves are asymmetrical, causing both to twist. As the wearer puts on the dress, the lower half needs to be twisted, moving the side seams to the sides and producing subtle wrinkles across the torso.

Burdastyle 06/2014#102 - I wish I looked like this in my dress!
In order for the dress to stay in its twisted state, it is quite tight. This is all very well on the beanpole model, but when I look in the mirror all I see is tummy and VPL. As much as I admire the twisty design, I think I may need to perform some surgery on this dress to make it looser and more flattering on me.

Truffle is unimpressed.
The dress is made from medium-weight, stable, knit fabric found at Remida. It was originally an oatmeal marle colour, which I decided to dye in an attempt to recreate the subtle striped look of the Burdastyle dress.

Blurry back view
I used natural plant indigo dye from a kit I bought online from Dharma Trading. This contains everything you need for small-scale indigo dyeing. I used half the kit, which was plenty for some experimenting.
Indigo kit from Dharma Trading

Here is the dress on the mannequin before dyeing.


I folded some of the front of the dress into fairly even pleats and hand stitched them loosely in place so the dye would penetrate most of the fabric and produce subtle stripes.


Then into the dye it went. Elbow-length gloves for me!


Here's how the pattern looked when it came out of the dye.


When it dried it was lighter and the neckline had some dark splotches, but that's all part of the unpredictability and fun of natural dyeing.


All in all, I'm really happy with this project. Although the dress is too tight on me, I loved playing with the dye and the indigo colour is beautiful. I'm pleased with the stripy effect and I definitely think the dress is worth adjusting for a more flattering fit.

LinkWithin

Related Posts Plugin for WordPress, Blogger...