Showing posts with label Swimwear. Show all posts

Monday 22 May 2017

Sophie Swimsuit with custom-printed fabric


I am very excited to show you the second garment I have made using fabric printed with one of my Mum's own paintings. You may have seen the dress I made a few weeks ago with a Eucalyptus design.

Painting by Chris Oxberry

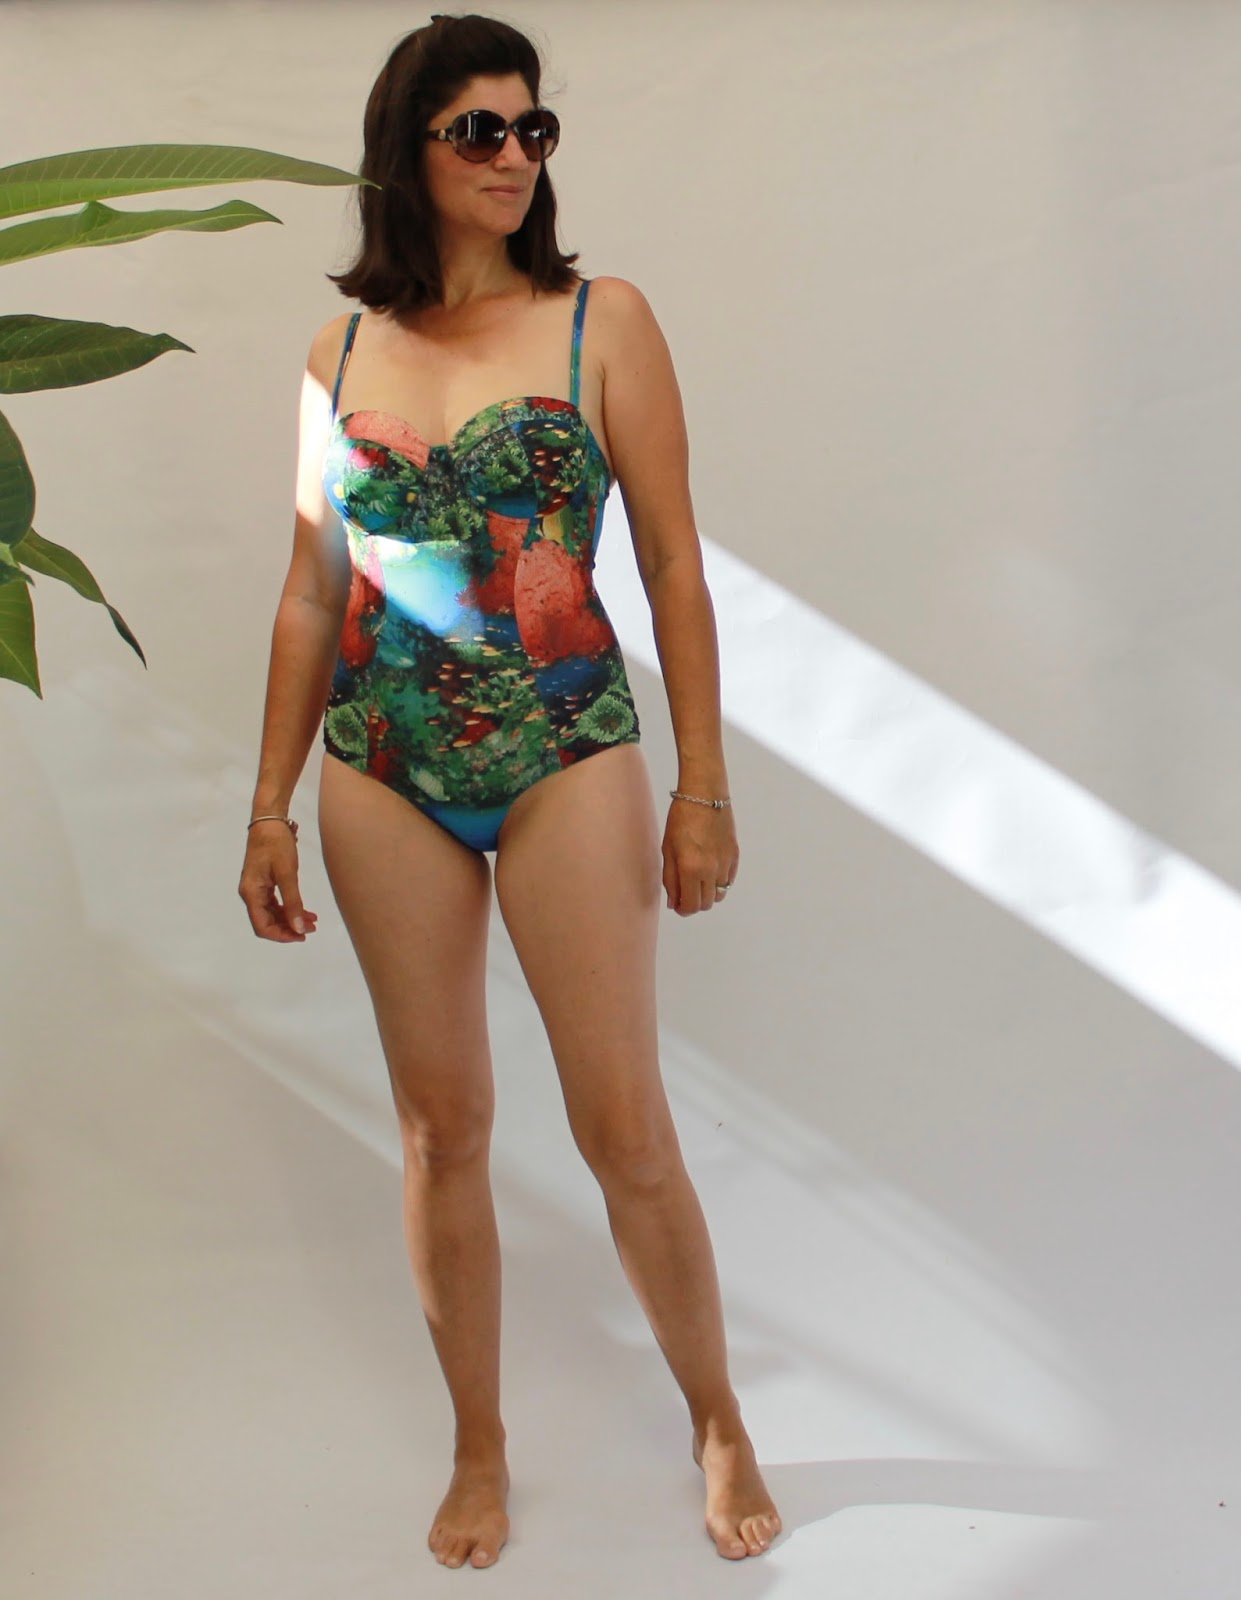
This painting depicts masses of everlastings (flowers) on a red-earthed, Australian outback landscape. I chose the lower part of the painting for the design with just a bit of the tree at the top.


I had the fabric printed by Contrado UK. This is the 'Slinky lycra matt 210gsm' and I absolutely recommend it for a swimsuit. The fabric is beautiful quality, soft but firm with good stretch recovery. The printing turned out really well on this fabric too as the colours are accurate and very vibrant. I have spoken about ordering from Contrado in this blog post.


I ordered a piece of fabric 100cm wide by 60cm long and just squeezed this swimsuit out (size 8 body, size 5 cup) with only tiny scraps left over - perfect! I had worked out my exact fabric requirements before ordering so I didn't have any waste. I cut the pieces from a single layer of fabric, which meant more cutting, but much less wastage, so totally worth it when working with special fabric.


The pattern is the Sophie Swimsuit by Closet Case Patterns. I have made this before and loved it, so the choice was easy. This time I added an inch to the torso length as my last one was just a bit short in the body causing a rather unfortunate chesty wardrobe malfunction on a very crowded beach! I think now this one might be a tad too long as there is some wrinkling at the back, but it's definitely to be better safe than sorry. The swimsuit is lined with orange lycra from my ridiculously extensive lycra stash. Other than that, everything was the same as for my previous Sophie Swimsuit.


This project took a lot of plotting and planning with my Mum, detailed measuring of fabric requirements, designing and ordering from the Contrado website, super careful cutting and slow sewing. 

I loved every minute!

I'm thrilled with my one-off swimsuit and can't wait until it's warm enough to actually swim in it. Maybe I need to plan a tropical holiday...


Sunday 5 February 2017

One-piece Sophie Swimsuit


Summer is in full swing and it was definitely time for some new bathers for me. I have seen so many lovely versions of the Closet Case Files Sophie Swimsuit, that it was the obvious choice. Although bikinis are far more practical than one-pieces, I like the er, smoothing effect a one-piece gives to the tummy region. I will probably make the bikini as well though.


I followed all the sizing instructions and came up with a size 8 body and size 5 cup. I love that only a few pages need printing once the size has been chosen and that you also get three size lines on either side of the chosen size. I used those to increase to size 10 at the hips. I am happy to report that the sizing is spot on, particularly for the all-important cup. The instructions suggested lengthening the body if you're taller than 5'6. I should have listened to that advice and will do it next time.


I had chosen a denim-look lycra from my (ridiculously large) lycra stash. Then, at the last minute, I changed my mind and used this coral reef print instead. I was very careful not to place a sea anemone at the lower, centre front but then, despite careful planning, I realised there were fish swimming out of my backside!


The whole time I was making this I marvelled at all the work Heather Lou has put into this pattern. I can't imagine how she worked out all that sizing and the instructions are fantastic. This was a very straightforward garment to make, despite it looking quite complicated.


I also love the design. There is enough coverage to feel comfortable and enough va va voom to still look the part amongst the beach fashionistas. Well, I felt like there was until I saw this photo. I should have given it a good hitch up beforehand. Damn not lengthening the body on my pattern!


I cannot find fault with this pattern. It's a winner and I'm super happy with my coral reef duds.


Thursday 19 February 2015

Papercut Patterns - Soma bikini becomes a tankini


OK. Deep breath. Swimwear pictures.

Try to concentrate mostly on the beautiful scenery of Eagle Bay, Western Australia.


I say 'deep breath' because my last swimwear blog post was one of my most popular. However, I suspect that it was mostly clicked on by frustrated men, hoping that 'Bombshell in Borneo' was going to offer them more than a middle aged sewer posing in a pair of bathers that used more fabric than the average set of protective workwear. Snigger - serves them right!

Anyway, this is my new set, the Soma Swimsuit by Papercut Patterns.

Soma Swimsuit from the Papercut website

Soma Swimsuit - I made the top pictured in the middle and the pants pictured on the left.

As you can see, the pattern is for a bikini. I wanted a bit more coverage, so drew up a tankini piece to be sewn directly to the lower edge of the bikini top in place of the edging elastic. I made the top edge of the tankini piece just wider than the lower edge of the bikini top, then drew a line outwards to the width I wanted at the hips. I curved the sides up very slightly at the hemline but, looking at these pictures, I think it would look better with a bit more of an upwards curve at the sides. The bikini pants are made according to the higher cut version in the pattern and are very comfortable. I will be making more of these to wear as underwear.


The bathers are made with navy lycra with a geometric jacquard pattern in the fabric, bought from a swimwear designer. The top and pants are lined with nude stretch lining. The tankini add-on is unlined. The straps are made using fold-over elastic and I added some bling, also from the swimwear designer.


The seam lines in the top are interesting and the fit is good and fairly supportive. This is probably because the top is actually quite bra-like at the front and back.


This was my first time using a pattern from Papercut. I forked out for the paper version and yes, the packaging is as lovely as everyone says. The instructions were excellent and very clear. I liked that they described how to layer the outer and lining pieces before sewing so that the seams were encased and not visible from the inside. My only tip would be to pull the upper elastic quite taut across the front and sides of the bikini top. I stretched it only slightly as instructed and had to redo it due to gaping. Otherwise, this is straightforward to make.


And yes, after gazing at that beautiful water, I did eventually venture in to give the tankini a road test.


The bathers performed perfectly and were really comfortable in the water. I much prefer wearing these to my Bombshell pair as I don't like the feeling of all the ruched fabric around me. I was constantly adjusting the gathers on the Bombshell, which detracted from the effortless chic look I was chasing, not to mention almost making me spill my cocktail. No, these are definitely an improvement and I will certainly be making them again.


 I leave you with a phone picture of an enormous stingray, approximately 1 metre across, that cruised through the water I had only just vacated. The risks I take for my blog pictures!

1m stingray (smudge at bottom of picture), shoreline, Eagle Bay.

Monday 28 July 2014

Bombshell in Borneo


I was very keen to see what all the fuss was about with this pattern which is, of course, the Bombshell Swimsuit by Closet Case Files. I have made swimwear before and not only enjoyed it, but ended up with bathers that I love. It was time to do it again. I found this brown lycra with white and gold hearts in my stash from a lycra buying spree when a swimwear manufacturer had a moving sale some time ago. I went a bit crazy buying more lycra than I could ever possibly use - so unlike me!


I was all set to start making View B (which I love) with the triangular shaped bodice pieces, and was just checking the sewalong for instructions, when the ever helpful LJ, aged 11, wandered over. Not having learned from past experience, I casually asked him which style he preferred. "Definitely this one" was the emphatic response as he pointed to View A. The wind nudged slightly out of my sails. "Oh why?" I asked. "The other one is too...boobalicious" said LJ. "Oh ha ha" said I. "One day you will appreciate boobalicious". "I already do" came the reply. "Just not on you".

Sails completely deflated, I printed off View A.


Then, just to taunt him, I highlighted my cleavage with gold lycra.


And wore my Fabulous Hat.

I mostly used the sewalong instructions to make my Bombshell. The instructions were great, but I didn't enjoy making this much at all. All those gathers and layers made for a cumbersome sewing experience that looked as if it was going to be a massive fail almost until the end of the process.

One reason for this was that, as suggested by the sewalong, I added three inches to the length of the inner layer (which meant adding 4.75 inches to the gathered layer) to make this fit my height of around 5'10". I even did a muslin of the inner layer and it seemed ok. It was not ok. It was and still is far too long in the body and when held up looks more like a knee-length dress than a pair of bathers. You can see in the photos that I have tried to distribute this length evenly from below the bust to the hips, but the gathers just want to congregate at my waist, accentuating my tummy in an unflattering way and looking uneven and belt-like in the back. 


The fit otherwise is fine and I will use the unaltered bodice piece if I make this again. I made size 12, which was one size up from my measurements, after hearing that the bathers can be difficult to get into. I think this was the right size for me.


 So, in summary, aside from the trials and tribulations in sewing these bathers, the too-long bodice causing uneven ruching and the lack of boobaliciousness, I am quite pleased with my Bombshell. It isn't as sleek and comfortable in the water as my last pair of bathers, but I think it has potential in the looks department. Actually, after looking at these pictures again, I think I will make another...and next time it will be View B for Boobalicious. So there LJ!

Pictures taken on Pulau Gaya Island, Borneo. We had just seen a monkey in the surrounding forest and, taking heed of the 'Beware Monkeys' sign, hightailed it back to the beach before it could do anything dangerous!
 

Tuesday 22 January 2013

Jacket rashies for the beach (Jalie 2795)


We have just returned from a five-day camping trip to the idyllic, beachside town of Dunsborough (approx. three hours drive south of Perth, Western Australia). I knew we would spend most of our time on the beach while we were there, so I wanted to make new 'rashies' (rash vests/sun shirts) for the boys, with hoods to keep their necks protected from the sun.

While flicking through my patterns and pondering how to attach a hood to the standard t-shirt style rashie (like this one I made for LJ, with matching shorts and hat), I came across my trusty Jalie 2795 jacket pattern. The more I thought about it, the more it seemed to be a good idea. The front zip would make it so much easier to get the rashie on and off (usually after swimming, I am faced with a wet child shouting "help!", their arms and head trapped by the too-tight neck of the inside-out rashie. Many's the time someone has almost lost an ear!). Also, this pattern is slim-fitting for swimming and the hood is exactly what I was looking for.


So it was decided. Another two Jalie 2795 jackets coming up quick-smart for the holiday. 

I have a large stash of lycra thanks to a fantastic sale at a local swimwear manufacturer late last year. The boys chose the aquarium print lycra fabric and I chose the black and blue lycra to go with it. I switched the positioning of the black and blue on each jacket so I would be able to quickly tell them apart as I dug around in the swimming bag while running after the boys reminding them to put their rashies on!


I followed the pattern exactly except that I left the pockets off as I thought they'd just get full of sand. I went up two sizes from the measurements of each of my sons. This worked well for JJ (aged 7), but LJ (aged 9) could have done with some extra length in the body and sleeves of the jacket. He is a beanpole. The measurements on the pattern are for a girl (here is a Jalie 2795 jacket I made for a seven-year old girl) and I think the different proportions of an older boy need to be taken into account when deciding on sizing. I'd say the best rule would be 'if in doubt, go up another size or two'!


Before I made these, I toyed with the idea of adding a sun visor to the hood, but I decided against it in case it hampered the swimming. Wearing a cap inside the hood works well on dry land. 

I cut both jackets out together and sewed them one at a time, so as not to mix up the numerous pattern pieces. Once cut out, they took around two hours each to sew and were ready in time for the trip.

These jackets were invaluable on the holiday. They were great for keeping the sun off, but the boys also used them, once dry, for warmth once the cooler evenings arrived. They were light and easy to carry around, looked good and, most importantly, easy to get on and off. Hooray!

Thursday 3 January 2013

More Christmas sewing

I was kept very busy before Christmas making presents for my family. I have already detailed the tennis outfit I made for my niece using Jalie patterns 2795 and 3023. 
I also made...

A 'rashie' (lycra swim/surf/sun top) for Mr Meggipeg. His old one was completely stretched out of shape, but I managed to trace a pattern from it and make him a nice new version. He was most pleased and has worn it several times already, some even to go swimming ;)

I rarely convert my overlocker (a Bernina 2500DCET) to a coverstitch machine, but I did for this project and the hem turned out really well. I should do it more often as I forget what to do each time and always spend ages consulting the instructions! This hem was done with a three-thread coverstitch.


For reasons that now escape me, I chose a three-step zig-zag on my sewing machine to finish the sleeves. Maybe I'd already forgotten the coverstich instructions!


My sister requested some cotton lycra shorts with a stretchy waistband to keep cool and comfortable during our hot summer. I made these for her. They look better on!


To hide the stitching on the turn-ups, I sewed a strip of fabric over the inside seam, just at the bottom where it would show.


Another request was this stretch mesh swimming wrap for my Mum. I surreptitiously traced one she already had and liked. It is basically a large rectangle with two little sticky-out tabs for the ties.


I finished the edges by overlocking the edge, then folding and stitching a 1cm hem with zig-zag.


...and for the littlest member of our family, my 8 month-old niece, I made a swimming outfit from this cute polka dot lycra from Textile Traders. The top is made using Kwik Sew 2596 (also used here for a baby t-shirt) and the pants are made using the tutorial and free pattern by Dana from Made. This is a great pattern if you are looking for a baby gift.


I added ruffles to the back of my version using strips of pink lycra. I also finished the sleeves with the same pink fabric, just folded in half and stretched slightly as it was sewn on (as for fold-over elastic).


Awwww, so cute!

Finally, I made a hat to go with the swimming outfit and some very light pants to protect that delicate skin from the sun when she is riding in the pram (both using Butterick 3846 in size M). The pants are made with printed muslin from Textile Traders and finished with more pink lycra used as fold-over elastic.


The hat turned out a little large so I added a button and elastic loop to keep it out of her eyes until she gets a bit bigger!


Modelling the pram pants!


Phew! I'm looking forward to some me-sewing now :) Fortunately my sister gave me 'Drape Drape' and 'Drape Drape 3' for Christmas (I already have No. 2, also from my sister for my last birthday - she knows me well). Fire up the sewing machine. Yee ha! (or whatever 'Yee ha' is in Japanese).


LinkWithin

Related Posts Plugin for WordPress, Blogger...