Showing posts with label Swimwear. Show all posts

Wednesday 19 December 2012

New bathers revealed


You may remember my previous blog post where I pondered swimwear for this summer and which styles might be most flattering for me. I eventually settled on this design by Jets. I liked everything about it apart from the white bands around the legs, so I omitted these.

Source: www.jets.com.au
I made my design using a combination of resources. The top, bust area was designed using the Pattern School website, which has a wealth of useful information on swimwear design. Be prepared to read and click for quite a while though! I used this information to design a halter top that would fit my measurements. I then cut it so I could add in the white bands around the neckline.

Source: www.patternschool.com


The bottom part of the bathers was designed using my Jalie tankini pattern 3023.


 I used an old J&L bathers pattern and some RTW (ready to wear) bathers to work out the rest! There was a LOT of planning involved, but it was quite absorbing in a way. Now it's done, I should be able to design future bathers with minimal changes to the basic design blocks.


I began by making a muslin with some lycra offcuts.


Much time was spent in front of the mirror pulling and adjusting and trying to see the back! Once I'd sorted out the fitting issues, which mainly consisted of the fit at the sides of the chest and the back straps, I got cutting into the navy blue and off-white lycra for the real thing. I used a buckle for the front and secured it with invisible hand stitches.


I fiddled about with the back for ages, trying different ways of getting the straps to look attractive and placing them so they didn't cause any pulling or wrinkling in the main part of the bathers. Eventually I settled on this design, which is a variation on a cross-over back using a ring. I just kind of arrived at this after much trial and error and it seems to work well.


I lined the front completely with blue fabric. I used swimwear elastic, held in place with a triple zig-zag stitch for the openings and I lined the bra cups with padded cups designed for swimwear use.


And here it is in action!
I have to say that this was quite an undertaking, but I worked through it with baby steps and it ended up being a very satisfying project. I saved well over $100 on the cost too. I am over the moon with the outcome and felt rather proud strutting up and down the dog beach last weekend :)

Tuesday 13 November 2012

Pondering swimwear


With summer rapidly approaching here in Perth, Australia, my thoughts have turned to bathers and, more specifically, what am I going to wear in the water this year? Oh, the enormity of the decisions I must make!

Last year I made myself a tankini using Jalie pattern 3023. This was wearable, but I was never over the moon with myself in it. While I like the tankini, I don't think the design is terribly flattering on me. So, over the last few weeks, I have been pondering swimwear designs and patterns to try to find one that I could make which would suit me.

I have often admired the designs of Aussie company Jets by Jessika Allen. I think many of their styles are stylish and classy and suitable for women (like me) who want to hide certain flaws but still want to look attractive rather than grandma-ish. Their website is a treasure trove of such styles, actually 163 different one-pieces alone last time I looked, and I spent some time selecting styles that I thought would suit my body type. I usually swim in very casual surroundings with the children, so that was also a consideration.

I eventually narrowed it down to these:
source: www.jets.com.au
My thoughts went along these lines...

Overall appearance: I like styles that draw the attention upwards, towards the bust and face and away from the tummy area. I think that having detailing around the top of the bathers (Styles 1, 3, 5 and 9) helps to do this and I really like the combination of plain navy or black accented with white detailing.

Bust: I quickly decided against Style 1 as it does little to enhance the bust. All the other styles pictured here have an empire seam under the bust which is much more flattering. So, with the empire line in place, the shape of the bust coverage needs consideration. There are two main shapes in these pictures - a tall triangular shape (top and bottom rows) and a horizontal figure of 8 shape (middle row). I like both of these, but settled on the tall triangular shape as it looks easier to make ;) The figure of 8 shapes seen here would probably require moulded cups to really look right and I don't want to bite off more than I can chew as a novice swimwear designer!

Legs: I prefer more of a low cut leg for me, much like the leg shape on my Jalie tankini pants. The bands on the legs on Style 3 look nice from the front, but draw too much attention to the bum area for my liking at the back (see below), so I will stick with a basic, low-cut leg shape.

My overall favourite of these designs is Style 3 in navy with white detailing exactly as pictured above. I love everything about it except the banded legs. The little tie detail and the white bands at the neckline keep the eye away from the tummy, the bust is accentuated but well covered and the overall appearance is stylish, without looking too fancy or try-hard.

There was just one more decision to make...


...the back!

My favourite style (Style 1 above), has a rather boring back. I much prefer a style which is scooped a bit lower down the back, like Style 2 above. The wide straps on this style are also an interesting feature. I have decided against a halter-neck style, purely for comfort reasons, so it's looking like a scooped back with cross-over straps - if I can make it work with the front design I've chosen.

So, basically I want the front like Style 3 (top photo), without the bands on the legs, and the back like Style 2 (above).

Great. 

Now what? OMG I need to actually design this! Never fear, I have thought about this as well. I have three things at my disposal:

- my Jalie 3023 tankini pattern
- an old J&L bathers pattern I found at the op shop
- a rather incredible website www.patternschool.com that details how to draft swimwear to exactly fit a set of body measurements.

As I write this, I am immersed in tracing paper and scraps of lycra (sounds a bit saucy!) as I draft a pattern and begin to make a muslin for my final, dream pair of bathers. I will let you in on this design process over the next few days. 
 

Wednesday 1 February 2012

Holiday sewing - a Jalie tankini for moi


I publish this post with much trepidation, after all, posting pics of myself in my bathers on the internet is not something I would normally do. I once gave Mr Meggipeg a dressing down (ha ha) for putting a picture of me in my togs on facebook and insisted he remove it. I am trying to convince myself that this big reveal is done in the name of blogging and sewing and is somehow therefore ok. Sort of.

So here we go. While Mr M was in Canada recently delivering his Mum back home after her visit with us (explanation here), I ordered some Jalie patterns for him to bring home. Jalie are a Canadian company so I saved heaps on postage, and of course when I saw that if you bought three patterns you could get one free, well I just had to choose four! More on the others as I make them. The first pattern I tackled was the tankini. Find the pattern here. To see the Jalie jeans I've made click here and here.


I began by making a muslin with some lycra I had in my stash. I blended the top pattern to a larger size at the waist and below as I didn't want it too close fitting around the tummy. This is what I ended up with:


While the general style was quite nice, there were a couple of things (apart from the fabric) I wasn't thrilled about. The panel across the chest and the top of the waistband went wavy with the topstitching which made them gape. This is a three-step zig-zag.


I didn't add the elastic to the bottom of the waistband as it was tight enough without it. The pants were a nice style but I prefer a slightly higher waist to cover the wobbly tummy area (!) also the elastic made a bulge in my upper thigh. Any additional bulges are definitely not required.


I quite liked the finish on the leg openings and the drawstrings at the sides were a nice feature.


So I went on and made another pair in a combination of turquoise and brown lycra, also from the stash. I fiddled about with the pants to try and make the waist a bit higher but I wasn't terribly happy with the fit of the waistband in the end. Again it gaped a bit and created a line which showed through the top. I think the next time I make it I will just fold over the waistband, rather than cutting it out as two sections to sew together.


I made another alteration to the pants, which was to add bands on lycra to the leg openings instead of elastic. This was more comfortable and flattering to wear as it didn't cut into the legs at all. These were attached with the serger and topstitched with regular zig-zag.


Here is the top. I eliminated the topstitching along the top of the chest panel, but it is still a bit gapey. Overall I'm quite pleased with it. I didn't put any drawstrings on this version. The hem was finished with a twin needle and the straps with zig-zag. This looked fine, but I heard threads snapping as I put it on. Ideally it would be finished with a proper cover stitch for max stretchiness


You can skip the next few pictures if you like ;)


I think the next pair I make will be improved by the elimination of topstitching on the chest panel, making the waistband out of one piece of fabric folded over and choosing some really lovely fabric, maybe a nautical stripe. I'll let you know when I've done them, but I'm not sure if I'll be brave enough to post any more pictures!

Feel free to ask me any questions about these or (even better) send me some tips.

These pictures were taken in the lovely town of Dunsborough in south west Western Australia where we had a summer camping trip.

Sunday 20 February 2011

The BOY - Sun protection


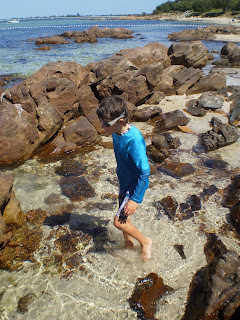
I loved designing and making the girly swimwear (previous post) and it was time for my own boys to get in the swim :)  I used some good quality camo lycra in black, white and greys with some nice thick turquoise lycra (both bought on sale). I made knee-length shorts from the camo and a long-sleeved rashie with the blue. I added a camo neck to the rashie. I then made a legionnaire-style swim hat with both fabrics. I copied an old cap we had for the design and added the fabric on the back for neck protection. I cut off the brim of the old cap and covered it in blue lycra for the swim cap. The cap could do with some tweaking to get the fit right, but overall is great for covering up that lovely skin. These sets came in so handy on our recent camping trip to Dunsborough, south of Perth. These pictures are taken in Dunsborough near Busselton.


Friday 18 February 2011

Another scorcher - sun protection for kids

The summer in Perth this year is just going on and on and it's really not that easy to find children's swimwear that offers good protection from the sun. If you do find anything, it is either super expensive or not terribly attractive. With this in mind I designed a girly rashie (top) and longer shorts for my niece.


I made it from some lycra I found on the discount table at Textile Traders last year, so the whole thing only cost me about $5 to make. I lengthened and changed the top to make it more of a tunic/short dress style and added a ruffle around the bottom, long sleeves and a polo neck. The shorts are a simple pattern using only two pieces of fabric (no side seams) with an elasticated waist and zig-zagged hem. Unfortunately I made the neckline a bit too tight, but otherwise it is very practical and very sweet. My niece looks so gorgeous in it. Maybe I'll make a matching swim hat too.

LinkWithin

Related Posts Plugin for WordPress, Blogger...