Showing posts with label Applique. Show all posts

Sunday 8 April 2018

Alabama Chanin inspired t-shirt


Last year, before our epic family road trip to the outback of Western Australia, I was looking for projects that I could take in the car to pass the time. Scrolling through the Alabama Chanin website, I came across a t-shirt with hand-beaded text on the front.
Alabama Chanin tee from their website
I decided to make my own version using the free Plantain tee pattern and the word 'Create'. I cut out the pattern from some blue knit fabric and stencilled the word across the front using a handmade stencil, silver acrylic paint and a sponge brush. Then I gathered together some beads, sequins, needles and thread and stuffed everything in a bag for the trip.


I'm not brilliant at looking down while I'm in the car as it makes me car sick, not to mention wanting to keep an eye out for kangaroos etc on the road, but I did manage to get a bit of beading done while we were travelling. After the trip, I carried on over the school holidays at the local theme park.


Finally it was done. I stitched the pattern pieces together by hand and embroidered a decorative stitch down the side seams, shoulder seam and on the neck binding using navy or pink embroidery thread.


Some close-ups:


I love this t-shirt with it's rustic, handmade look and added blingy beads. I wish I had more time to make all the Alabama Chanin things. I love them all!

I'm also wearing my Sasha trousers in these pictures.


Friday 1 May 2015

Jasper Sweater crossed with Alabama Chanin with some natural dyeing thrown in


I had agreed with myself not to buy any more patterns for a while and then, what do I see, but this gorgeous Jasper Sweater by Paprika Patterns. Well, I couldn't help myself and, what's more, I don't regret it!


The main fabric I used for this was hemp/cotton knit, bought on a recent excursion to the Margaret River Hemp Co. in Fremantle with the One Year One Outfit (OYOO) Perth crew. This fabric has a lovely natural colour and feel. Unfortunately it doesn't pass muster for the OYOO challenge as poorly thought out local laws don't allow hemp to be grown here. I hope this changes as hemp is fantastically sustainable and has a very low environmental impact. The fabric is also really nice and smoking it doesn't get you high, or so I'm told. This one metre length cost me $12.95. It wasn't quite enough for the Jasper, especially after some pre-washing shrinkage, so I hunted around and found a piece of cotton knit fabric that I had dyed with Eucalyptus leaves during a natural dyeing course some time ago.

During the dyeing process the fabric was folded, clamped with popsticks (from ice creams) then dyed, Shibori style, in a pot of boiling eucalyptus leaves (species unknown). I forgot to take a photo of the uncut piece, but it was similar to this onion skin-dyed sample I made on the same day:


I used the dyed fabric for the collar, the welt pockets and as a backing for some Alabama Chanin style reverse appliqué on the back of the jumper. I used ribbing fabric for the cuffs and bottom band.


I used the Angie's Fall stencil from the Alabama Chanin website. When I last looked it was free to download, but it now costs $8. I traced a flower from my computer screen at the size I wanted, cut the stencil, then placed it here and there on my back pattern piece. I used watered-down acrylic paint applied with a sponge brush to stencil the pattern on the fabric. This is a quick method that I've used before with good results.


I took the back piece on holiday with me recently and stitched away in a very relaxed manner with coffee or local wine to keep me going. Lovely! I used a double strand of brown thread for the stitches. It was fun to cut away the appliqué and see the Shibori pattern emerging underneath.


Once the back was done and I was home again, I made up the jumper. I was impressed with the drafting and the instructions and I'm pleased with the fit.


The epaulet on the collar is a nice touch. I found a handmade clay button in my button drawer that was perfect. I can't remember where that came from, but possibly my Mum made it during her pottery spree.

You can see the eucalyptus dyed fabric on the collar in these pictures. I'm hoping it doesn't look like I spilt my breakfast.


So, a new pattern, unfamiliar hemp fabric, natural dyeing and reverse appliqué. So much creative fun packed into one garment! Sewing is the best.

Friday 17 May 2013

A cosy jacket for my mum (Burdastyle 12/2012, #140)


My gorgeous Mum turned 70 last week! I know, neither of us can believe it. She certainly doesn't look her age.

Anyway, as usual I headed to the sewing machine to make the majority of her presents. This jacket, Burdastyle Magazine 12/2012, Jacket #140, was a request Mum made while she was flipping through my magazine. She wanted something warm that she could use as a jacket and a dressing gown when she was on holiday in cooler places than our hometown of Perth.

Burdastyle Transform Jacket
The pattern suggested 'fulled loden' fabric should be used for this jacket. I have been informed by a helpful reader that this is quite readily available in Germany, but is difficult to find here. It's also apparently a bit scratchy to wear. I wanted something cosy and soft, so I chose this grey polar fleece.


The majority of the vertical seams are sewn wrong sides together so the seam allowance is exposed on the outside as a feature. I carefully trimmed the seam allowances after stitching so they would be neat on the outside. The edges of the hood, hem, pockets and cuffs are left raw. I finished these with pale grey grosgrain ribbon, which was a nice detail.

I like the way the cuffs fold right back.


I made the jacket a size smaller than I would usually wear as my Mum is a little squirt. The jacket is quite snug on me, but fits her well.


The hood is very roomy and forms the collar when it's folded down.


This jacket is super warm. I nearly expired taking these photos!

As well as the jacket, I made this tea towel. It has hand prints of all the grandchildren, done in fabric paint. I used free motion sewing to write the names of the children and to applique '2013' on to the bottom corner. I made bias tape to bind the edges.

This basic idea for this came from 'Make it Perfect', but I changed it a bit.


There were a couple of other 'bought' presents. But I think mum appreciated these - and the hand made card and birthday cake :)

Saturday 29 December 2012

Anyone for tennis?


I did lots of sewing for Christmas presents this year, mostly for my two sweet, little nieces. The biggest project was this tennis outfit, which was made according to stringent requirements stipulated by Miss 7. She wanted a college-style jacket with a zip and short sleeves and the number '64' on the back.

I immediately remembered that Andrea (and her daughter) of Fabric Epiphanies had used Jalie pattern 2795 to make a boys college jacket. I also have this pattern, so that was my starting point. I decided to make a little matching skirt using Jalie pattern 3023.


 I made the jacket first using white stretch mesh fabric for the main jacket with contrasting pink knit fabric for the waistband, collar, cuffs and pocket welts.

Before sewing the jacket together I made the number applique for the back. I searched the internet for 'college fonts' and found one I liked. I couldn't get it to install for some reason, so I copied the font picture into Word, cropped and resized it, then printed it out. I traced the large outer number on to the glue side of some fusible interfacing and fused it to a scrap of pink fabric. I pinned it to the back jacket piece and sewed it on with a narrow zig-zag stitch.  I repeated the process for the inner number with white fabric and sewed it to the pink number.


I made the jacket according to the pattern instructions in a size J. I chose the size based on exact measurements. If I was making this again I would go up a size or two as it just fits now with no growing room! The upper/top sleeve is made from two pattern pieces, one finishing at short sleeve length and one to make a long sleeve. I just used the piece that finished at short sleeve length along with the the two lower sleeve pieces, which I shortened accordingly. I finished it off with a cuff of pink fabric.

The collar was made with a long strip of pink fabric that I tapered at the front edges to get the 'college' look. This led to a slight problem with the upper zip edge, which would normally be hidden inside the jacket collar. I overcame this by adding a scrap of fabric to each side of the top of the zip. The process took a bit of trial and error so I made myself some instructions in case I ever needed to do this again (see below).

The zip was attached to the jacket leaving the last 3cm unstitched. I cut two pieces of knit fabric 6x2cm, folded each in half and stitched about 0.5cm from the long edge. This was turned right side out and the corner placed over the upper edge and teeth of the zip. I used a narrow zig-zag stitch to attach the fabric to the zip, then trimmed off the excess, sewed in the zip and topstitched. This gave quite a neat finish.

I added a little heart charm for extra girliness.


For the skirt, I used the Jalie 3023 skirt pattern without the sewn-in pants. I used a size K this time, one size up from the measurements I had, but again, this only just fits! I made the waistband from white cotton lycra as the mesh did not have enough stretch. I added piping in pink and a smaller number applique done as described above.


This outfit took a lot of time and I agonised over the size before Christmas day. I had my 7 year-old son try it on numerous times to check the fit (he is a very tolerant child!) and I almost made another in a bigger size, but my sewing machine suddenly died on Christmas Eve, so that was the end of that idea!

I watched little Miss 7 open her present with bated breath. Would she like it? Would it fit? Would she wear it?

She loved it.

Her beautiful, sparkly Christmas dress was cast aside as she rushed to put on her new outfit. She wore it all day and, by all accounts, has worn it every day since. I don't know who's happier, she or I :)


Oh, and the other good news is that my sewing machine has been fixed by the amazing man at Cockburn Sewing Centre. He has performed miracles on my machine and I highly recommend him to anyone local to Perth. Life is good for Auntie Meggie :)

PS: this outfit has been entered in the 'Sewing for children' competition on 'Sewing Pattern Review'. It would be great if you could vote :)

Monday 3 December 2012

Can you make me 23 charleston dresses in 48 hours???


The doorbell rang on Friday morning and in came my dance teacher laden with sequin fabric and a last minute request for the concert on Sunday! Could I make 20s style dresses for the teens, just 23 of them!!! Luckily she'd bought the dresses and I just had to sew on the fringes...except that there weren't actually any fringes, I had to create those too  :-o

After making the 27 circle skirts for the younger girls in the concert, I knew I had to work FAST to get these done. I took some photos along the way to describe what I did, just in case anyone else is in need of a quick and dirty way of mass producing flapper dresses!


Ideally, these dresses would have been made with ready-made fringing, sewn on in rows. Unfortunately, because we needed so many dresses, the shop didn't have enough fringing and the dance teacher bought this gorgeous sequinned fabric instead. Having to cut the fringing added significant time to the making of these, but they did look fantastic when they were done.

First I cut the fabric across the rows of sequins into rows. Each row was 17cm long and went the width of the fabric (150cm). I needed approximately 1.5 rows per dress. The dresses were simple, black, stretchy dresses in a fitted, t-shirt style.

Cutting the strips of fabric
I laid out each dress and marked with dressmaker's chalk where the strips of fabric needed to be stitched on. I marked the first line just below the underarms and neckline and the other rows in 16cm  increments down the dress. This meant that the 17cm strips would overlap slightly down the dress and hang just below the hemline at the bottom.


Then I got stitching! Luckily the mesh backing of the sequin fabric was stretchy so I could just sew it on to the stretchy dresses using a simple zig-zag stitch without any stretching adjustment. If you were sewing non-stretch trim to stretchy dresses, you would need to stretch the dress as the trim was being sewn on to it. The needle mostly went through the sequins without any trouble and I only broke two needles in making all the dresses - not bad.


Here is a dress with the rows of fabric stitched in place. When I reached the end of a strip of fabric, I just butted the next strip up to it and carried on sewing (see join in second row from top). I only did the front of the dresses and left the backs plain.


Here is a close-up to show how the rows overlapped.


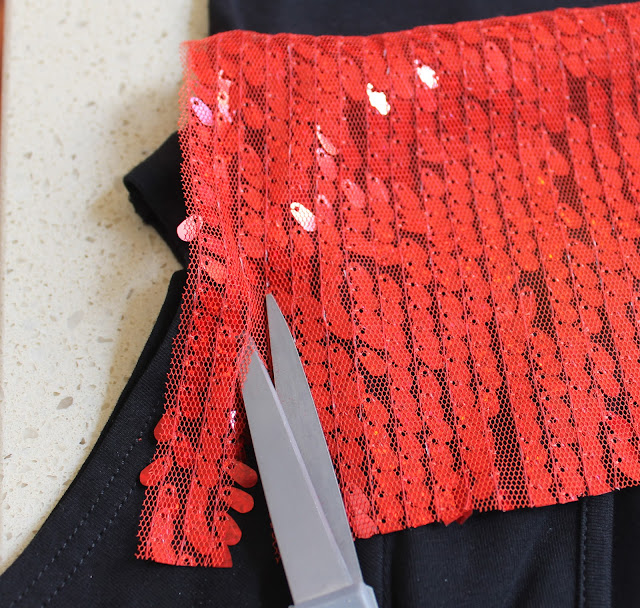
Next the cutting. At this point it was necessary to call in the volunteers. There is no way I could have got these dresses done in two days without helpers to cut the fringes as it was taking around 45 minutes per dress to cut it properly. What we did was to cut along every third gap between the rows of stitching that were holding the sequins in place. We avoided cutting the sequins or the stitching holding them on so as to maximise the number of sequins left on the fabric, rather than on the floor! However, one of my lovely helpers took more of a shortcut and didn't worry too much about these rules. She ended up getting a lot more dresses done in the time and I don't think you could really see the difference in the end ;)


Thank you so much to my wonderful helpers. Between us we performed a miracle and got the dresses done!


Here are some of the gorgeous girls backstage ready to perform. I am told that the dresses looked incredible under the stage lights - Yay!


LinkWithin

Related Posts Plugin for WordPress, Blogger...