Showing posts with label Costumes. Show all posts

Saturday 10 October 2015

I'm late, I'm late!


My eldest son was recently invited to the 13th birthday party of a girl at school. It was to be a Mad Hatter's Tea Party and every guest was instructed to dress as a particular Alice in Wonderland character. Mr 12 was assigned 'The White Rabbit'. 


If I was feeling less than excited about conjuring up a white rabbit costume, it didn't last long. I heard a sentence from my son that I have waited twelve years to hear: "Mum, can you teach me how to sew so I can make a white rabbit costume?" Music to my ears!


The first step was a visit to Remida creative reuse centre in Perth to gather supplies. I took both my boys and their friend since it was school holidays. I love seeing their inspiration being fired up as they imagine what they could make from all the goodies there. The problem is holding them back so we can fit it all in the car!

We managed to find everything we needed for the costume apart from the ears, glasses and red binding for the tunic, all of which we had at home. That means this costume was essentially free, apart from my yearly membership fee of course.


The tunic is made from strong, white nylon fabric. We folded it over, cut the top a bit wider than my son's shoulders and tapered out slightly to just below hip level. We cut another piece the same and made a hole through both pieces just big enough to get his head through. These were sewn together (by my son) at the neckline, then one piece pulled through to give a clean finish. We used wadding at the front between the two layers. I sewed the cross on the front and bound all the edges with red lycra binding from my stash.


While I was doing that, my son used a heart template to trace and cut out the small hearts from red sticky paper. The larger heart was traced on the computer screen from one we found on the internet. The paper wasn't sticking strongly enough to the fabric so I stitched around each one to hold it in place. The sides of the tunic were held together with a small line of stitching.


The ruffle was made from four long strips of net curtaining, approximately 15cm wide. We cut a piece of 1cm wide elastic a bit longer than my son's neck measurement. The net strips were placed on top of one another, the elastic stretched to maximum capacity and sewn with zig-zag down the centre of the strips. We then joined the ends of the ruffle together and it could be easily put on over the head.


Next the clock. We used a piece of plastic poster board and drew two circles to cut out with a scalpel. The top and back of the clock was covered in gold stickers. I cut the numbers freehand from black stickers. Red arrows for hands and done!


We were both thrilled with the way the costume turned out and we had such a nice time together sewing, sticking, chatting and laughing. The party was last night. All the characters looked fantastic and it was reportedly "The best party ever and no one believed we'd made the costume!" Success all round I'd say.


Monday 3 December 2012

Can you make me 23 charleston dresses in 48 hours???


The doorbell rang on Friday morning and in came my dance teacher laden with sequin fabric and a last minute request for the concert on Sunday! Could I make 20s style dresses for the teens, just 23 of them!!! Luckily she'd bought the dresses and I just had to sew on the fringes...except that there weren't actually any fringes, I had to create those too  :-o

After making the 27 circle skirts for the younger girls in the concert, I knew I had to work FAST to get these done. I took some photos along the way to describe what I did, just in case anyone else is in need of a quick and dirty way of mass producing flapper dresses!


Ideally, these dresses would have been made with ready-made fringing, sewn on in rows. Unfortunately, because we needed so many dresses, the shop didn't have enough fringing and the dance teacher bought this gorgeous sequinned fabric instead. Having to cut the fringing added significant time to the making of these, but they did look fantastic when they were done.

First I cut the fabric across the rows of sequins into rows. Each row was 17cm long and went the width of the fabric (150cm). I needed approximately 1.5 rows per dress. The dresses were simple, black, stretchy dresses in a fitted, t-shirt style.

Cutting the strips of fabric
I laid out each dress and marked with dressmaker's chalk where the strips of fabric needed to be stitched on. I marked the first line just below the underarms and neckline and the other rows in 16cm  increments down the dress. This meant that the 17cm strips would overlap slightly down the dress and hang just below the hemline at the bottom.


Then I got stitching! Luckily the mesh backing of the sequin fabric was stretchy so I could just sew it on to the stretchy dresses using a simple zig-zag stitch without any stretching adjustment. If you were sewing non-stretch trim to stretchy dresses, you would need to stretch the dress as the trim was being sewn on to it. The needle mostly went through the sequins without any trouble and I only broke two needles in making all the dresses - not bad.


Here is a dress with the rows of fabric stitched in place. When I reached the end of a strip of fabric, I just butted the next strip up to it and carried on sewing (see join in second row from top). I only did the front of the dresses and left the backs plain.


Here is a close-up to show how the rows overlapped.


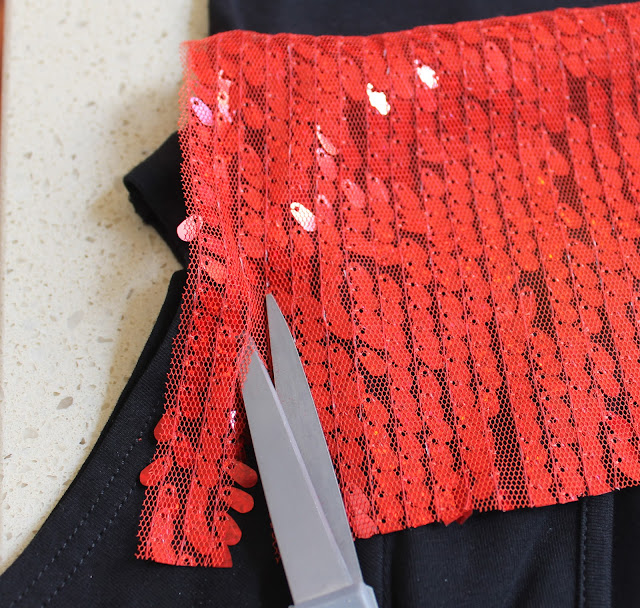
Next the cutting. At this point it was necessary to call in the volunteers. There is no way I could have got these dresses done in two days without helpers to cut the fringes as it was taking around 45 minutes per dress to cut it properly. What we did was to cut along every third gap between the rows of stitching that were holding the sequins in place. We avoided cutting the sequins or the stitching holding them on so as to maximise the number of sequins left on the fabric, rather than on the floor! However, one of my lovely helpers took more of a shortcut and didn't worry too much about these rules. She ended up getting a lot more dresses done in the time and I don't think you could really see the difference in the end ;)


Thank you so much to my wonderful helpers. Between us we performed a miracle and got the dresses done!


Here are some of the gorgeous girls backstage ready to perform. I am told that the dresses looked incredible under the stage lights - Yay!


Tuesday 20 November 2012

27 Dresses...well skirts actually


My sons' hip hop dance class consists of three boys (including my two) and 27 girls!

One of their dances for the end-of-year concert has a 50s theme and I was enlisted to make circle skirts for the girls. I did volunteer my sewing skills, but the dance teacher was rather apologetic when she told me how many skirts she needed!

I needed no excuse to go to the fabric shop for supplies. I bought 30m of polka dot fabric in two colours - white with black spots and black with white spots, 20m of black elastic and some overlocker thread. I had planned to make my own pattern, but then I found a pattern for girls' circle skirts (Simplicity 7401) in the op shop for 20c. Must have been fate!


 I modified the pattern a bit and made three sizes (6, 8 and 10 years) on sturdy brown paper. Then I got cutting and sewing.

Here is a finished skirt.


I wanted the skirts to be as quick and simple to make as possible as there were so many. They needed to look good on stage, but it was fine if they were a little rough on the inside! The pattern suggested attaching a separate casing for the elastic waistband, but I made them with an exposed elastic waistband instead.


The waistband was attached by dividing the elastic and the skirt waist into quarters, stretching each elastic quarter to fit each skirt quarter and attaching the skirt with a simple zig-zag stitch. This can be seen more easily from the inside. Of course, simple ribbon size labels were a must.


 After a while, I got a bit of a production line happening where I grouped the skirts into sizes then did all the side seams, followed by the elastic waistbands. Once they were all made, I changed the overlocker to rolled hem mode and went for it. Metres and metres of rolled hems. It was quite therapeutic actually, although I had to chase the overlocker around the table if I went too fast :)


I calculated that, once they were cut out, each skirt took about 15-20 minutes to make.

Done!

Monday 5 December 2011

Ikea rug to Mexican poncho costume


Mr Six was involved in an assembly item at school. The assembly had a multicultural theme and the children were required to dress in clothes from another country. A quick raid of the dressing-up box revealed nothing more multicultural than Star Wars and Ben 10 costumes, but we did discover a Mexican sombrero at the back of the wardrobe.

Now we just needed a poncho.

I found an old Ikea rag rug and we were in business. Mr Six even did most of the work himself! This is what we did:

Fold the rug diagonally and cut it to a square shape.

Fold the square in half...

...and in half again

and cut a little bit off the top corner to form a hole to put your head through.

Trim the hole to the right size (the rug is stretchy so don't make it too big). I made a v-neck shape pointing to one of the corners for the front of the neck. I also finished off the raw edge with a narrow strip of black jersey fabric (or use bias binding) and made a little felt embellishment for the front.

Then add wool tassels to all the sides that don't already have them. We used a loop/hook rug making tool but a thick needle would be fine.

 He did all the tassels by himself and was so proud of his efforts!


And it's done. He just wore all black underneath. The assembly performance was adorable. They all looked SO cute in their international costumes, I have to admit to a couple of teary moments!


LinkWithin

Related Posts Plugin for WordPress, Blogger...