Showing posts with label Stencilling. Show all posts

Monday 4 August 2014

Hand-sewing on holiday - Alabama Chanin (the preparation)

Michael Kors, Kuala Lumpur
 Before we set off on our Malaysian holiday, I did a bit of planning and got everything ready to make an Alabama Chanin skirt. I thought that I could get stitching on the plane and in the evenings when I wasn't partying it up at the top nightspots (chance would be a fine thing - ha!).

I had traced the patterns, but wasn't going to put in all that handiwork without checking the fit first, so I made a muslin of the skirt and tank top.

Wins a matching coconut!

I used very flimsy fabric for the tank, which shows in the bad fit around the arms and shoulders. I stitched the main seams on the machine and topstitched and finished by hand, to get the 'look' of Alabama Chanin.

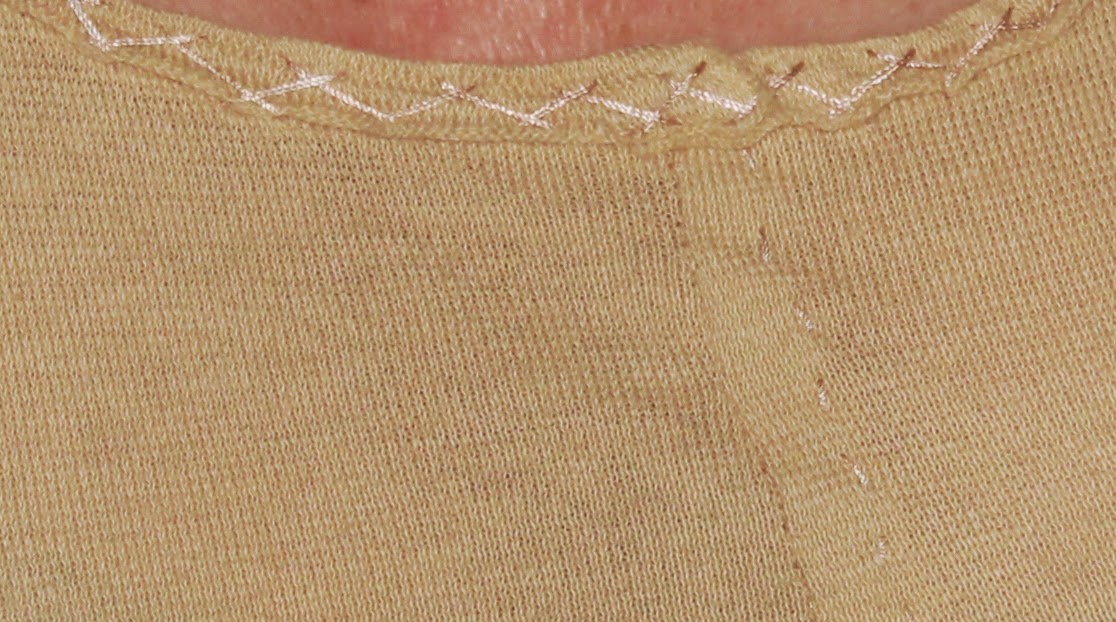
Hand-sewn neckline and topstitched front seam.

For the skirt muslin, I used scraps of khaki plain and striped knit fabric. I made this entirely by hand, including sewing the two fabrics together and attaching the fold-over elastic waistband. After wearing the skirt a few times I noticed that the hand-stitched seams had begun to unravel slightly in places. This wasn't surprising as I'd only used a running stitch, but was a good lesson for making The Real Thing.

I liked both pieces enough to fling them in the suitcase. The skirt was perfect for hanging with the headhunters in Borneo.


Upon spying my skirt, the chief headhunter hurried over to discuss the finer points of creating an Alabama Chanin piece...


and was so impressed, he invited me to attack a tourist of my choice with a poison dart.


But I'm getting ahead of myself. Before we went I also prepared the fabric for The Real Thing.


I opened up the 'Bloomers' stencil design from the Alabama Chanin website on my computer screen and traced it on to some thick paper, study enough so that I could reuse the stencil. I cut it out with my old biology dissecting knife (don't worry, I cleaned it first), then Mr Meggipeg helped me screen print the design on to my top layer of fabric. Although his role was to hold the screen so it wouldn't move, he now claims credit for 99% of the project.

Basting the two layers together.

 The top layer of fabric is this charcoal grey knit and the bottom layer is purple. I used black fabric paint for the printing, which ended up being almost impossible to see except under cricket pitch floodlights in the sunshine. Unfortunately I only discovered this on the plane when I went cross-eyed trying to see where to stitch. Top tip for sewing on a plane (apart from NOT using a black on black design): use a self-threading needle so the thread can be cut with one's teeth (no scissors allowed) then snapped into the needle avoiding the whole 'pointing a scraggy thread end through the eye of  the needle' scenario.


 I did enjoy having this to do on holiday. I managed to get one and a bit of the four panels done over the nine days. Since being home, I've set up a bright light in front of the TV and I scorch my pupils there in the evenings getting a bit more stitching done. I am about to start my last panel and I can't wait to see how the skirt is going to turn out.

 Of course, I'll show you as soon as it's finished.

Monday 1 October 2012

Tumble dying with a stencil to make a cool t-shirt


After watching me making my ombre dyed, polka dot t-shirt, my boys were desperate to get in on some Tumble Dye action. After some discussion, they decided on a Party Rock Gym design. There are images all over the internet for this and, after looking at a few, I came up with this design of my own using MS Word and Powerpoint.

If you would like to use my design, you can download it here and resize as necessary.

I printed the design on to normal paper, covered it in clear Contact plastic film (only to keep it strong enough to be used more than once) and cut out the lines with a scalpel.


The inside bits of the letters are saved and stuck to the bottom corner of the stencil. If you can, I would recommend cutting out letters as I've done for the circular part of the design, leaving a bit of paper to hold any middle bits in place, as for the 'P', 'A', 'R' etc. The little connector bits hardly show in the finished product.

After being asked at least 67 times if it was ready yet, I finally finished cutting out the stencil! It was then laid on to a square of t-shirt fabric, placed outside on newspaper and I let the boys loose with the dye spraying!


They were actually really careful and loved doing it.

My tips for children using these dyes would be:

  • Make sure the nozzle is pointing in the direction you want the dye to go (yes, we learned this the hard way!); 
  • Spray approximately 10cm from the fabric;
  • Don't saturate the fabric with dye as it will run under the stencil, just gradually build up to the intensity you want; 
  • You can mix colours to get fantastic effects, but be careful not to mix more than two colours or you get muddy brown.
  • It's worth dyeing a square of fabric, rather than the actual t-shirt in case of mistakes and resulting meltdowns (we had both!).


When the dyeing was finished, we blotted off excess dye that was pooling on the stencil using paper towel and carefully lifted the stencil away from the fabric. I ironed the designs to set the dye, trimmed the edges, then stitched them on to t-shirts (which I'd also made, it was a busy day!) for the boys.


I used a strip of the trimmed fabric to sew a zig-zag along the side of the t-shirt for extra coolness!! I've been saving all my dye-covered scraps to use as embellishments for future projects.


The boys are SO thrilled with their t-shirts. They wore them to their hip hop class and proudly announced that they'd made them themselves when the teacher admired them!

A very rewarding project, which could be adapted for varying ages.

Sunday 23 September 2012

Ombre dyed, polka dot t-shirt


How much fun is this for spring?

I bought some new spray dyes for fabric. They are called Tumble Dyes and they come in a wide range of colours. They are really easy to apply - just spray straight from the bottle. I ordered these four gorgeous colours from Dharma Trading in the US, (along with a few other things ;) They were not expensive and the postage to Australia was very reasonable.


My mind is spinning with possibilities for these, but to start with I tried this simple t-shirt. I decided to make my t-shirt, but this could easily be done on an existing t-shirt.

Here's what to do:

Fold a piece of paper into four and draw some circles (or whatever shape you fancy). I used my old school Math-o-mat. A circle punch would be even better.


Cut out the circles and place them on your t-shirt. I Tumble-dyed my t-shirt before I sewed it together. This gives a neater dye finish at the seams, but is not necessary if you have a ready-made t-shirt. Place the dots randomly or in a pattern. Remember to place some card or newspaper inside your shirt if you are using an existing one.


After blowing some of my circles away while spraying the dye, I decided to weigh them down using metal washers. If you have freezer paper you could iron the circles on to your fabric before dyeing.


Hold the bottle 10-15cm from the fabric and spray away. I sprayed more at the top of the t-shirt and less near the bottom to create the ombre effect.


Once the spray has dried, remove the circles and iron the fabric (or place in a warm dryer) to heat-set the dye.


Make your t-shirt. I used white trim for the neckband, but you could dye some to match or contrast with your design.


Told you it was simple!


Have you Tumble dyed anything lately?

Monday 15 August 2011

How to stencil clothes with adhesive plastic film and paint


Let me introduce Mr Hurley. Mr Hurley, his brother (Mr Hurley) and his dad (Mr Hurley) love wearing HURLEY brand surfwear. With so many Hurleys in the family this can get expensive. I decided to modify the original Hurley logo and do some stencils on clothes.

I have seen tutorials using freezer paper, but I didn't have any to hand, so I substituted clear 'Contact', which is the inexpensive, adhesive plastic film used to cover school books. It is best to use clear Contact for ease of tracing your design, but it's a bit hard to see in some of the pictures.

To start with I designed my stencil on the computer. I used Microsoft Word and the 'Hurley' is written in Century Gothic font. I printed it out and made a couple of modifications by hand so it looked like this:


Then I placed the clear contact over the printout and cut out the letters with a scalpel.


Any middle bits of letters (like the 'e') need to be saved to be stuck on the fabric later.

I then carefully peeled the Contact from its backing and stuck it to the fabric. I used a paintbrush and acrylic paint to fill in the cut outs. You could also used fabric paint of course. The consistency of acrylic paint works fine for this and didn't produce any bleeding. I would recommend at least three coats allowing paint to dry in between.


I reused the same stencil to make this t-shirt.


Mr Hurley jumping for joy!


LinkWithin

Related Posts Plugin for WordPress, Blogger...