Showing posts with label Naughty Bobbin Patterns. Show all posts

Tuesday 2 July 2019

The Prospects Dress - Naughty Bobbin Patterns


When I was asked to be a pattern tester for the newly released Prospects Dress by Naughty Bobbin Patterns, I said yes immediately! Savage Coco always manages to design something that makes you feel like a million dollars and this is no exception. 


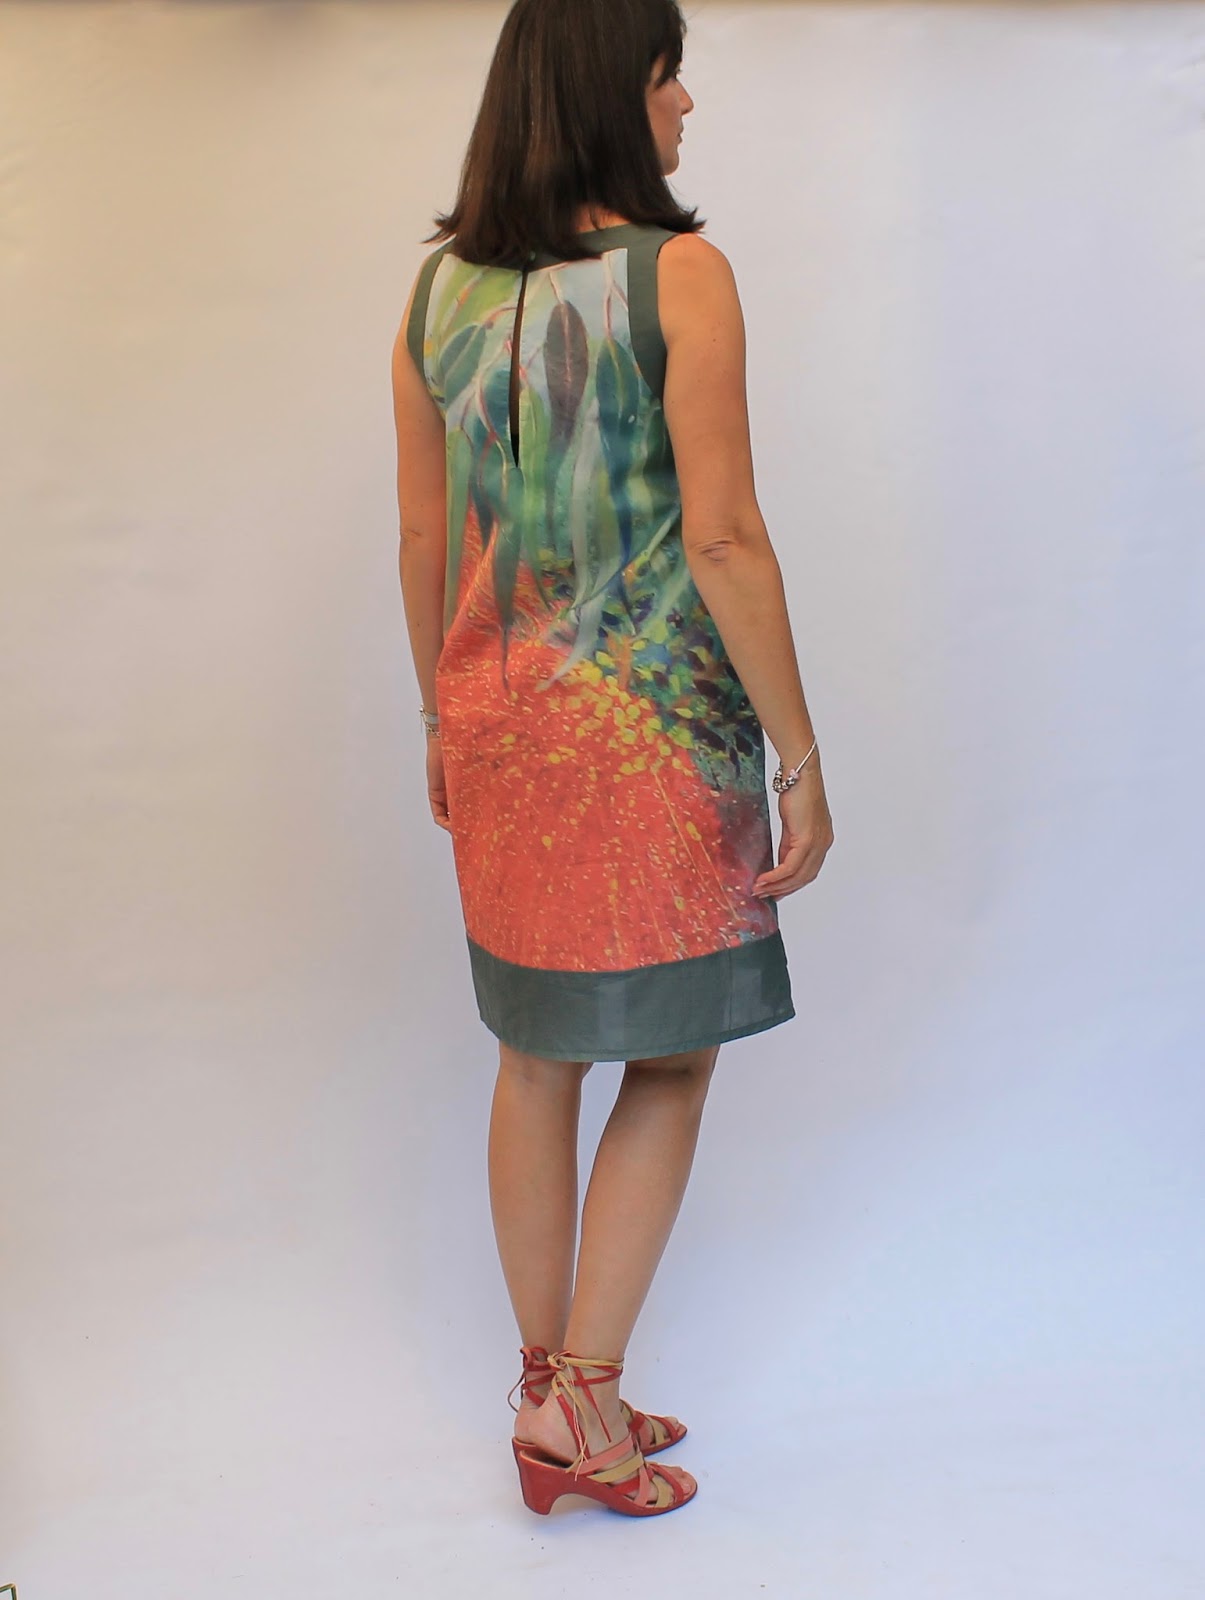
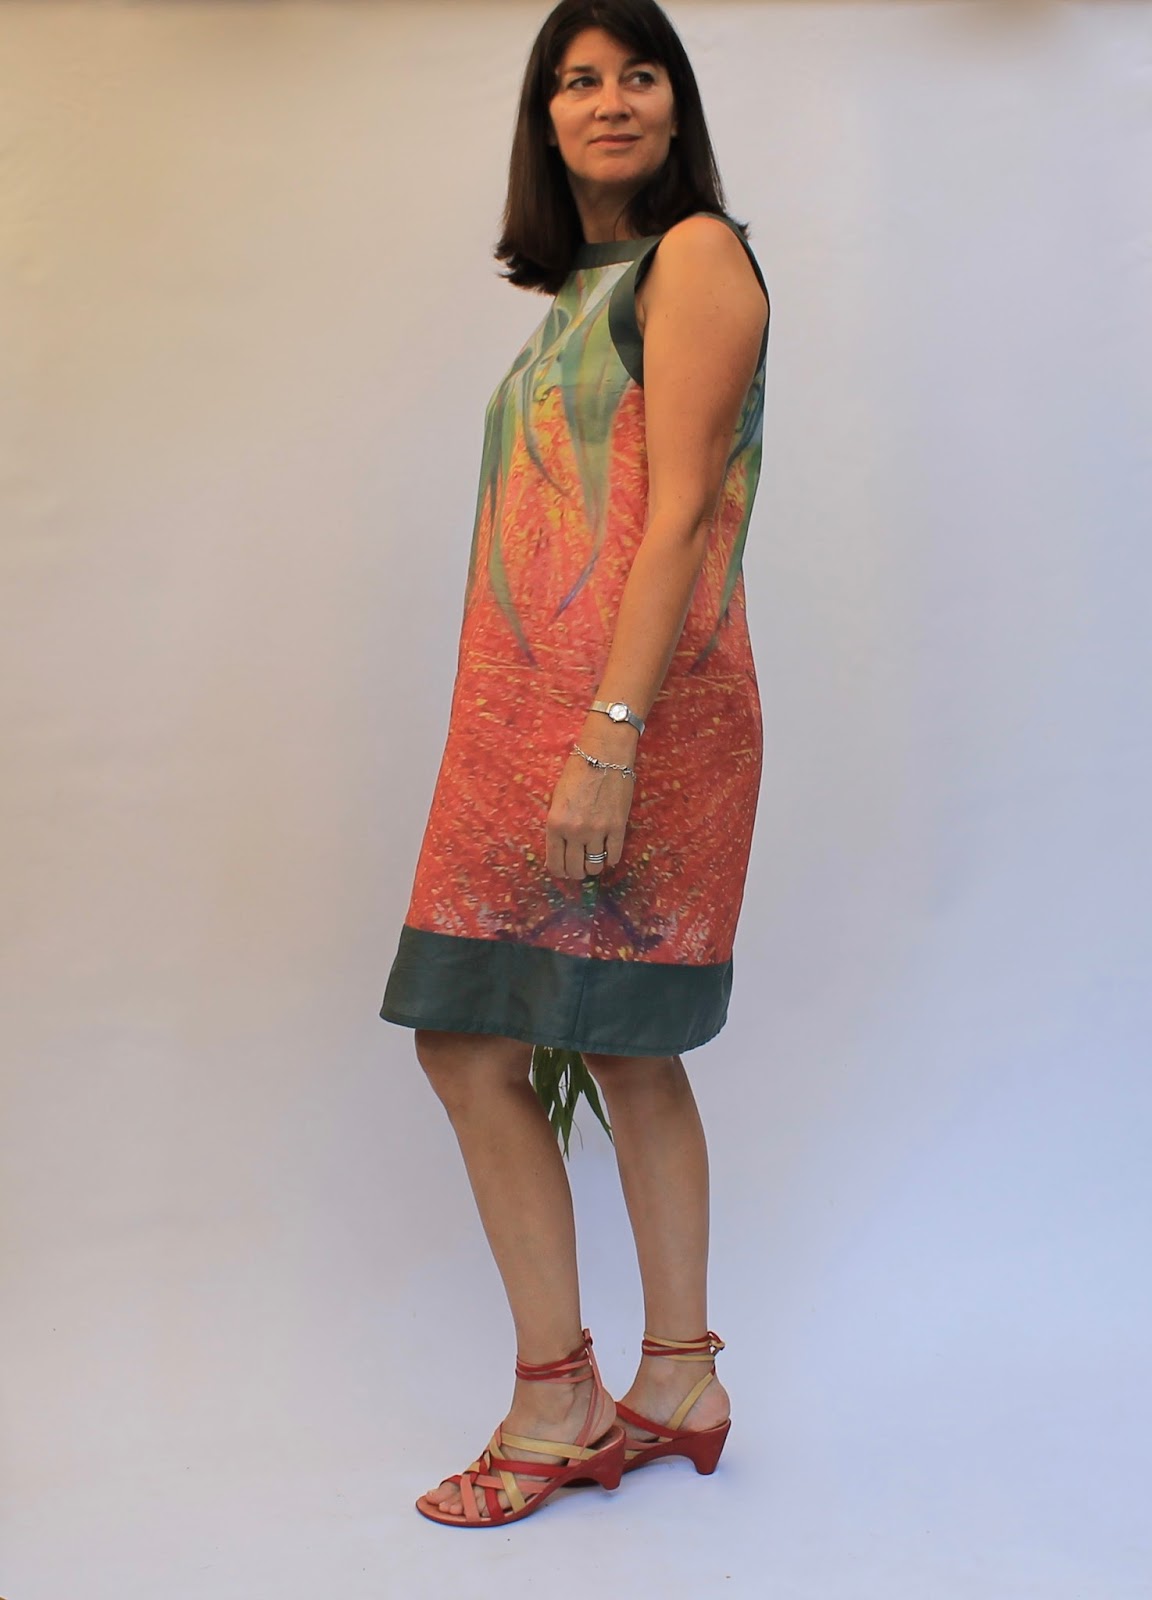
The Prospects Dress is a lined, knit dress with flattering, cut-away shoulders (but not so cut away that you can't wear a bra), a high neckline and a figure-skimming style. It is available as a Print-at-home PDF, a print-at-copy-shop version or a printed pattern, starting at only $5.25. If, like me, you actually enjoy gluing PDFs together (yes I really do), this is a bargain!


I made my dress using a bright red slinky knit fabric that had been in my stash for a very long time. I rarely wear red, but I rather like this shade on me. It certainly ups the va-va-voom-I'm-going-to-strut-about-in-this factor.


The dress is not difficult to make and the instructions guide you through making a beautifully finished dress with no seams showing on the inside. It is also possible to make this entirely on a sewing machine, with no need for an overlocker.

I made a size Medium, according to the size chart, and it fits perfectly.


This is a gorgeous pattern and I love the dress. It really is one of those things that you put on and instantly feel amazing in. It is also incredibly comfortable and easy to wear.

Naughty Bobbin has got lots more exciting things in the works, so keep an eye out for those.


Thursday 29 March 2018

Tessuti Skylines Competiton - Burdastyle jumpsuit and Naughty Bobbin Cap


Well this was a slow sewing project if ever there was one! Many hours were spent during the planning, the pattern adjusting, the muslining, the additional adjusting, the cutting and the construction. This is, of course, my entry for the Tessuti Skylines Competiton, where the rules state that this checked fabric alone must be used for the entirety of the outside of the garment.

Choosing the project was fairly easy. I loved the idea of making a special occasion dress in this fabric, but such a thing would never have fitted into my casual lifestyle, so I chose a jumpsuit that I could wear every day. I was inspired by a loose-fitting jumpsuit I saw on Etsy. I perused many patterns trying to find something similar and finally settled on Burdastyle FS/2014 #I. In addition to the jumpsuit, I made a little cap using the Naughty Bobbin Patterns Summer Ensemble Pattern. That pattern for a skirt, top and cap is fantastic btw!

Burdastyle Jumpsuit FS/2014 #I
There were several features of the jumpsuit that I wanted to modify, so I began by making a muslin. I experimented with the bodice, trying a wrap style and a loose bib style, but eventually settled on this sleeveless shirt/boiler suit style.

Here I am wearing a heavily modified muslin and experimenting with sleeves (my family said NO to sleeves!). I made a size 42 according to my measurements, but then took in the sides, took 2cm off the bodice length and altered the back shoulder seam for a better fit. Other changes I made to the original pattern included: raising the neckline and adding a collar - I used the collar and stand from the Named Wenona shirtdress pattern; enlarging the pockets; adding a button placket and press studs instead of the zip - I used the button placket from the Closet Case Patterns Kalle dress and lengthened it so it extended into a fly front; adding back patch pockets; and lengthening the leg 5cm.


I cut the pattern on a single layer of fabric so I could match the print as perfectly as possible in every direction. I made sure the bodice and pants matched for the vertical stripes and that the horizontal stripes matched across the front and on the sides. I cut the shoulders, waistband and button placket on the bias for some visual interest. The stripes also match on the cap as much as possible with a little bias-cut pocket on the side!

Spot the front and back pockets!!


Here are some close ups:

I used press studs instead of buttons for emergency toilet situations...


...and a press stud on the back of the collar (I love the shape of the Named Wenona collar).


Topstitching on the waistband and pockets and the double waistband that hides the belt at the back.


The button placket extends into the pants


and the cap. I love this cap and have worn it every day since I made it.


So there we have it, finally finished! I really enjoyed the challenge of this project and I am very happy with the outcome. This jumpsuit fits perfectly into my casual lifestyle and the cap is so well-fitting and comfortable, not to mention providing lots of shade with the large brim. I'm very pleased I entered the competition as it pushed me to spend time making something I really wanted and love.


There's still time to enter!


Thursday 9 November 2017

A new Amare Dress for a Melbourne Cup lunch


This week it was that time of year again when the ladies of Oz grab their finery and fascinators and sashay off to a fancy lunch for some horse race or other. These days the Melbourne Cup lunch is the fanciest event I attend all year, so I decided a new dress was in order.

Enter the Amare Dress by Naughty Bobbin Patterns!


I have made this dress before (back when Naughty Bobbin Patterns was Savage Coco Patterns) and I wore it to a Melbourne Cup lunch, but it's such a lovely pattern that it was my first choice for this year's do. The dress has a closely-fitting wrap style bodice and a tea length circle skirt. I had bought two metres of this floral fabric for $20 in a local designer's closing down sale. It was apparently Italian in origin and I loved the print and drape, which I thought was perfect for this dress.


The problem was (gasp) that two metres wasn't really enough fabric. After playing around with the pattern pieces I decided that I could make it work by cutting the dress from the opened-out fabric, rather than on the fold, and by slashing and squeezing the skirt pattern piece just enough to get it to fit. This involved making several evenly spaced cut lines fanning out from the waist to the hem and overlapping them just a bit at the hemline to bring in the hem without affecting the waist size. I also made a couple of minor fitting adjustments to the bodice based on my last version. The resulting skirt was less than completely circular but it's not noticeable.


I had happily spent a morning adjusting the pattern and laying it out for cutting. I took my time and enjoyed the process. Then, almost as my scissors were poised for the first cut, the doorbell rang. It was my bossy sister, who beetled in and told me she needed me to trim her hair. On her way to find a suitable hairdressing chair, she spotted my fabric on the table. I held my breath hoping she wouldn't ask about it. No such luck. "What are YOU making?" she demanded. I showed her the pattern hoping she wouldn't utter her famous words. "Nope, it's all wrong" she pronounced. "It's the wrong style, the wrong length and it won't look good on you. You should wear shorter dresses and show off your legs". She then held up the fabric, scattering pattern pieces in her wake, to demonstrate how wrong it all was. Feeling a bit crushed, I suggested that we do her hair. The haircut proceeded much as the fashion advice had done, with my sister instructing me on every cutting detail and airily waving away any suggestions from me. Against my better judgement, I dutifully cut some layers into her long hair, which turned out to be a bad idea. I offered to fix it but that was declined. Eventually, after perusing a few more dress patterns and making sure I had taken her advice on board, it was time for her to go. "Bugger off then" I called as I closed the gate. "I'm glad I ruined your hair!"*

As a result of this encounter I bundled the pattern and fabric into a ball and went back to the drawing board. I then spent countless hours looking through my patterns, pinterest and the Burdastyle website. Nothing appealed to me. After a couple of weeks of this I bravely decided to ignore my sister and continue with my original plan. My inner serenity began to return as I smoothed out my fabric and pressed the pedal to sew those first few stitches. Then, as I tried on the almost finished dress, I knew I'd made the right decision. Hooray for following your heart and ignoring bossy sisters!

*She knows I love her really!


As is customary for race attire, a hat or fascinator was in order. I decided upon the latter and set to work making a fabric peony with some scraps from the dress and other remnants that seemed to coordinate. I used a tutorial I found online with a free pattern that I used without adjusting the size. I added a couple of dried flower things from an arrangement in my lounge room, sewed on a hair clip and that was done. It turned out rather well I thought and a nice size for a fascinator.


Also, while on the subject of accessories, I made a matching Harriet Bra! Well, why not?


So, after my false start with the dress, I was off and racing to my lunch. It was lovely spending time with some great friends in a beautiful location and much fun was had admiring everyone's outfits. My dress got many compliments and the overwhelming verdict was that I was right and my sister was wrong. Ha!


Friday 16 June 2017

The Sizzler Sundress - Naughty Bobbin Patterns


Well, if you're ready to amp it up to full volume this summer, this is the pattern for you! Being a pattern tester and not having seen a photo or drawing of the dress, I had no idea of the va va voom factor until I'd finished it. Then I pulled it on, looked in the mirror, and I was strutting around like Kim Kardashian at a beach resort!* This is the Sizzler Sundress by Naughty Bobbin Patterns and if you want to look like you've dropped two dress sizes in 30 seconds, you need this pattern now!

*I hasten to mention that this was all in the privacy of my own home and that any public strutting will slightly more subdued. Just slightly!


The dress is fitted with a flattering front neckline and gorgeous v-back. It is designed so that bra straps won't show and I can happily report that mine were well hidden. The bodice is lined, the front has a ruched overlay and the back can be lined if desired. I chose to line the back, which helped to smooth out any underwear lines or other imperfections beneath! I used my main fabric as lining for this dress.


The bodice has a faux-wrap design with pleats below the bust. It is surprisingly supportive, stays firmly in place and shows things off very nicely. Insider tip: hoick up the boobage once the dress is on and you can gain a cup size or two as well! The ruched front panel is very flattering and cleverly covers lumpy bits. Who's going to look at your tummy with that neckline on offer?!


The dress is straightforward to sew with a couple of little tips included for a really great fit and finish. I have absolutely nothing negative to say about this. I love it! It's such a sexy and fun design and I feel like a million dollars in mine. Go on and get it.


I received this pattern free of charge. All opinions are my own.
Apologies for the brazen hussiness of this post. I blame the Sizzler Sundress!

Monday 1 May 2017

A foray into fabric design


The Divine Dinner Dress by Savage Coco

I am VERY excited about this project! I'm not sure if I've mentioned it here, but my Mum is an artist. She paints vibrant pictures of Australian landscapes and native flowers as well as memories from her overseas travels. You can see some of her work here

It occurred to me that some of her designs would look gorgeous as fabric and I began to ponder how to go about it. I talked to Mum one evening a couple of months ago and, as soon as I suggested it, Mum was off and racing with ideas! 


I was keen to use her Australian paintings as they are beautiful and unique. Mum said to leave it with her to think over and, before I knew it, she'd been through my blog, found her favourite things and chosen paintings that would make suitable fabric for each garment! 

Meanwhile, I'd been looking at getting the fabric printed. I'd seen that Velosewer had used the UK company Contrado to have fabric printed with a photo for swimwear. Rather fancying some custom printed swimwear myself (more about that in a future post), I decided to give them a try. I was not disappointed!


The Contrado website allows you to upload photos, tweak the design and size, select from a huge number of fabrics (105 from memory) and send the design for printing.

Contrado Swatch Pack

I wanted to be sure the fabric was exactly what I wanted so I sent away for a sample pack before I made my decision. The swatches were sent from England to Australia in less than a week and I found it a huge help to feel the fabrics. I loved some of the sporty, technical fabrics, but decided to see how I went with natural fibres to begin with. After narrowing down my fabric selection, I decided to make three garments each with a different print and fabric. This dress was made from 100% cotton Pima lawn 75gsm.

You need to set up an account with Contrado to get started, then select 'fabric printing' and choose your fabric type. From there you can start your design by uploading images.


Once the image is uploaded you can play around with it using different tools. I chose to print this design as a mirror image. This worked really well for the dress as it meant the front and back of the dress were pattern matched at the sides.


I then carefully measured my dress pattern pieces to work out exactly the amount of fabric I needed. Contrado enables exact measurements to be printed. This is useful to keep costs down and reduce waste. I prewashed my fabrics and measured them before and after. This piece stayed the same width, but lost 2cm in length after washing. 


The Pima Lawn fabric was perfect for this dress. It's light, but not transparent, and was lovely to sew. The printing turned out beautifully and has not faded with washing. The Contrado service was easy and fast and I was very happy with everything.


So, the dress! Mum chose this pattern as she thought using contrasting fabric at the neckline and hem would 'frame' the printed fabric. It's the Divine Dinner Dress by Savage Coco. I have made this dress before and it remains one of my favourites. Savage Coco now has a new website called Naughty Bobbin Patterns, but this pattern and excellent tutorial are still available on the old site. I shortened the dress, and took in the sides. It's perfect for showcasing a special fabric.


You can see here how mirroring the design gave a nice print match (and a totally different look) on each side.


Mum's original painting depicted leaves and flowers of Eucalyptus miniata. I love the colours and smell of Eucalypts and the way this print turned out is unmistakably Australian. It took me ages to decide on the contrasting colour, but I think the soft green goes well with the print.


I am over the moon with this dress and I will wear it with a very special pride knowing that it was the result of an exciting collaboration with my beautiful and talented Mum. Stay tuned for the other two designs we worked on together.


 Love you Mum xx

NOTE: if anyone is interested in using these designs for fabric printing (or other things), please let me know and we can discuss it further!

Wednesday 12 October 2016

Summer Solstice Set - Naughty Bobbin Patterns


Well this is exciting. My online sewing friend Savage Coco (yes, the designer of the Presto Popover top that took the sewing world by storm last year) has completely rebranded and revamped her website and shop. Coco and I have never met, but have exchanged many emails. She is hilarious and very talented. To celebrate the website launch, Coco has released a pattern combo for this brilliant little Summer Solstice Set, consisting of a skirt, top and bonus cap. Take note Aussie and NZ friends - we don't often get new pattern releases that suit our seasons. We can wear it first for a change!


The new company name is Naughty Bobbin Patterns (formerly Savage Coco Patterns) and you have to visit the website just to see the cool sewing cartoons on the homepage!


Anyway, this set. The skirt is a simple straight design with a smooth elastic waistband and the top is a tank style with a flattering, square neckline that dips lower at the back. The top has a built-in shelf bra and is sewn together in a clever way that creates a completely clean finish inside. Both items are made from knit fabrics. I used ponte for the skirt and cotton jersey for the top. I made a size M with no changes. The fit is spot on and I love that the top completely covers my bra straps from all angles.


But wait, there's more! This is the Coco Cap, which also forms part of the Summer Solstice Set. I am thrilled with this as it gives lovely shade and looks so much better than a normal cap. I made mine from denim scraps left over from the Refashioners 2016 Jeans challenge. I forgot to wear it in the other photos so I tried to take some selfies - not easy when you are trying to show off a hat, I kept trying to look at the camera.


The hat is a great fit and has a back elasticated section that can be adjusted to fit during construction. I have a large head, so I was happy to find that this was big enough. It is lined, but not difficult to make. The brim is stiffened with pellon interfacing. This is not easy to get in Australia. An alternative would be two or three layers of your stiffest interfacing or steal the plastic cover from your child's school exercise book.


I am over the moon with this set and highly recommend it. Everything is well thought out, well fitting, stylish and with clear instructions. The skirt is so comfy and quick to make, I'm going to have one for every day of the week. Congratulations to Naughty Bobbin Patterns!


LinkWithin

Related Posts Plugin for WordPress, Blogger...