Showing posts with label Natural dyeing. Show all posts

Thursday 6 April 2017

Minttu Swing top - Named SS17 Playground Collection


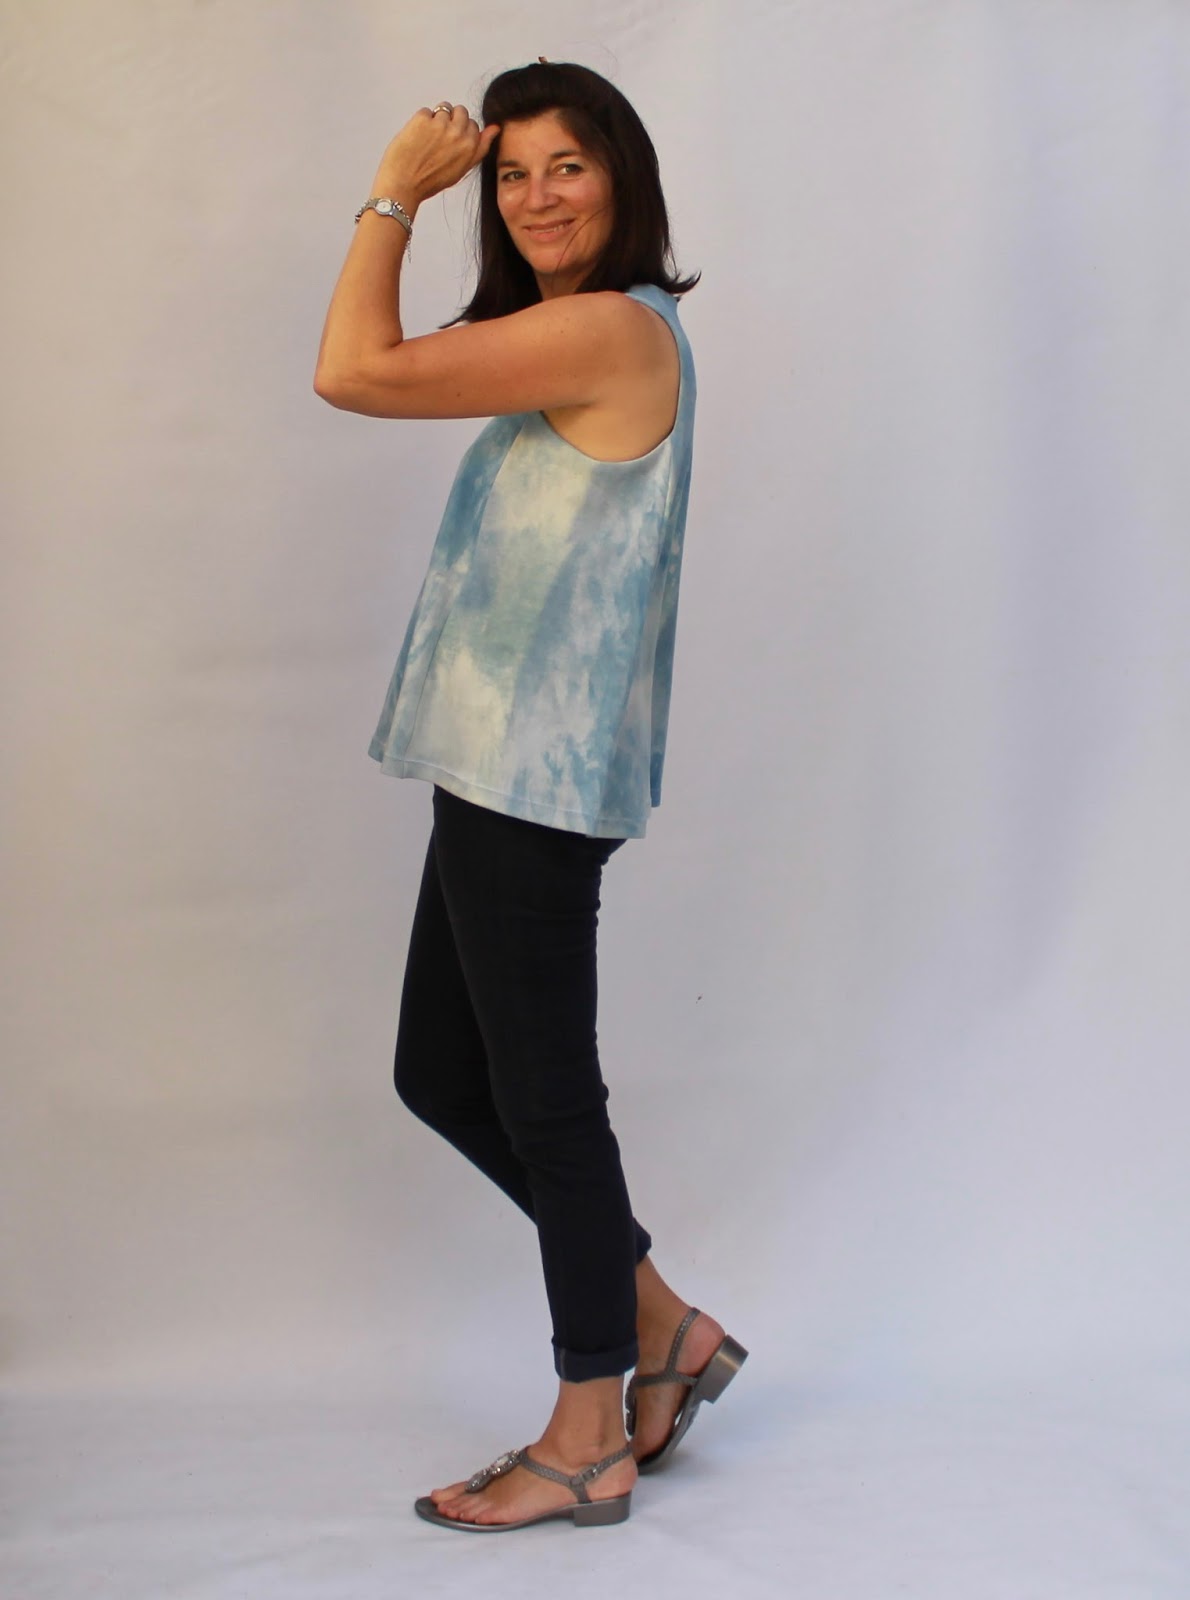
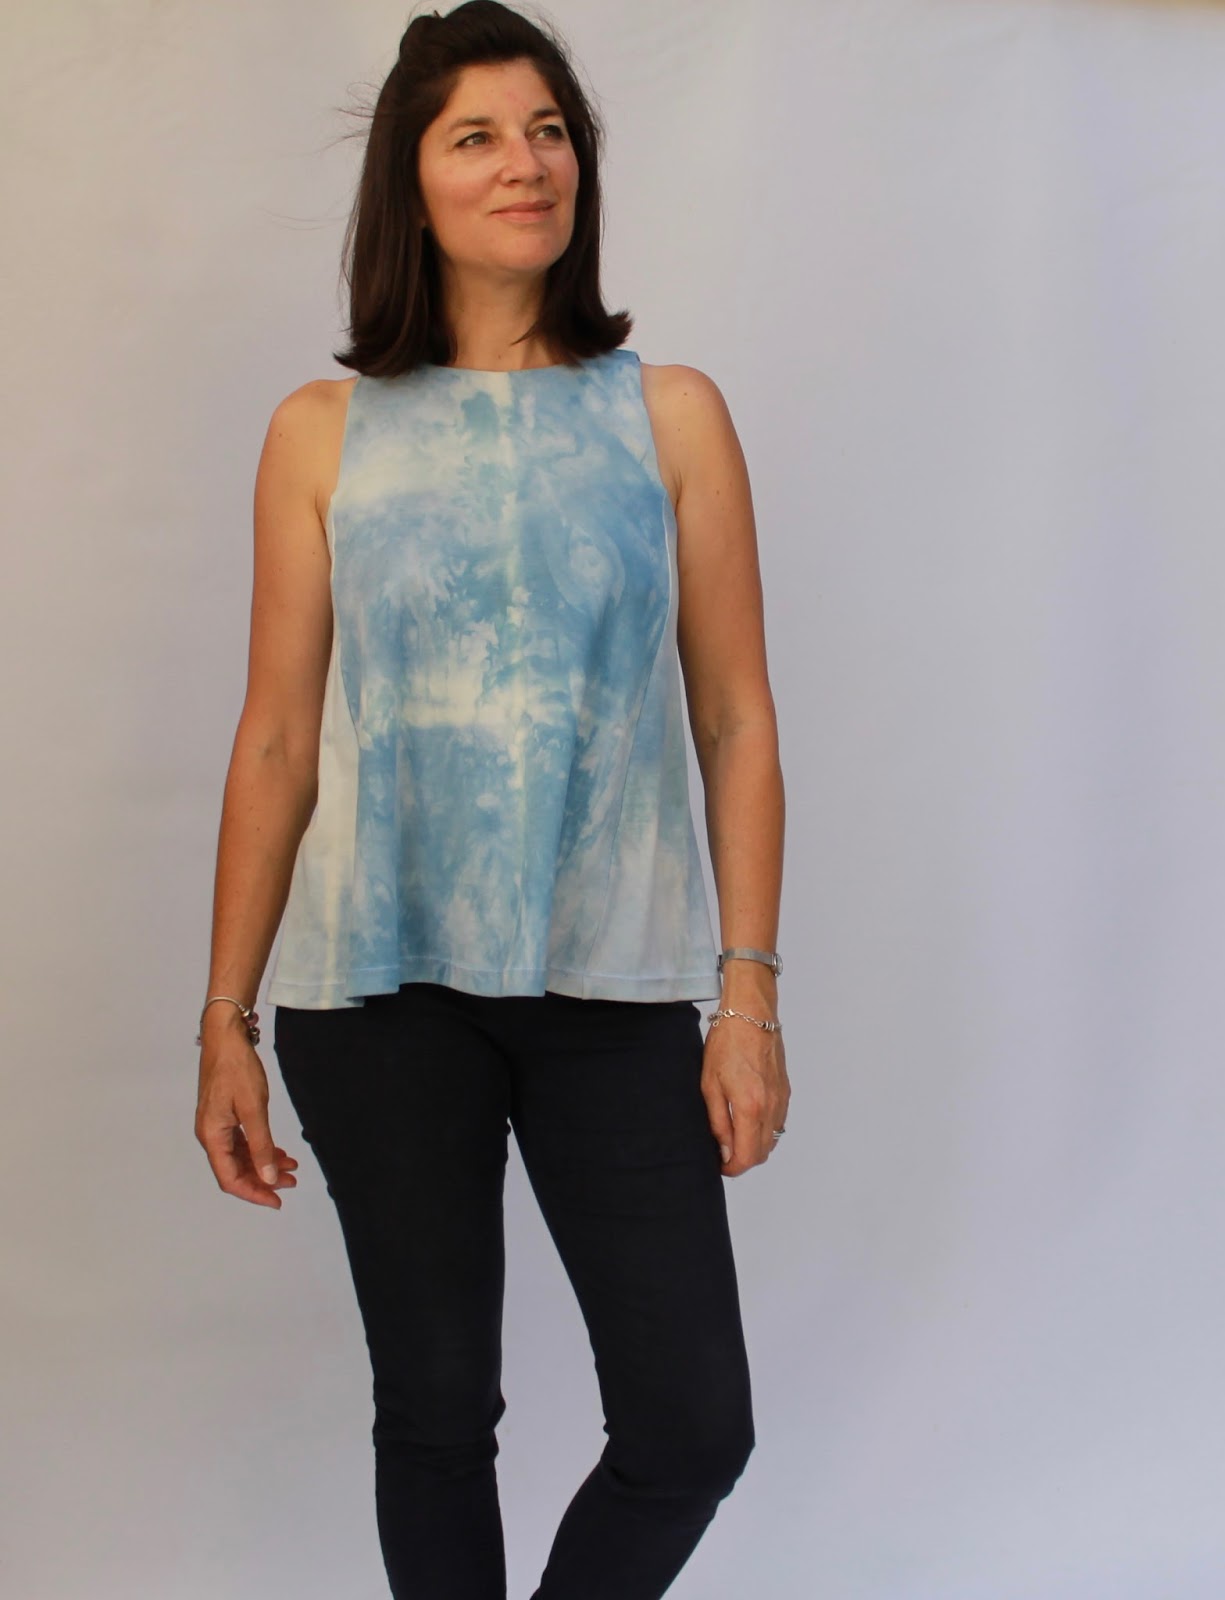
The Minttu Swing top was the final pattern I tested from the new Named collection. This is a flattering design with a high neckline, cut-away armholes, side panels and a swing shape. It has a one-piece facing for a neat finish at the neckline and armholes.


I used a 100% cotton knit that I had dyed with indigo and that was left over from my Alabama Chanin dress, one of my favourite creations.


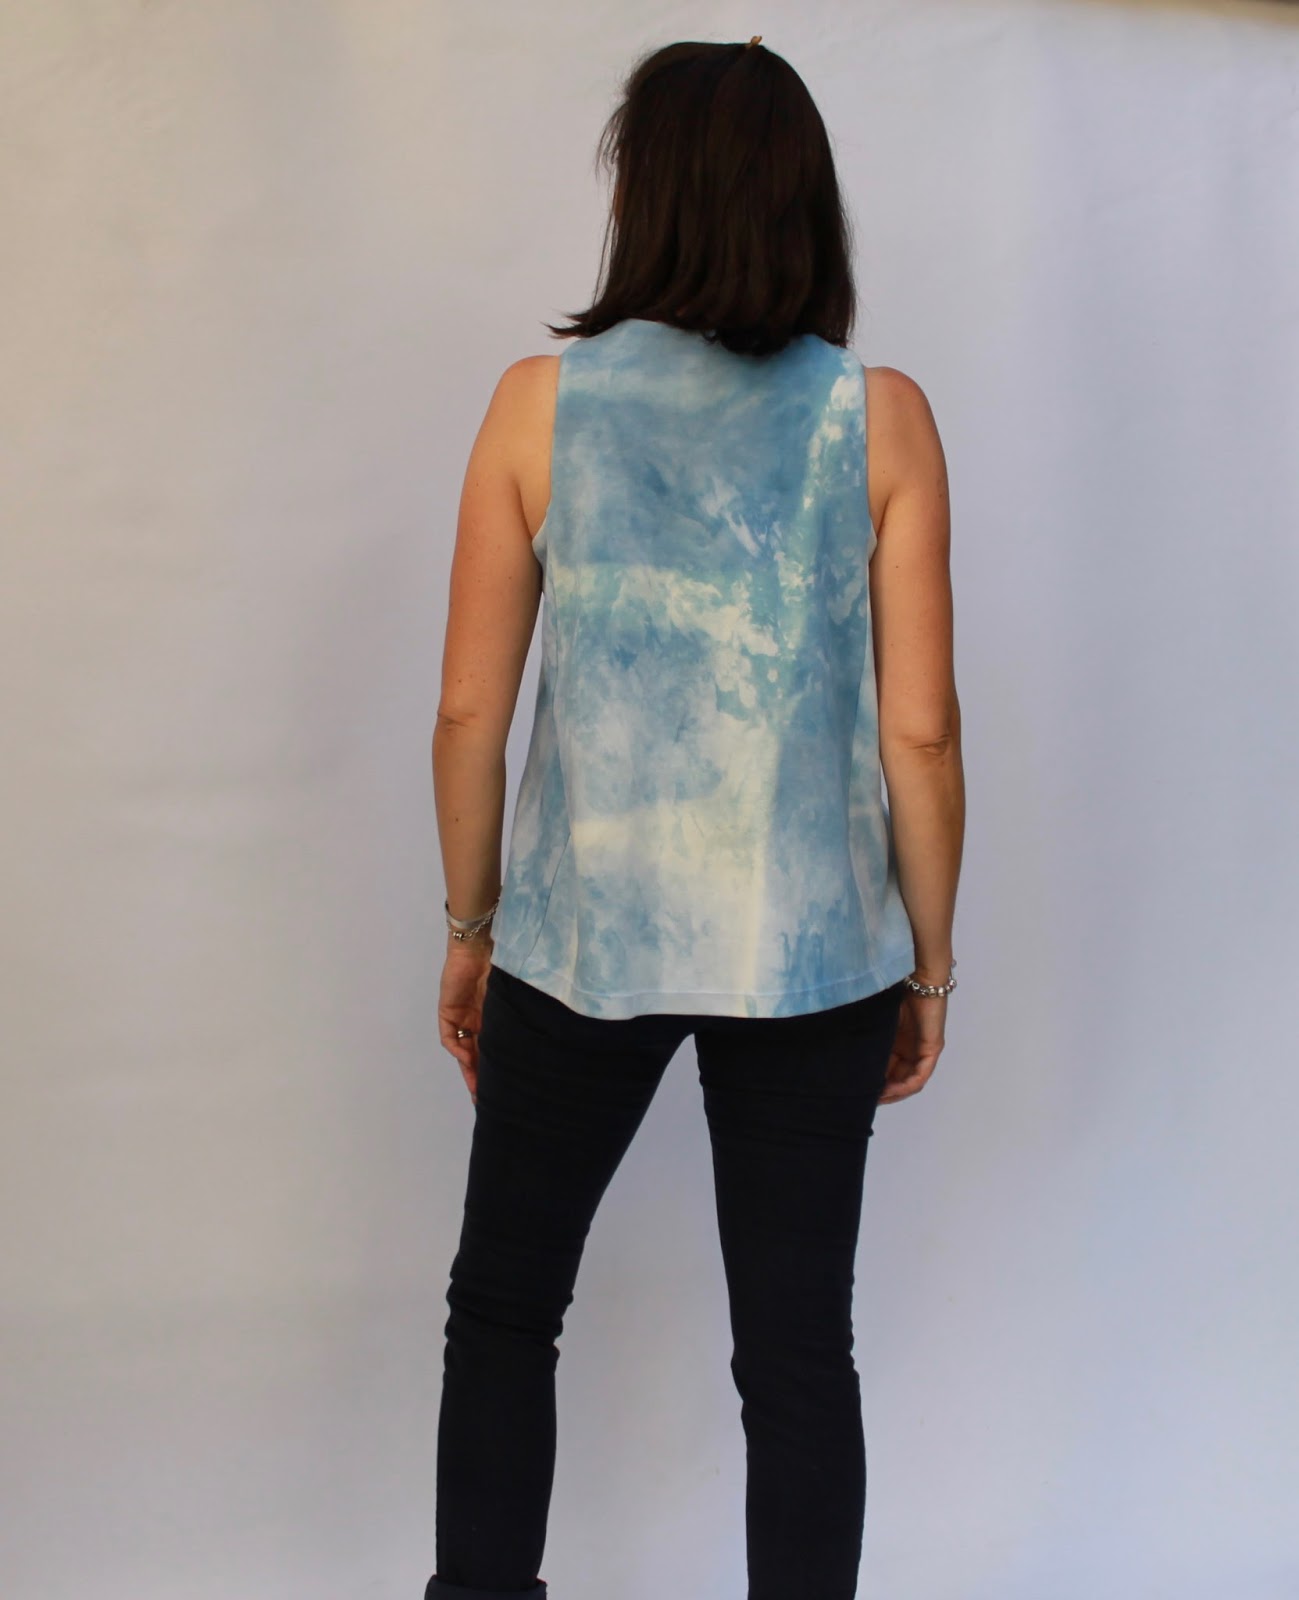
This is a quick and easy top to sew and I highly recommend it. It is very easy to wear and the style goes with many different 'bottom-half' garments. In these photos I'm wearing some StyleArc Elle pants. Yesterday I wore it with some loose Hudson Pants modified to be made with a woven fabric and I think it looked even better. You'll have to believe me, I've done my photo session!


I rarely wear anything with cut-away armholes, but actually I think they are more flattering to the arms than a simple sleeveless design. The attention is drawn away from the upper arms somehow. This is a definite win for keeping cool and looking...well, hot! OK, at least a few degrees warmer than usual.


The only issue with appearing to have amazing arms, is that normal bra straps show. I didn't have any racer-style bras, so quickly whizzed up a couple of Noelle bras - the free underwear pattern by Madalynne. I did an FBA on the Noelle pattern as it's really for smaller busted women. I can recommend the bra and knickers.


I am thrilled with this top and with my other Playground Collection items, the Maisa denim jacket and the Ansa dress and top. I think this is my favourite Named collection so far.


Thursday 16 March 2017

One Year One Outfit 2016


I haven't talked much about the totally local outfit I made during the whole of 2016, but I have been beavering away and it is finally finished!


Now I have to admit here, that 'totally local' is not exactly an accurate description for this outfit. The challenge was to create an outfit that was completely sourced from naturally-occurring materials within a 500km radius of my location. As discussed last year, there are not a lot of dressmaking materials available around Perth, Western Australia except wool. I stuck to the rules last year, but rebelled this year and used a couple of imported products. I decided that having a wearable* almost-totally-local outfit made more sense than a totally local outfit that sat, unworn, in the cupboard. 

*I use the term 'wearable' somewhat loosely here!


This year's outfit includes a dress, a bag and some shoes. The bag and shoes are felted from Merino and Corriedale wool from West Australian sheep and are 100% locally sourced apart from the soles of the shoes, which I made from jute string imported from China. 


The dress is nuno felted with silk hankies and wool on silk. I had really wanted to try nuno felting and had intended to use local wool and imported silk and dye it with local plants. However, it turned out that locally sourced and dyed materials were going to make life as a newbie nuno felter too complicated, so I bought everything from Treetops Colour Harmonies. Treetops is the most glorious shop and all their silk and wool is carefully hand dyed in colours inspired by West Australian bushland and beaches. If you're going to deviate from totally local, this is the place to do it!


My supplies were silk hankies, silk georgette fabric and superfine Merino wool tops in the colours 'Chinchilla'. I had never worked with silk hankies before and was quite surprised to find that they were not the nose-blowing variety, but squares of fine silk fibres, each stretched from a single silkworm cocoon. It felt very special to work with these little wonders of nature.


The dress was made during a three day nuno felting workshop with Nancy Ballesteros at the Feltwest studio. The course was absolutely brilliant and I learnt so many new techniques. Nuno felting a fitted garment with silk hankies is a long and involved process. It begins as a pattern that would fit a giant and is worked and washed and rubbed and rubbed and rubbed until finally it fits a real person. Despite having three full days to make this, in the last hour or so I was actually running back and forth from the sink to the table to the rubbing boards in a manner reminiscent of Project Runway or Masterchef!


My design for all three of my items was based on an abstract flower design I saw in the book '500 Felt Objects' by Nathalie Mornu, which was kindly lent to me by Carolyn of Handmade by Carolyn. I used the colours of the wool and silk hankies to vary the colours of the flowers and to highlight the edges and centres against the background. The flowers were placed close together at the neckline and bodice, for strength and modesty, and further apart towards the hemline. I am wearing a flesh-coloured slip under the dress.


The front and back of the dress were made separately and fitted during the felting process. Areas of the dress, such as the armholes, were shrunk with further felting so they were fitted and not gaping.


The dress was then sewn together with silk strips to create a decorative seam. The hem was hand rolled and stitched.


The bag is completely felted from local wool in white and brown and incorporates the same abstract flower design as the dress. I made the bag at another fabulous Feltwest course run by Sue Eslick. I attended the course with Sue from Fadanista, who is always great fun and has made a breathtaking totally local dress and accessories that you must see.


The bag was made in the round as one piece with a plastic 'resist' in the middle to stop the front and back felting together. You can see here that I went to considerable effort to dye some of my wool with locally sourced indigo. This is a bit of a sore point as the indigo nearly all washed out during the felting process!


An inordinate amount of rubbing and shaping followed before the bags were sufficiently felted and strong. Here Sue was laughing as my indigo dye ran out all over my shoes. Little did she know that my bag was watching her every move!


Encouraged by my newfound resist felting expertise (!), I attempted the shoes on my own! To make the template, I drew around my foot and measured the width at the widest point. This measurement, 9.6cm, was divided by three giving 3.2cm. I then added 3.2cm all around the foot drawing to allow for the wool shrinkage and foot shape. The left and right templates were made from thin packaging foam sheets covered with duct tape.


Rub a dub dub...


Once the felting was done, I cut a foothole in the top. I thought I'd made it in the right place, but I ended up having to patch the heel as it was too low.


The sole was made with a plaited strip of jute string that I placed on a template of my foot, sewed together and stitched to the shoe with local wool.


So there we are!


I have an outfit that is only partly local. However, every inch of it was planned and designed and made lovingly agonisingly by hand in a process that was exhilarating and difficult and immensely satisfying.


So, the big question now is will I wear it? Well, I can happily report that I have already done so! I wore the dress to a wonderful get together of the Perth Sewcialists late last year. The Sewcialists, as always, were very kind and complimentary of the dress and much patting of the fabric took place. I call that a win for One Year One Outfit!


Huge thanks must go to Nicki of This is Moonlight for conceiving this idea of nature and sustainability and facilitating the meeting of wonderful, like-minded people. She will be doing a round up of the participants soon and has made an exquisite hand woven coatigan. Thank you also to Carolyn, for the fun get togethers, for encouraging me to keep creating my outfit and for her (very kind) enthusiasm about my shoes! Her outfit is the most beautiful knitted dress and hat, dyed with local plants. You must see it. Thank you also to Sue for the laughs, the inspiration and being my partner in crime at the workshops. If you didn't click on her gorgeous doily dress earlier in the post, do it now. My outfit from last year can be found here.

Friday 2 December 2016

Merchant and Mills Camber Set


A couple of months ago, fellow Perth sewer @homesewnstuff put a call out for bra foam for her Sophie swimsuit. I had some spare so offered it to her and she gave me the Camber Set pattern in return - how awesome is that?! This dress is just my style.


I wanted to make it from this green Irish linen that I had bought in Singapore, but I only had one metre. I managed to just squeeze the pattern on to the fabric, but had to piece together the back yoke and line the yoke with white cotton. I changed the neckline to a V-neck, as I prefer a lower neckline, and made a cotton facing to finish it off.


Once the dress was finished, I decided the colour needed a bit of a boost. It was feeling kind of washed out (below). The obvious choice was to dunk it into my indigo dye vat, with which I have been experimenting lately with great vigour. I will have to write about that soon as it's all very exciting. Well at least it is to me. Be prepared for all my future clothes to be blue!


I didn't want to completely lose the original colour of this dress, so I just dyed the the top portion. I lowered it into the dye to chest level and slowly out to create an ombre effect. Indigo dye works quite quickly, so I began slowly lifting the dress out as soon as it had gone in. I counted the seconds and lifted at a rate of about half a centimetre per second, so the shoulders were only in for about a minute. My indigo is quite light, so the effect is subtle, but I think the dye it gives the dress a lift.


After wearing the dress, I decided it needed pockets, so I pieced together two pockets from my tiny scraps and sewed them on.


Perfect and just in time for summer. Thanks @homesewnstuff for the excellent pattern!

Thursday 16 June 2016

StyleArc Elle pants and Amber top


I have made so many pairs of these pants, but have never blogged them! They are a sleek and simple design, made with very stretchy, woven fabric. Make sure your fabric is very, very stretchy, or you won't get them on. Ask me how I know this!

Note: discount code for this pattern at end of post.

StyleArc Elle Pants
At first, I made them from bengaline, as recommended by StyleArc, and they were fabulous. I have a picture of some black bengaline ones from an old post about my Splattered Jacket.


More recently I have been hacking them to look like jeans. I have made three pairs like this, but only photographed the white pair so far. I am really pleased with these. They look like jeans, but are soooo stretchy and comfortable they feel like leggings.


Don't tell anyone they are almost jeggings!


I took a few photos while I was making these to show how I made them look like jeans.

To start with, I added a mock fly front, by adding some fabric to the front crotch curve at the cutting out stage. I used my Jamie jeans pattern for the fly curve, but you could just draw it freehand.


I marked the original front edge line on the fabric and stitched 1cm away from it, to account for the seam allowance.


The right side was then topstitched to look like a jeans fly.


Next I made back pockets, also from my Jamie jeans pattern. It would be simple to copy some from existing jeans. I did the inner line of topstitching before I sewed them in place.


I sewed them on according to the pocket placement markings on my Jamie jeans.


That's it.


The top I'm wearing is also StyleArc. This is the Amber top, which I have previously made from Japanese cotton. For this one I used woven cotton for the front and back and cotton knit for the sleeves and detailing. To make it I sewed the side seams together first, then folded it shibori-style and dyed it in natural indigo. I also dyed the sleeves, yoke and front stripe. Once everything was dry, I sewed the rest of the top together.


This technique ensures perfect pattern matching at the sides!


A perfectly, secretly, comfy outfit!

To get this pattern for 20% off, visit the StyleArc Gumroad shop and enter the code meggipeg20. I will receive a small percentage of any sales made. UPDATE: this code may no longer be valid.

LinkWithin

Related Posts Plugin for WordPress, Blogger...