Showing posts with label Underwear. Show all posts

Thursday 9 November 2017

A new Amare Dress for a Melbourne Cup lunch


This week it was that time of year again when the ladies of Oz grab their finery and fascinators and sashay off to a fancy lunch for some horse race or other. These days the Melbourne Cup lunch is the fanciest event I attend all year, so I decided a new dress was in order.

Enter the Amare Dress by Naughty Bobbin Patterns!


I have made this dress before (back when Naughty Bobbin Patterns was Savage Coco Patterns) and I wore it to a Melbourne Cup lunch, but it's such a lovely pattern that it was my first choice for this year's do. The dress has a closely-fitting wrap style bodice and a tea length circle skirt. I had bought two metres of this floral fabric for $20 in a local designer's closing down sale. It was apparently Italian in origin and I loved the print and drape, which I thought was perfect for this dress.


The problem was (gasp) that two metres wasn't really enough fabric. After playing around with the pattern pieces I decided that I could make it work by cutting the dress from the opened-out fabric, rather than on the fold, and by slashing and squeezing the skirt pattern piece just enough to get it to fit. This involved making several evenly spaced cut lines fanning out from the waist to the hem and overlapping them just a bit at the hemline to bring in the hem without affecting the waist size. I also made a couple of minor fitting adjustments to the bodice based on my last version. The resulting skirt was less than completely circular but it's not noticeable.


I had happily spent a morning adjusting the pattern and laying it out for cutting. I took my time and enjoyed the process. Then, almost as my scissors were poised for the first cut, the doorbell rang. It was my bossy sister, who beetled in and told me she needed me to trim her hair. On her way to find a suitable hairdressing chair, she spotted my fabric on the table. I held my breath hoping she wouldn't ask about it. No such luck. "What are YOU making?" she demanded. I showed her the pattern hoping she wouldn't utter her famous words. "Nope, it's all wrong" she pronounced. "It's the wrong style, the wrong length and it won't look good on you. You should wear shorter dresses and show off your legs". She then held up the fabric, scattering pattern pieces in her wake, to demonstrate how wrong it all was. Feeling a bit crushed, I suggested that we do her hair. The haircut proceeded much as the fashion advice had done, with my sister instructing me on every cutting detail and airily waving away any suggestions from me. Against my better judgement, I dutifully cut some layers into her long hair, which turned out to be a bad idea. I offered to fix it but that was declined. Eventually, after perusing a few more dress patterns and making sure I had taken her advice on board, it was time for her to go. "Bugger off then" I called as I closed the gate. "I'm glad I ruined your hair!"*

As a result of this encounter I bundled the pattern and fabric into a ball and went back to the drawing board. I then spent countless hours looking through my patterns, pinterest and the Burdastyle website. Nothing appealed to me. After a couple of weeks of this I bravely decided to ignore my sister and continue with my original plan. My inner serenity began to return as I smoothed out my fabric and pressed the pedal to sew those first few stitches. Then, as I tried on the almost finished dress, I knew I'd made the right decision. Hooray for following your heart and ignoring bossy sisters!

*She knows I love her really!


As is customary for race attire, a hat or fascinator was in order. I decided upon the latter and set to work making a fabric peony with some scraps from the dress and other remnants that seemed to coordinate. I used a tutorial I found online with a free pattern that I used without adjusting the size. I added a couple of dried flower things from an arrangement in my lounge room, sewed on a hair clip and that was done. It turned out rather well I thought and a nice size for a fascinator.


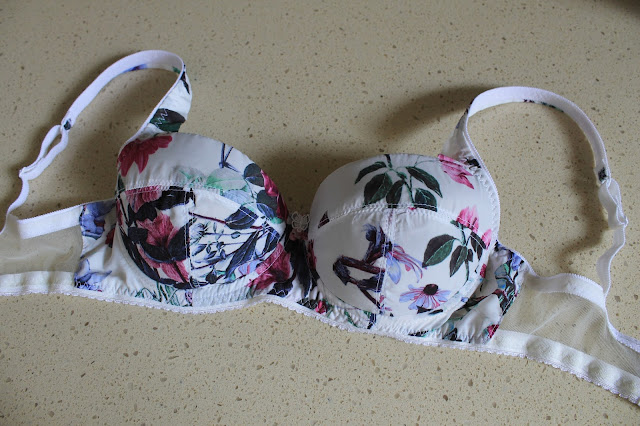
Also, while on the subject of accessories, I made a matching Harriet Bra! Well, why not?


So, after my false start with the dress, I was off and racing to my lunch. It was lovely spending time with some great friends in a beautiful location and much fun was had admiring everyone's outfits. My dress got many compliments and the overwhelming verdict was that I was right and my sister was wrong. Ha!


Wednesday 13 January 2016

Boylston bra - one, two, three and success!


I bought the Boylston bra pattern by Orange Lingerie a few months ago. I had briefly (!) dabbled in bra-making with a couple of Kwik-sew 3300 bras (below), which were good, but I was keen to make a foam cup bra. 


Then I found a bag full of bra-making supplies at the op shop. Score of the century! I could wait no longer and got cracking on the Boylston.


Notes on Boylston sizing for anyone interested

I measured myself carefully, studied the size chart and decided I was a 34C. This ended up being very wrong and way too small and I will explain why for anyone contemplating this pattern (I would be interested to hear how the sizing worked for others). 

For the band size, the instructions have you take your underbust measurement in inches then add 4 or 5 inches depending on whether it was an even or odd number, respectively. This gave me 34, but the 36 was actually the right size band for me. 

For the cup size, you need to find the difference, in inches, between the high bust and full bust measurements. My difference was 2.5 inches, which put me between a B and C cup. As instructed I rounded up to a C. After making two C cup bras, I eventually decided I was a D cup in this pattern. 

The fitting of the three bras I made was as follows:

34C - way too small to put on and do up.
36C - comfortable and wearable, but the bridge sat away from my chest and the bra tended to ride up with wear. Thank you Mr Humphries (showing my age with that one!).
36D - very well fitting and comfortable with the bridge sitting against my chest. If I was being very picky I would have the top edge of the cup pulled in slightly.

So, my experience was to go up a full band and cup size from what was indicated in the size chart. This meant going from 34C to 36D. My RTW bra size is generally 36D.

The foam I used was 3mm thick. I removed the seam allowances from the foam pieces, so they were stitched with no overlap. Use of foam and its thickness may influence sizing.


I made my first bra, the 34C, from this pretty Potter's Textiles remnant and used some foam I found at Remida for the cups. The back was made from power mesh. I'm so upset this was too small.


 The 36C was made from some spotted polyester satin left over from some dance costumes I made a while back. This is wearable and I love the spots.


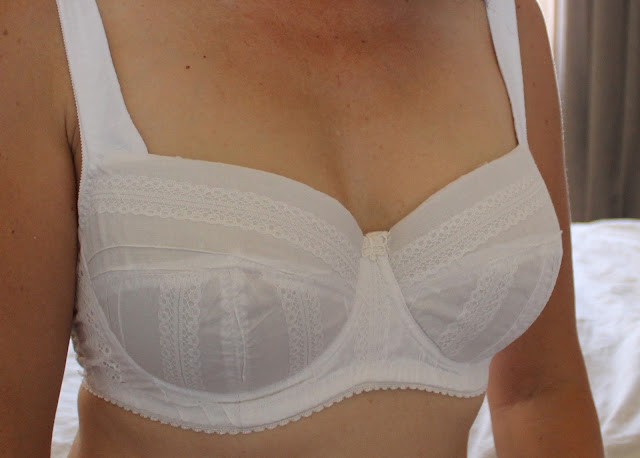
My latest, and best fitting, version was made in white cotton with pintucks and lace detail as part of the fabric. The back band is a double layer of mesh. I wanted something that wouldn't show under summer clothes. I'm really happy with this one. It's not a pretty as the others but I love wearing it and don't want to take it off for washing. I need another few, ASAP!


And here it is on me. Now I have the sizing worked out, I'm really happy with this pattern and will certainly be making many more.

Thursday 21 February 2013

What lies beneath (Amerson undies by Madalynne)


I recently stumbled across this new underwear pattern. It's by the lovely Madalynne and it's free! You can download it here. The pattern is beautifully presented as a downloadable pdf file with clear diagrams and instructions (and some further notes here). There are also some gorgeous photos on Madalynne's blog of this pattern and others she is working on. Well worth a look - I wish I looked like that model in my new knickers!


The pattern is somewhat unusual as it's made from woven, rather than knit fabric. Also, it has the elastic on the outside! These features combine to make a very cute pair of knickers that would be perfect to wear under loose clothing on a hot day, or perhaps on their own for a private soiree ;) They are not really suitable for wearing under close-fitting clothes as their outline will show.

To make these, I used a scrap of light, microfibre-type fabric that has been sitting in my stash for an embarrassingly long time. Instead of elastic, I used a 2cm wide strip of lycra, folded lengthways into thirds. I cut it to the same length as suggested for the elastic and attached it with a triple zig-zag stitch. This worked perfectly as an elastic substitute and looks better as a design feature than basic elastic. I made a little ribbon bow for the front.


These are not difficult to make, but it does take a little time to fold and stitch the hems and attach the 'elastic'. They are very comfortable to wear, but are cut a bit more cheekily at the back than the knickers I usually wear. Ooh la la! It was nice to take the time to finish these properly as they do look and feel a bit special.

Thank you to Madalynne for this lovely pattern.

LinkWithin

Related Posts Plugin for WordPress, Blogger...