Showing posts with label Patrones. Show all posts

Tuesday 20 September 2016

Patrones magazine bias-cut dress 10/2013 #20 for the Sewing Bee


I have entered the Pattern Review Great British Sewing Bee competition this month*. The first challenge was to make a pair of shorts or capri pants. My polka dot capris will be blogged soon. Suffice to say, they got me through the first round. Challenge number two was a bias cut garment. 

Bias cut? I never make bias cut garments. They have a habit of showing lumps and bumps I'd rather keep well hidden. This was a challenge indeed. After examining and rejecting every pattern in my arsenal I finally turned to my stack of Patrones magazines. I love those magazines, they have interesting and lovely designs. I flicked through the pattern layouts and looked at anything that was cut on the bias. Eventually I settled on this dress.


This is dress number 20 from the October 2013 issue of Patrones Extra Magazine (No 33).  It is completely bias cut, but is not too clingy. The skirt is quite full and the ruffles add some extra interest.


I chose a lovely cotton voile with an abstract print that I had bought from a Morrison (Australian designer) sale a few months ago.


This light fabric required careful sewing and I used French seams throughout (inside picture above). This was tricky as the fabric wanted to gather along every stitching line. I also had big problems working out how to French seam the neckline flounce. It took me three goes before I got the right side showing!


The flounce follows the neckline and then extends past it down the front of the dress. The hem of the flounce and all the other hems of the dress are finished with a rolled hem on the overlocker. The flounce has a bit of hand beading on it too.


The skirt is made up of ten pieces, all different and asymmetrical. There are ruffles along four of the seam lines and the hem dips at the front and back.


The back has a slight racer back, which is nice with the ruffle falling over the shoulders.


This dress was quite involved to make, not least because the instructions were in Spanish so no use at all to me! It took quite some working out just to determine which pieces were meant to go where, let alone how to sew them together. It seemed to work in the end though and I didn't have any pieces left over, so something went right!


 I am very happy with this dress. The bias cut bodice is fitted, but not too tight. The skirt is swishy and cute and the ruffles and print distract from lumpy areas beneath. Now to sew some of those other gorgeous Patrones patterns I've remembered after searching for this one!

*There is no public voting in this competition, a judging panel makes all the decisions. There are four rounds in total.

Thursday 2 June 2016

Brief thoughts on Me Made May 2016

StyleArc Toni dress made as a top with StyleArc Elle pants / Named Jamie Jeans with Burdastyle 06/2014#114 jumper / Vogue 1378 pants with Megan Nielsen Briar tee made as a jumper / StyleArc Lola pants with Deer and Doe Plantain tee and Paprika Patterns Opal cardi / StyleArc Mara Shirtdress / Pauline Alice Xeria dress with Megan Nielsen Virginia leggings / Vogue 1378 pants with Burdastyle 11/2012#128 top / Refashioned dress from jeans
Like me, you are probably ready to forget Me Made May for another year. However, I thought I'd just have a quick look through the handmade clothes I wore in May 2016 and see what was popular in my wardrobe.

May 2016 in Perth was, weatherwise, pretty similar throughout. Most days were in the low to mid 20s with a couple of rainy days. This meant that hardly any of my warm and cold weather gear was seen at all, which was a bit of a shame.

Patrones army jacket with StyleArc Elle pants and Named Wenona shirt / Patrones jacket in black with khaki StyleArc Lola pants / Deer and Doe Plantain tee with black StyleArc Lola pants / Named Jamie jeans with Paprika Patterns Jasper sweater / Named Jamie jeans with StyleArc Amber top / Vogue 1313 dress with Closet Case Files Nettie bodysuit / StyleArc Estelle jacket, Paprika Patterns Jade Skirt and SavageCoco Patterns Presto top / Named Inari Tee dress / StyleArc Estelle jacket, Patrones blouse and silk StyleArc Lola pants.

MY MOST POPULAR PATTERNS IN MAY 2016

Pants: StyleArc Elle and Lola pants (some of the Lola pants were altered to have an elasticated cuff and front and back patch pockets) and Named Jamie jeans.

Tops: Burdastyle jumpers and Deer and Doe Plantain tees.

Jackets: Patrones jackets in black and khaki, StyleArc Estelle jacket.

Dresses and skirts: my refashioned denim dress from jeans was the only dress or skirt I wore more than once. I always wore my Megan Nielsen leggings to stay warm. I love all the dresses and skirts I wore in May.

The pattern companies I wore most things from were StyleArc, Paprika Patterns and Named Clothing. I think I use mostly patterns from these companies year round actually.
StyleArc Estelle Jacket almost finished! / Named Wyome jeans, Paprika Patterns Zircon sweater / Named Wenona shirtdress / Victory Patterns Hannah dress, Closet Case Files Nettie bodysuit / Burdastyle jumper and StyleArc Elle pants / Refashioned dress from jeans / Patrones jacket, StyleArc Lola pants, indigo dyed Plantain tee / Vintage pattern jumper with Megan Nielsen Virginia leggings in ponte / Burdastyle jumper, Named Jamie jeans
So there we are. Thank you to all who followed my progress on Instagram and made lovely comments. I loved seeing what everyone else was wearing day to day too.

Tuesday 7 July 2015

Army-style Patrones jacket - Patrones Issue 34, No. 55


Can I just say that I'm a little bit excited about this jacket?!

This has been such a long time in the planning and finally it is here. I first saw the pattern in Patrones magazine, Issue 34, a year or two ago and spent ages trying to find the right fabric. I ended up finding this ripstop cotton on the other side of the world and it was just what I wanted. You may have seen my recent post where I made a wearable muslin of this pattern in bleach splattered fabric. I made a couple of mistakes on that one due to having only Spanish instructions, but I love it and have worn it many times. I wrote detailed notes for myself on where I went wrong and what I learnt the first time and, I'm happy to say, this jacket went almost without a hitch.

Patrones Issue 34, No. 55
Patrones Issue 34, I can't find a date for this magazine.
The pockets and detailing really make this jacket and I was careful to take my time and get it as true to the picture as I could. I assembled the pockets, and the tab that joins them, separately and sewed the whole structure on to the partly assembled jacket so the placement would be right. The lower pocket flap has a double welt opening for the tab to pass through. The lower button is sewn to the tab, but not the pocket so I can still easily slip my hands inside for warmth or stray chocolates if I'm lucky.


The tabs were sewn to the jacket at the waist for the belt to pass through, front and back.


I chose to keep the jacket unlined as designed. To keep the inside neat, I constructed the entire jacket with French seams, apart from the side seams which were neatened with the overlocker. I made some bias binding to finish the edge of the facings. I'm wearing my ponte pants and 'Mannish' gathered blouse in case you were wondering!


I decided to leave the hood off this jacket. I had lots of trouble with it on my first version (to the point of accidentally ripping it in half as I unpicked it for the umpteenth time), so saved some stress and omitted it this time.


The only other changes I made were to leave the buckle off the belt (I couldn't find one the right size) and to lengthen the sleeves a bit.


I haven't got quite the worn-in look of the magazine picture, but that may come with time.


I used metal buttons and snaps to finish it off and to coordinate with the metal zip.


I am thrilled with this jacket. It feels like a big achievement to have come to the end of such a long process. Many hours were spent plotting and planning, deciphering the pattern, scrutinising the pattern photo, jotting notes and, of course, carefully sewing. The fabric is perfect and the 3% lycra provides just enough stretch to make this really comfortable.

I love it when a plan comes together!

Thursday 11 June 2015

Splattered jacket - Patrones 34 No. 55


A while back, my local newsagent stocked Patrones magazines. Sadly, they can no longer get them, but I did buy a few copies when they were available. I love Patrones patterns as they tend to be stylish and current. They also offer lots of new designs in every issue, unlike the repetition we often get from Burdastyle.


Issue 34 from a couple of years ago was bursting with gorgeous coat patterns and I fell in love with this military-style trench coat. Ever since then I have been waiting for the right fabric to make one. I was after ripstop cotton, recommended by Carolyn for her army jacket and apparently occasionally available in Spotlight. However, many trips to Spotlight and elsewhere failed to locate any and I grew increasingly despondent. That is until I won a voucher for Fashion Fabrics Club, an online store in the US, in the Pattern Review Jeans Contest. Ripstop cotton was my first search and they had it! I bought some in green and orange. I also bought a few other things and spent far more than my voucher value! Note to international buyers: the postage was exorbitant (US$135 for this order, yes you read that correctly) and the amount is not calculated until after the order is packed. Also, the website doesn't tell you, but it only takes US credit cards so you need to phone in your order sometime during the early hours. Despite these drawbacks, I am thrilled with all my purchases and have already made some things.


Anyway, back to the coat which is not made from any of the above fabrics. Sorry!


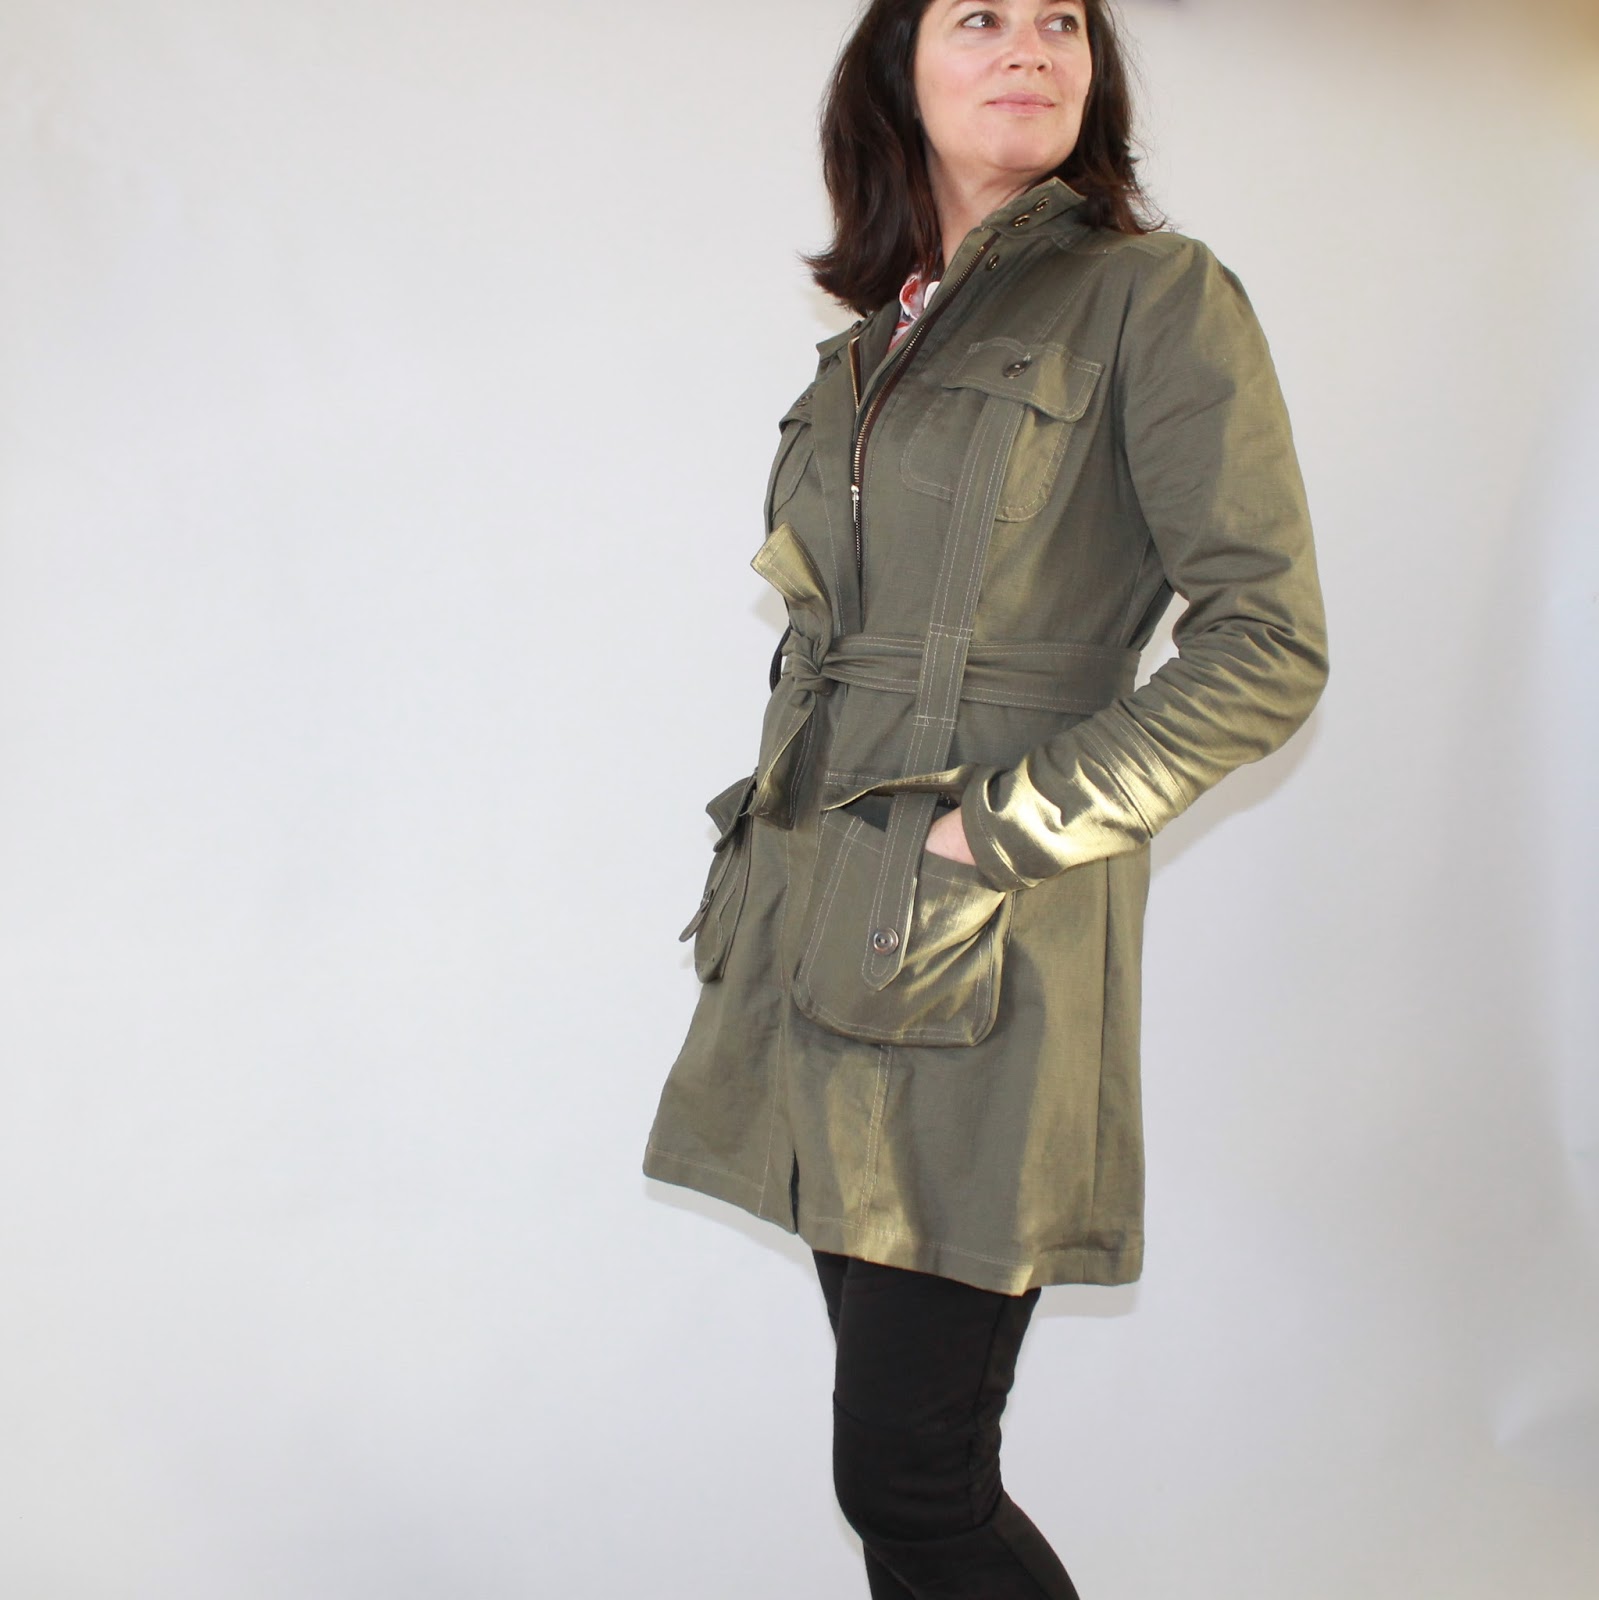
This is my wearable muslin for the real deal made from the olive green ripstop cotton. I don't usually bother with a muslin, but since I was getting the fabric from overseas and it cost more to post than to actually buy AND given that the instructions were in Spanish, I thought I'd better have a practise first.


This coat is made using some black stretch woven, possibly bengaline, with bleach spatters all over it. I bought this at a designer fabric sale because, although it came as lots of oddly-shaped pieces, I thought it looked cool and interesting. I love a good rummage at a designer sale (thanks Bronwyn for the fun outing). It took quite some time to cut out this coat in the end because the pieces were often not quite big enough for my pattern pieces. I did have to sew some together to fit everything on. Luckily the bleach splatters hide the joining seams quite well.


My previous attempts of typing Patrones Spanish instructions into Google translate have yielded hilarious but wholly unhelpful results. I decided this time to just work this out myself. The only things I did translate were the names of each pattern piece, which did help a lot. However, let me just say that 15 pattern pieces plus several strips of fabric for the belt, tabs, facings etc. did not make for a stress-free, instruction-free construction experience. Unsurprisingly, I got myself into quite a muddle involving jettisoning the hood through the nearest window and redrafting the collar to fit the ever-widening front sections. When I had finished the entire jacket, I realised that the front was too wide as I'd done something weird with the zip plackets. This is difficult to explain, but I think I know what to do next time. The picture below has the zipped-up front folded over itself at the top as it's so wide. I'm choosing to ignore this problem.


Anyway, focussing on the positives, I was pleased with the way the pockets turned out. I love the long tab that runs from the upper to the lower pocket, feeding through a welt hole in the lower pocket flap.


The pockets from the side:


And the matching tab at the back, forming the belt carrier.


The bleach effect was varied and interesting and I like how it looks. I tried to match the different bleach patterns a bit like here on the sleeve and cuff.


The coat is a perfect fit (apart from the wide front) and is super-comfortable due to the stretchy fabric. My ripstop has minimal stretch so I may need to allow for this in the next version.


Can you spot some fabric piecing in the pictures above and below? Hint: at the hemline.


Making this involved some swearing and seam ripping but I got there in the end and learned some useful lessons about jacket construction. I've made several notes for next time and I've been working on some less-taxing projects as I psyche myself up for the next attempt at this coat. I actually really love this version and have worn it out a few times already on cooler evenings.

Worn here with StyleArc Elle pants (unblogged but I just love these) and Seed boots.


Friday 24 October 2014

StyleArc Lola pants and Patrones top (329 #9)


Some time ago I went to a fabric sale. It was a moving sale at the crazy workshop of an eveningwear designer. I've mentioned this sale before, but I haven't shown you any of the silk I bought - until now!

I'm not usually one to spend heaps on fabric. When I began sewing a lot for myself I was a uni student and did it to save money. Then I never really got past that 'sewing to save' mentality. However, I have been conditioning and training myself at various textile establishments over the last few years and can happily say that the money I spend on fabric and associated accoutrements is increasing in an exponential fashion! 

But I still can't resist a sale. And I don't spend that much on fabric reeeeeally (just in case Mr M is reading).


So anyway, this sale had lots of silk and, although I resisted the more expensive rolls of fabric in favour of remnants, I bought a nice selection. The added bonus was that it was cheap enough that I didn't feel terrified to use it.

First I made these StyleArc Lola pants. I used navy silk charmeuse with the non-shiny side as the right side. I didn't have quite enough to fit the pattern pieces on properly, so I added a strip down the sides, shiny side out. I had to piece the strip but it's not terribly noticeable.


I used the shiny side for the waistband too. I left off the elastic at the hem.


I love these pants. The fit is great, I think they are on trend with the stripe, they are super-comfy and the silk is gorgeous.

My sister disagrees, but I'm ignoring her. Here's me practicing the look I will give her when I show her the whole outfit!


So then, getting a bit carried away and running the risk of producing pyjamas, I made a silk charmeuse blouse and wore it with the silk pants! Don't mess with me girlfriend.


The blouse is pattern 9 from Patrones magazine No. 329, which was a lovely gift a while back from Katherine of Bloom's Endless Summer. I must ask her how her move is going.

Patrones 329, pattern 9.
Before I began sewing, I helpfully spent some time typing the instructions into Google translate. This was the result:


I was at a bit of a loss as to where to begin, but I noticed the 'drinks between aplomas' part near the end so did quite a bit of that first, ignoring the aplomas as they didn't seem important. After that, the bit about 'two necks in front and one behind' started to make more sense and I went from there.  


The neckline was the trickiest part and mine isn't perfect. I blame the drinks and aplomas. Luckily the slight asymmetry and odd hand stitch are not noticeable when worn, partly due to the gorgeous idea of the decorative bead, which also helps to hold the neckline in place. I need to tighten the thread holding the bead so it can't be seen. I did not add elastic to the hem, preferring to leave it loose.


So there we are, I'm dressed head to toe in silk charmeuse and I'm loving it! I wore this out last night to the opening of an art awards and exhibition where my Mum had a painting. I was elegance itself!


LinkWithin

Related Posts Plugin for WordPress, Blogger...