Showing posts with label Pattern drafting. Show all posts

Thursday 29 September 2016

PR Sewing Bee Round 3 Challenge - The Colette Rue Dress


I made it to the third round of the PR Sewing Bee! My second round entry is here. The competition is hotting up now and this challenge was a lot harder than the first two. We were to make a Colette Rue dress, but put our own 'spin' on it. This may not sound too bad, but my feeling is that the 'spin' needs to be pretty amazing to make the cut in this round, not to mention the perfect sewing required.

Colette Rue Dress
The Rue Dress is a vintage-inspired design with a fitted bodice and two skirt options. While I love this 40s style on some people, it is not my thing at all. To make this wearable and fitting with my style it needed to be modernised and made into a more flattering shape for my body type. I didn't want to change the pattern too much though. It still needed to retain the essence of the Rue. I thought long and hard about what to do and eventually came up with this design.


I used View B of the pattern with the slimmer skirt. The bodice was redrafted to move the curved pieces away from the centre and towards the sides. The curves were redrawn and the new style lines continued down into the skirt and made into pockets. The sleeves were omitted as we are heading into summer. In addition to the design changes, I needed to make numerous fitting alterations, mainly to the bodice. I wanted the curved pieces below the bust, rather than on it, so that required some fiddling with the two curved pattern pieces and the bust pleats - not easy. I also needed to lengthen the bodice and lower the armholes (complete list of changes available here)

Here are the alterations I made to the two front bodice pieces. This alone took many muslins!


I chose this floral stretch denim fabric bought ages ago from Potter Textiles. The dress is lined with a cream floral cotton voile and the piping is made from polka dot fabric from the shorts I made in Round 1 of the Sewing Bee.


I was as precise and careful as possible with matching the piping at all the seam lines and the neckline. As for the invisible zip, let me just take a bow. I think it's the best I've ever done!


This process was difficult and stressful and took many hours. I often had a houseful of hungry teenage boys and my time limit was reduced by three days as I'm attending a felting course this week. A couple of muslins in, I did contemplate not completing this challenge. I emailed my sister who said that if she'd been doing it, the dress would have been a ball on the floor by now. That suddenly made me realise how long it's been since I hurled a sewing project at the wall (a fairly common occurrence in the early days). My gosh, maybe I have actually come quite a long way, if only in controlling my sewing hissyfits. I was spurred on to finish. Thanks sis!


I am really happy with the finished dress. It is a bit of a departure from my usual style, but still feels like me. My favourite thing is the pockets and how they blend into the new style lines. I am also very proud of the sewing I did here. Fingers crossed I make it to the final round of the competition.

Monday 8 February 2016

Anyone for tennis? - Jalie 3023 skirt x Virginia leggings and a Briar tee


I sewed up a storm for my Christmas presents last year and, now it's February, I am starting to recover enough to blog about it!

My sister requested a tennis outfit and emailed me very specific, illustrated instructions. Anyone who has read this blog for a while may know that my sister is not only super particular, but is also a lifetime member of the brutally honest brigade. I was feeling the pressure as I planned and sewed this outfit to her exact specifications!


The skirt was to be slightly A-line with a pleated lower back section under a second frill. It had to also have built-in shorts.

I chose stable lycra/ponte fabrics for the outer skirt in polka dots and plain black.

I used the swim skirt of Jalie 3023 as a starting point. I made a few changes to the pattern, which began with raising the waistline and adding some length. Then I cut the back pattern piece into two horizontally and created the lower frill by slashing and spreading the lower back pattern piece. The middle frill was made from a strip of black fabric cut on a curve so it only flared slightly.

Jalie 3023
I assembled the back of the skirt and added some decorative white topstitching along the seamline of the middle frill.


The box pleats are underneath the black frill.


The plain front piece was sewn to the back at the sides. Then, before I attached the waistband, I made some little, black, cotton lycra shorts using Megan Nielsen's Virginia leggings pattern (the best-fitting leggings pattern ever). The shorts and skirt were sewn together into a doubled-over waistband and hemmed with a cover stitch.


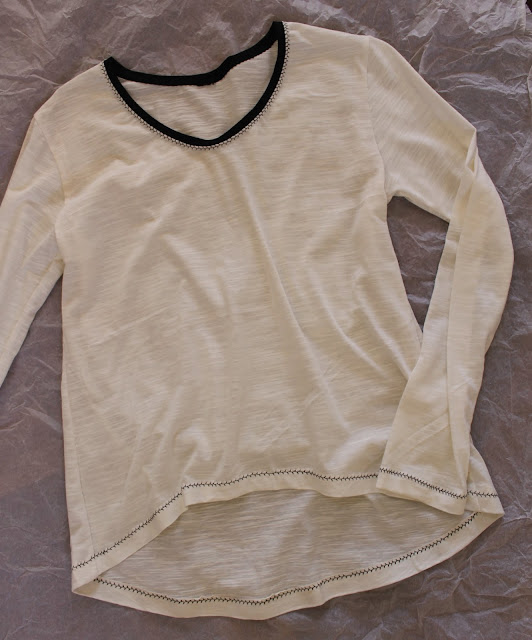
The black and white top was requested to provide some sun protection. I used the Megan Nielsen Briar T-shirt pattern and added long sleeves. The length was altered to somewhere between the t-shirt and crop top lengths. I used a lightweight, cotton knit fabric for the top and added a black neckline and decorative black topstitching on the hem and cuffs.


I was very nervous as my sister opened her present on Christmas Day, but she liked it! Then, the other day, she sent the pictures of herself in the outfit that you see here.

I was blown away. She looks amazing! OK, her legs look amazing, but the tennis outfit shows them off to perfection, doesn't it?


I was thrilled. 


And I bet no one else could concentrate on their game!

Monday 8 September 2014

Biker-style ponte pants tutorial with free pattern pieces


So, you saw my ponte pants and want to make some of your own?

Let's do it!

Supplies:
You will need approximately 1 metre of ponte fabric, a leggings pattern* and a printout of my additional pattern pieces for the quilting and knee detail (download free here).

*I used the Megan Nielsen Virginia leggings pattern and modified it as described below. You can use your own leggings pattern or make one by tracing a pair of leggings (remember to add seam allowances).

Method:

The Virginia leggings pattern has no side seams. You need to create some by folding the pattern in half lengthwise (see below) so the two crotch curves match up as closely as possible. Open out again and trace separate front and back pieces using the fold line as the new side seam. Don't cut it out yet. Next you need to add at least 1.5cm all the way down each of the long leg seams (inside and outside leg). This is because ponte knit doesn't have the same amount of stretch as leggings fabric. Larger sizes may need to add more leg width. 

Check your printed knee and quilted pieces against your leggings pattern. Add width if necessary to match your leggings width. 


Cut out all your pattern pieces, including the printed ponte pants pieces, from ponte fabric that has been folded with selvedges together. Take note of grainlines and direction of greatest stretch.


With the two front pieces right side together sew the crotch seam using an overlocker, zig zag or other stretch stitch. Repeat for the two back pieces.


Mark the placement of the quilted piece on your front leggings pieces. Mine is marked in white chalk 27cm from the top of the side seam. Adjust yours as necessary depending on your size. Hold them up against your legs to check placement.


Fold over the top 1cm of the quilting piece and place it on the leggings front piece level with the chalk mark you just made. Pin in place.


Topstitch along the top edge of the quilting piece. I chose to use a straight stitch and stretch the fabric as I sewed so the resulting seam has some stretch. You could used a triple stretch stitch instead but I find it to be less neat than a straight stitch. You can see the seam being stretched as it is sewn below.


Using your sewing foot as a guide, stitch quilting lines through the two fabric layers all the way down the quilting piece. Remember to stretch as you sew. I moved my needle to the right to get stitching lines approximately 1cm apart.


This is the finished quilting. Don't worry if the sides are a bit uneven.


Fold the edges of the knee pieces over by 1cm and place them so they overlap the quilting pieces by 1cm. Pin in place.


Topstitch along the top and bottom edges of the knee piece, stretching as you sew.


If you fancy pockets, add them to the back leggings pieces now. I used the pockets and placement from my Jamie jeans pattern and topstitched them in place. If you don't have a jeans pattern, use a pair of jeans as a guide.


 Trim any excess fabric from the edges of your quilted and knee pieces then sew your leggings together with an overlocker or stretch stitch. I like to sew the inside leg seam first, matching the crotch seams, then the outside leg seams. Add the waistband, hem the lower edge and you're done.


Hooray. Ponte pants!


Sunday 7 September 2014

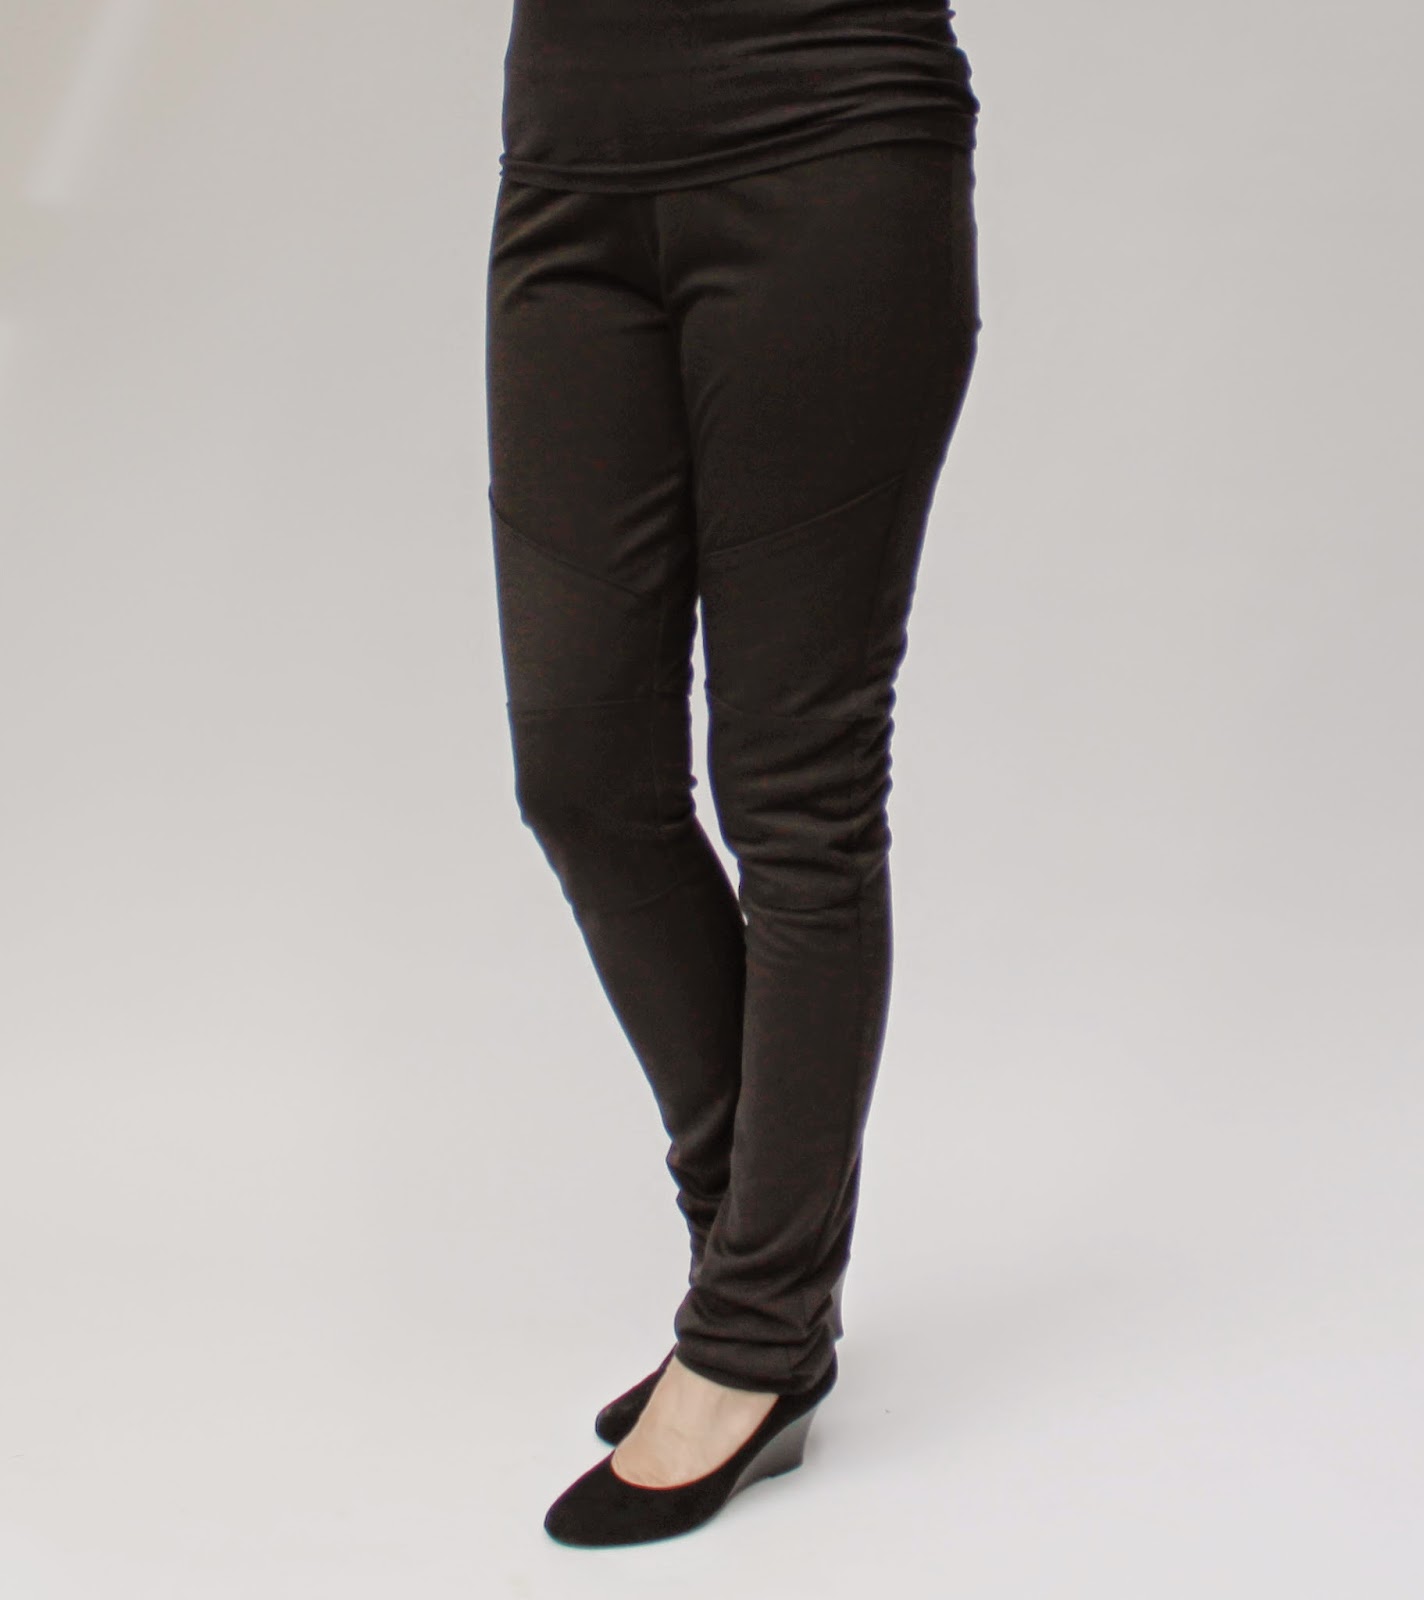
Ponte pants and another Briar t-shirt


Ponte pants. Ponte pants, ponte pants!


With quilting and knee patches.

Up until a week ago I didn't even know I needed these and now I can't get enough of them.


I liked them so much, I made another pair in black (a bit looser fitting). 


I've lightened these pictures to show the detail.


So comfortable.


And then my sister saw them and requested a pair....with back pockets.


So, here's what happened. I was chatting with my sister and she mentioned that she'd seen someone wearing ponte pants and how great they were and how she'd asked where this person had bought them from and this person said she'd bought them three years ago and they were no longer available. She chatted on a bit more but I wasn't really listening. My mind latched on to the words 'ponte pants' and careered off imagining what such things might look like and, more importantly, how I could make some. I knew immediately that mine would have a slight biker look. When I got home I googled some images and found my inspiration:

My inspiration was this ebay listing
I decided to use the Megan Nielsen Virginia leggings pattern as the basis for these and draw up some pattern pieces for the quilted area and knee patches. I created a side seam (this leggings pattern doesn't have a side seam) and widened the legs a bit to account for the limited stretch of the ponte.

And THEN, I drew up these pattern pieces all proper like so I could make a tutorial and include a download so anyone who also feels that they must have ponte pants can have them tooooo!

But you will have to wait until tomorrow for the tutorial and download. Also, the download will only be my quilted piece and knee piece. The Virginia leggings pattern is copyright, but you can get your own from here or use a different leggings pattern or even trace some of your own leggings and make your own pattern. 

So let's get that leggings pattern ready and tomorrow we'll make some ponte pants!

Oh yeah, and I made this t-shirt with the Megan Nielsen Briar pattern. Stretchy at the front and sleeves, woven at the back with a pleat for movement (described here).


 Oh and one more very exciting thing. Burdastyle recently asked for nominations so they could compile a list of the 50 best bloggers for sewing enthusiasts. AND I MADE THE LIST!!!! I can't believe it. Thank you so very, very, very much to whoever liked my blog enough to nominate me. I'm just happy that anyone wants to read about what I've made. Burdastyle now wants people to vote for their favourite blogs from the Top 50. There are some really great blogs on the list, so it's worth a look.

Until tomorrow xxx

Wednesday 30 October 2013

Little French Jacket progress report 1

Thewallinna
Many of you have probably heard the buzz about the little French jacket (LFJ) sewalong with Thewallinna and A Challenging Sew. I have admired these jackets over the years as they popped up on various blogs along with 70+ hour estimates of the time taken to make each one. 'Ha!' I scoffed. 'Surely it doesn't take anything like that amount of time'. So when I saw the sewalong I signed up pronto.
I had bought a Patrones magazine (Patrones Extra Dos Piezas, No. 24) earlier this year containing several drool-worthy LFJ patterns. I eventually chose this one. It has a matching skirt, which I may also make in the time left over from the 70 hours!
 

It's just as well I'm doing the sewalong as all the instructions are in Spanish, which I don't speak, although I am compiling a handy list of Spanish sewing terms. I've stuck it up above my sewing machine to study at my leisure!
First step was a muslin. I traced the pattern in size 42 (note: the sizing is different to Burda, in which I am 38) and used carbon paper and a tracing wheel to transfer the markings, stitching lines, grainlines etc. to my muslin. Would you believe I actually had some old sheets of carbon paper from my typewriter days? Well, if you knew me you probably would believe it! Everyone else is using newfangled sewing tracing paper in large sheets of fabulous colours. Pah!
Here is an early fitting of my muslin before I made a few additional tweaks. I didn't sew the back collar piece on the muslin. Bit of a sneaky time saver there!

The fit at the front was not too bad.

The back needed a bit more length and flare in the peplum and some fitting in the lower back. Once that was done, I drew all the new stitching lines with red and blue marker pens and unpicked all the seams (below right). Next, I had to cut all the seam allowances off using the red and blue guide lines (below left).
Ok, don't get excited, but we're about to unfold the actual jacket fabric!
I'm using a pink boucle with stripes that I have decided to place horizontally. When I went to take this photo I noticed that the stripes were completely wobbly. I fixed that up quick smart before anyone noticed. Here I have all my upper (non-peplum) pieces that are carefully placed so that hopefully the stripes will line up on the finished jacket. I did the same again with the peplum pieces. The sleeves will be cut after basting the jacket together to better match the stripes. The pieces are placed far apart to make room for huge seam allowances, which enable fitting adjustments later and allow for fraying of the fabric.
I feel like my boys on a long car trip. Are we there yet?
No, we are not!
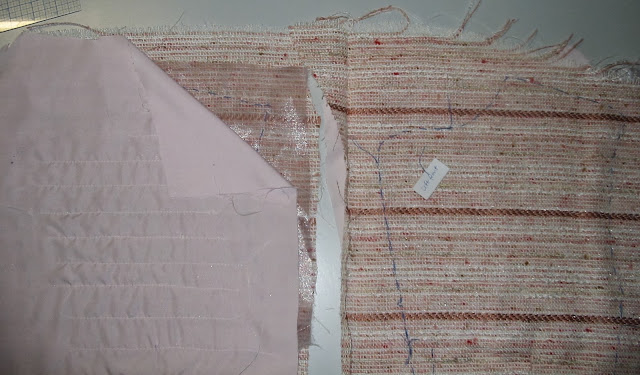
Once the pieces were roughly cut (above), each one needed to have the outline of each pattern piece hand sewn in running stitch in a contrasting coloured thread (visible below). The shoulder seams then had to be strengthened by cutting a piece of organza to fit the shoulder to the lower armscye and then these boucle pieces were used (still with the muslin pinned in place) to cut the lining for every pattern piece, being careful to match grainlines.
Deep breath. Then came the quilting.
After some trial and error, I decided to quilt in straight lines parallel to the stripes in the fabric. This is done by machine (thank gawd), but has to be an inch in from all sides and 2 inches in from the hem. I used my handy inch gadget thing to measure as I went. The quilting lines were 2-3cm apart and, I'm pleased to say, are invisible in this example (to the right of the inch gadget).


Here we are with the quilting done (not yet ironed) shown from the back and the front, ready to have the threads pulled between the boucle and lining and hand knotted. Yes, every blinking thread. Yes, it took hours. The organza stabiliser is also visible here, as are my sticky labels identifying each piece.


Hooray, we're finally ready to sew something together.

Oh, and just quietly, to the diehard readers who made it this far, that 70+ hours....I think it's an underestimate!

Update: For Part 2 of the Jacket construction, please click here.

LinkWithin

Related Posts Plugin for WordPress, Blogger...