Showing posts with label sewing techniques. Show all posts

Tuesday 22 March 2016

Little leather bag


I have been making little leather bags for a while, but have never blogged them before. My last one recently needed replacing so I thought I'd take some photos of the process I used to make this one.


This bag measures 18 x 22cm and is small enough to hang over my wrist so I have both hands free for important things like walking the dog and rummaging in op shops and fabric sales. 


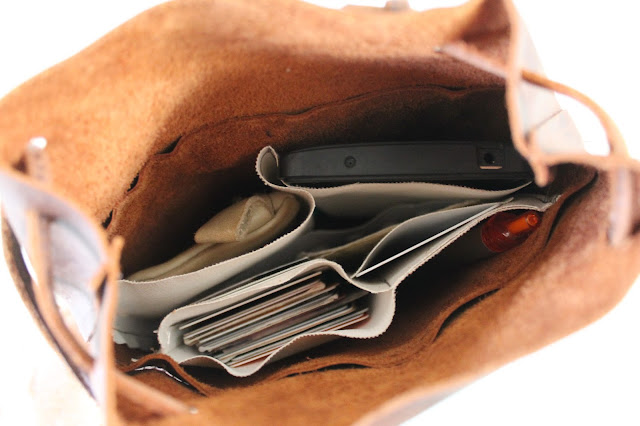
The inside is completely custom designed to fit my personal things. I have larger pockets for my purse, phone and general cards and additional pockets for frequently used cards, my sewing pattern wishlist, headache tablets etc. 


As soon as the bag is picked up by its handle, the top pulls closed and holds everything inside.

This clever design is based on a tutorial by jujumade. She makes the most stunning bags accented with ceramic beads. My first bag was made by following her tutorial, but I have evolved my process since then to suit my needs.


This is not really a tutorial, I just took a few progress pictures. Using leather scraps from Remida Creative Reuse Centre, I cut two rectangles. One was approximately 22cm wide and 15cm high* and the other was 22cm wide with some excess at the base to form the bottom of the bag. These were machine sewn together along one side. Using canvas, also from Remida, I sewed pockets for cards and things (above left) and larger pockets for my phone and money (right).

*I ended up deciding this was not deep enough for the bag and I added another 8x22cm piece on top of each side.


Once the pockets were sewn in place (using minimal stitching so it would look nice from the outside), I needed to close up the second side of the bag. This had to be hand sewn, so I ran the leather through the machine without thread first to create the holes. That made the hand sewing much easier and neater (above).


Next I determined where to cut the base, which was the excess of one side folded under. After cutting, I held it in place with clips and sewed it by machine.


I made the strap by sewing a 1cm wide strip of leather in half lengthways. Holes were made in the top of the bag with a leather punch (four holes on each side) and the strap threaded through and knotted in place.


Lastly I added my little purse that I'd made to go with my last bag. It has been well used and is a bit grubby, but still perfectly functional.


Voila. A cute and very practical new bag with a special place for everything I need. I have been taking this everywhere since I made it and it's perfect.

Sunday 15 March 2015

Biker-style jeans a la Balmain


When I spotted this khaki stretch cotton in Textile Traders last week I knew exactly what I was going to make. Grungy, biker-style jeans, that's what. My inspiration was these jeans by Balmain, recently selling for US$695 at The Store. I bought 1.5m of fabric for $18 and a zip for $3. That's more like it!

Pierre Balmain Military Green Coated Biker Jeans: Source

The features I wanted in my jeans were the front seams, quilted hip panels and partly quilted back pockets. The Jamie Jeans pattern by Named Clothing was a perfect starting point as it has the front seams and two-piece back pockets. I just needed to draw up a diagonal panel for the front quilting.


So, while my fabric was sloshing away in the washing machine, getting all nice and faded, I drew up the pattern pieces I needed. I found a strip that I had cut off a summer-weight bed quilt ages ago and cut the pieces for quilting from that. Two lower pockets and two parallelograms for the front.


I used the outer quilt fabric to keep the wadding in place.


Here are my quilted front pieces. The one on the right has been trimmed down ready to turn the long edges under and topstitch on to the side front jeans piece.


This is how the fabric looked after one wash - just how I wanted it.


Once the quilting was done and sewn in place, these were straightforward to make. I've made this pattern a few times now and it is my very favourite jeans pattern. I just made some minor fitting adjustments and added some extra leg length at the cutting-out stage. The fit isn't perfect with a few wrinkles at the back, but I'm happy.


 My finishing touch was this rectangle of leather that I stamped with my life's philosophy!


 Phew! Done in a day and a half, ready for a last-minute entry in the Pattern Review Jeans Contest.


$695 jeans for $20? Don't mind if I do!


The tank is self-drafted and made from bits and pieces from my stash. The front is a lovely soft print remnant from Potter's Textiles.


I'm rather pleased that the direction of the quilting lines match on the pockets and front panel. Completely intentional of course ;)


Overall thoughts: love, love, love these!

2015 Jeans Contest

Sunday 11 January 2015

StyleArc Tammy knit dress


I bought a couple of StyleArc patterns in the member sale last month and this pattern came free with my order. It's the Tammy knit dress, a simple pattern with lots of options for different looks.

StyleArc Tammy knit dress combo
I love a simple knit dress and was eager to try this out. Since this was going to be an easy pattern to make, I decided to set myself a challenge. This was not to be an ordinary challenge involving speed or tricky fabrics. This was to force me to overcome a hurdle I have been avoiding for years. This was (the excitement is palpable now) to finish the hem with a coverstitch (and the crowd goes wild). 

I have a Bernina 2500DCET overlocker which converts to a coverstitch machine. An incredible concept that, despite filling me with excitement, I have largely ignored, aside from a couple of fumbled and disastrous hemming attempts when I first bought the machine around five years ago.

At a recent sewing blogger meet-up in Perth, Sue of Fadanista casually mentioned that she has an overlocker/coverstitch machine and happily flits between the two settings. Well, that was too much for me and mastering the coverstitch became my New Year's resolution.


Anyway, back to the dress. It is a very easy pattern with just the front, two back pieces with a centre seam, sleeves and neck binding to sew together. I used a basting stitch to make sure the stripes were matching before finishing the seams with the overlocker.


I used a nice quality, striped, knit remnant from Potters Textiles. The 1m piece only cost $6 and I managed to squeeze the whole dress out of it, although I had to make the sleeves a bit shorter than the pattern intended to fit them on the fabric.


I made a size 10 and changed only the sleeve length and the neckline. I lowered and slightly widened the front neckline using the Briar t-shirt pattern as a guide. I think the fit of this dress is perfect, not too tight or too loose and incredibly easy and comfy to wear. I know I'll be reaching for this all summer.


The back neckline is scooped, which I quite like, and the front is neatly finished with a narrow band. OK, I know, you want to hear about the coverstitching. Well, here it comes...


Oh be still my beating heart! But wait there's more...


While you reCOVER from that excitement, let me fill you in on the details. It turns out that it's not really that hard at all to convert my overlocker to do coverstitch. The secret is to read and follow the instructions. Who would have thought it? Actually I'm generally pretty good at reading instructions so I'm not sure why my previous efforts failed. Anyway, this time I was super thorough and it worked! Next time I might move on to the next chapter and try a two thread coverstitch. Whee hee!


The only problem, aside from the hem stitching being a bit wonky, was that there was some slight puckering. I'm guessing that this must have been because I had the differential feed set at 1.5 instead of zero. I should have checked that before I started.


 I definitely recommend this pattern for a simple and perfect summer dress. I will certainly be making more and look forward to trying the overlay top too. As for coverstitching, well this is just the beginning. A whole new hemming world is opening up to me and I can't wait to explore it!


Wednesday 1 October 2014

New jeans - Named Wyome boyfriend style


It's no secret that I love the Jamie jeans by Named. I think I've made six pairs of them now (not all blogged) and I wear them all the time. 

So when Named released a new jeans pattern, the Wyome boyfriend jeans, I couldn't help myself. 

This post is an analysis of my first two pairs of Wyomes - the fit, the tweaks and the future.


My first pair was in this lovely, but wrinkly, lightweight denim. The Wyomes are made from non-stretch fabric and have a slightly relaxed fit. This pair I made with no changes to the pattern. Well, at least I did at first.

I made a size 10 according to my measurements. The size 10 Jamie jeans are a great fit on me. These turned out to be a closer fit than I expected from the pattern picture - not tight, just less loose, if you know what I mean. I searched for the boyfriend-ness in the style and wasn't sure I found it. Still, I liked them and modelled my newly finished pair when my sister came over. 


I should mention that my sister is my biggest critic: "New jeans? Turn around....Oh...No...They are not flattering on the bum. The pockets are wrong, they're too low and too small. Hmm, and the front is too baggy just there so it gives you a camel toe when you walk. Good fabric though."

"Please say what you really think." I retorted (well I thought about it). "Don't sit on the fence. Oops, did I just fling your hot cup of tea at you slightly too roughly?" 


The problem was, as usual, she was right.

There wasn't much I could do about the front crotch but, when she'd gone, I ripped off the offending back pockets with their cute chevron stitching and replaced them with pockets from the Jamie jeans pattern. I used the Jamie pocket placement as a guide so they sat higher up on the back.

This is what I ended up with - Wyomes with no changes except to the back pockets (and a zip fly instead of buttons):


My sister deemed the new back pockets an improvement so, with renewed hope, I set about making a second pair.


These were made as a wearable muslin (I know, I should have done that the first time) so I used a piece of curtaining fabric picked up from Remida. It was lovely and soft, but terrible to sew as it didn't pass through the machine easily, resulting in uneven stitches.


I made the same size, but changed the crotch curve very slightly. The Wyome crotch is quite different to the Jamie crotch in size and shape so it wasn't possible to just copy the Jamie curve. I decided to compromise and took in a 1cm sliver from the bottom of the fly to the crotch point of the Wyomes. I think it has improved the camel toe issue, but there are still wrinkles there.


The back is unchanged apart from using the Jamie jeans pockets and placement. I added 5cm to the leg length so I could wear these unrolled. After trying them unrolled, I decided I won't wear them that way. However, I haven't consulted my sister, so this may change!


These are still not perfect, but I really like them. They are very comfortable and look good with a top worn untucked. I am pleased with the slightly relaxed style and love that they can be made with non-stretch fabric. It makes a great alternative to the many stretch jeans I've made recently. Although they are overall closer fitting than I expected, the fit itself is spot on at the waist and hips.

So what's next? A linen pair, already cut out and partly assembled. I'm hoping linen will give more of a relaxed feel. The next pair will incorporate some of the tweaks I've mentioned and I think I'm going to like them a lot. Will I show my sister? We'll have to wait and see. It might mean crediting her with the ideas for improvements and I couldn't possibly do that!

Monday 8 September 2014

Biker-style ponte pants tutorial with free pattern pieces


So, you saw my ponte pants and want to make some of your own?

Let's do it!

Supplies:
You will need approximately 1 metre of ponte fabric, a leggings pattern* and a printout of my additional pattern pieces for the quilting and knee detail (download free here).

*I used the Megan Nielsen Virginia leggings pattern and modified it as described below. You can use your own leggings pattern or make one by tracing a pair of leggings (remember to add seam allowances).

Method:

The Virginia leggings pattern has no side seams. You need to create some by folding the pattern in half lengthwise (see below) so the two crotch curves match up as closely as possible. Open out again and trace separate front and back pieces using the fold line as the new side seam. Don't cut it out yet. Next you need to add at least 1.5cm all the way down each of the long leg seams (inside and outside leg). This is because ponte knit doesn't have the same amount of stretch as leggings fabric. Larger sizes may need to add more leg width. 

Check your printed knee and quilted pieces against your leggings pattern. Add width if necessary to match your leggings width. 


Cut out all your pattern pieces, including the printed ponte pants pieces, from ponte fabric that has been folded with selvedges together. Take note of grainlines and direction of greatest stretch.


With the two front pieces right side together sew the crotch seam using an overlocker, zig zag or other stretch stitch. Repeat for the two back pieces.


Mark the placement of the quilted piece on your front leggings pieces. Mine is marked in white chalk 27cm from the top of the side seam. Adjust yours as necessary depending on your size. Hold them up against your legs to check placement.


Fold over the top 1cm of the quilting piece and place it on the leggings front piece level with the chalk mark you just made. Pin in place.


Topstitch along the top edge of the quilting piece. I chose to use a straight stitch and stretch the fabric as I sewed so the resulting seam has some stretch. You could used a triple stretch stitch instead but I find it to be less neat than a straight stitch. You can see the seam being stretched as it is sewn below.


Using your sewing foot as a guide, stitch quilting lines through the two fabric layers all the way down the quilting piece. Remember to stretch as you sew. I moved my needle to the right to get stitching lines approximately 1cm apart.


This is the finished quilting. Don't worry if the sides are a bit uneven.


Fold the edges of the knee pieces over by 1cm and place them so they overlap the quilting pieces by 1cm. Pin in place.


Topstitch along the top and bottom edges of the knee piece, stretching as you sew.


If you fancy pockets, add them to the back leggings pieces now. I used the pockets and placement from my Jamie jeans pattern and topstitched them in place. If you don't have a jeans pattern, use a pair of jeans as a guide.


 Trim any excess fabric from the edges of your quilted and knee pieces then sew your leggings together with an overlocker or stretch stitch. I like to sew the inside leg seam first, matching the crotch seams, then the outside leg seams. Add the waistband, hem the lower edge and you're done.


Hooray. Ponte pants!


LinkWithin

Related Posts Plugin for WordPress, Blogger...