Showing posts with label Natural dyeing. Show all posts

Wednesday 13 April 2016

StyleArc Tammy Dress, handstitched Alabama Chanin style


This project has been on the go for a while, which is exactly how I like it. I really enjoy having a little something to work on in the evenings or while on holiday.


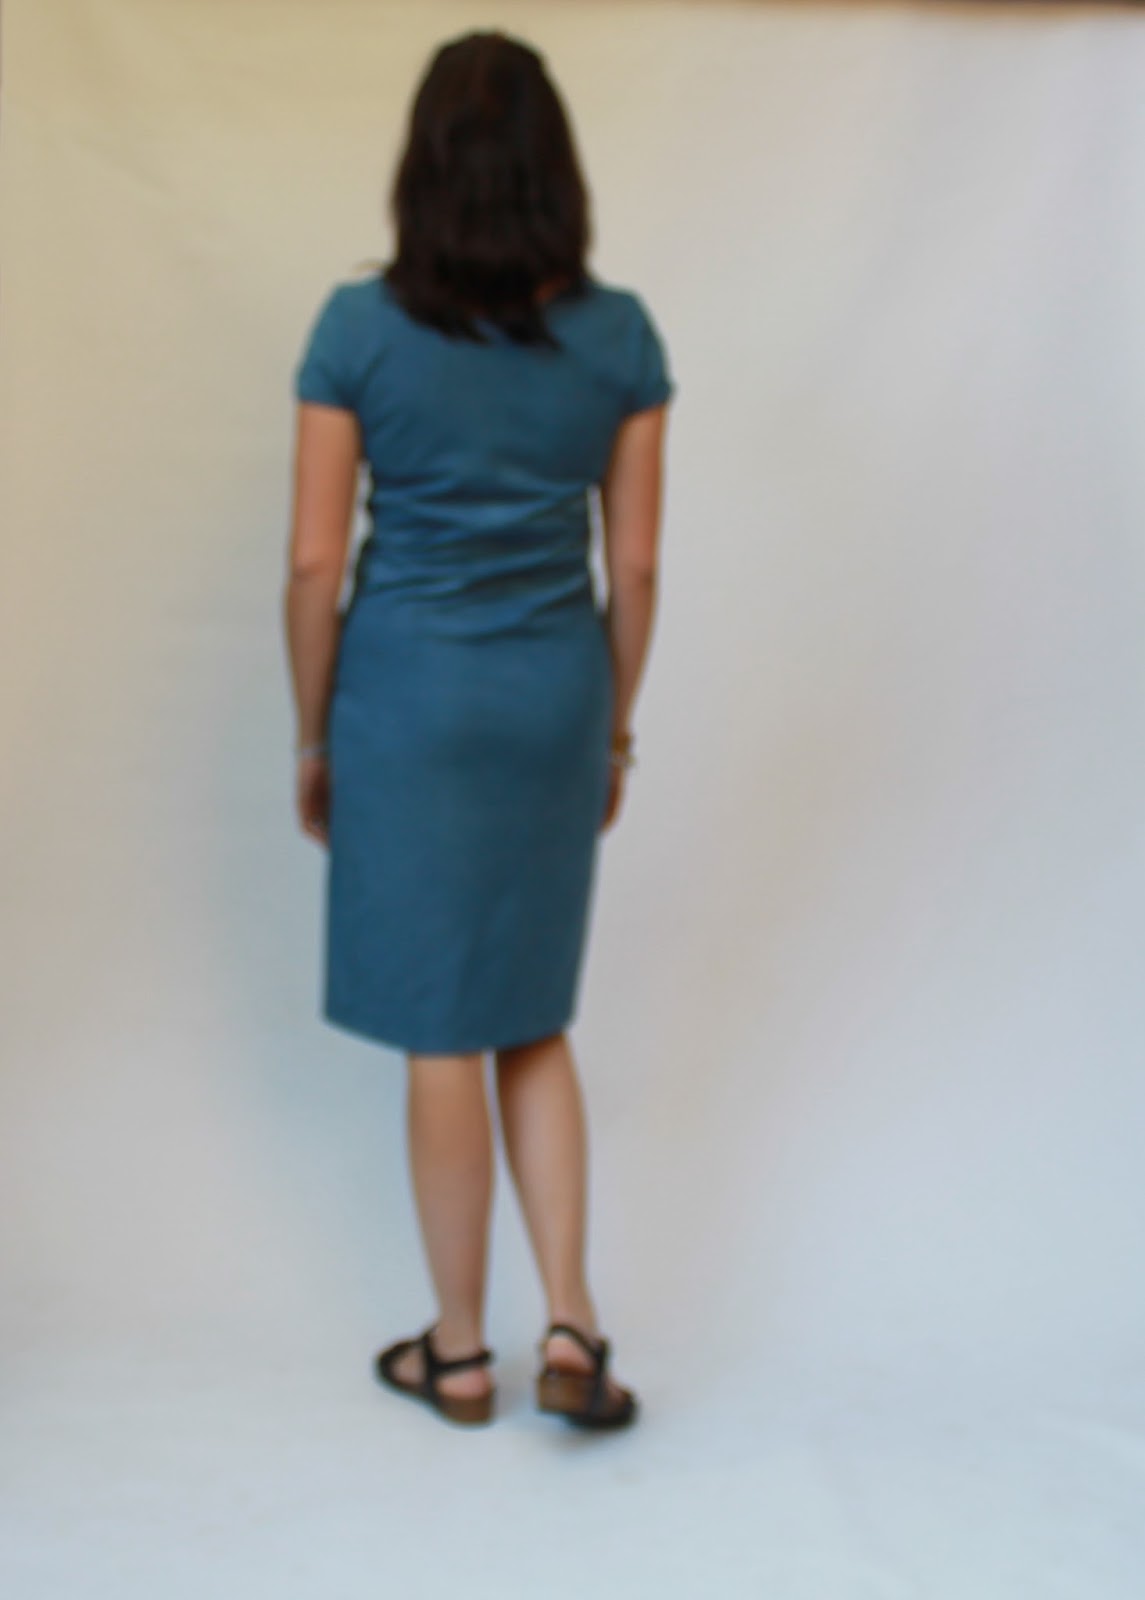
I dyed the fabric, a white 100% cotton knit, with indigo last year at the studio of Trudi Pollard. In my enthusiasm, I forgot to pre-soak the fabric in water and added it dry to the dye pot. This is not recommended as it introduces air into the vat. However, it did produce this lovely splotchy blue and white pattern as the dye penetrated the scrunched up fabric.


I just love that faded denim colour.


I used the StyleArc Tammy dress pattern as it's one of my favourite patterns. I used two layers of fabric in the dress, the blue on the outside and the same fabric in plain white on the inside. They were treated as one piece and handsewn together to create the dress. This gives the dress more structure. I used navy blue embroidery thread for the topstitching.


The neckline is finished with a strip of fabric folded over the raw edge and stitched in place with a decorative stretch handstitch. I have taken to basting the neckband on by machine before the hand sewing as I find it easier to stretch the band while machine sewing it. It's quite hard to stretch the band enough while hand sewing. This way the band sits nicely and doesn't flip out. I removed the machine basting afterwards.


The neckline is also embellished with tiny blue and white beads sewn in a random pattern. I had to hunt down my tiniest needle to fit through the beads. The beads are sewn all the way around the neckline, none of that RTW only-on-the-front nonsense!


The sleeves were finished by turning under and hand stitching in place.


The hemline edge was left raw and I stitched three narrow strips of fabric above the hem with little pleats here and there and a few beads to catch the light. This ruffled technique is one I've long admired from Natalie Chanin's books.


I was rather sad when this project came to an end. I kept thinking of new embellishments I could add, but decided that there was enough going on as it was. This was very quick for an Alabama Chanin project as there was no applique. I have done a reverse applique project before but I think this plainer design probably suits my lifestyle better. It doesn't stop me drooling over Alabama Chanin applique though, most notably Carolyn's beautiful outfit she posted a few days ago, which is probably the best I've seen anywhere.

Happy Stitchin!

Monday 14 March 2016

Indigo dyed casual shirt dress - modified Named Wenona


As the summer here in Perth got hotter and hotter (and it continues into autumn), all I wanted to wear were loose, cotton, sleeveless dresses. I had dyed this piece of double gauze in an old vat of Japanese indigo. The colour in the vat was almost exhausted and barely there, but resulted in this soft, dusty blue, which I loved.


This pattern was based on the Named Wenona shirtdress (previously made here and the shirt here), but I made a few changes. The Wenona dress pattern has a seam at the waist, which I eliminated. I also took in the sides quite a bit so the dress could be worn without a belt. I left off the sleeves and cut the top shoulder piece down to fit.


I kept my favourite feature of the button on the back collar.


The collar stand and back yoke were lined with a yellow and blue patterned cotton scrap given to me by a quilting friend.


And I used pale yellow buttons to keep the contrast going.


The slightly mottled, pale denim blue seems perfect for the relaxed style of this dress. I used grey thread for some subtle topstitching.


I have worn this dress so much. It is very, very casual, but just so comfortable. I love it.


Sunday 6 December 2015

Indigo dyed Vogue 8897


I have had this pattern for quite a while and decided it was about time I used it. As usual, I googled the pattern to see what others had made. Unfortunately there was not a lot of enthusiasm for the pattern out there. It seemed everyone who had made it needed major adjustments to even begin to achieve a good fit.

Vogue 8897
The pattern is Vogue 8897. The drawing on the envelope makes the dress look quite fitted and lovely:

Vogue 8897
The picture on the website looks more like a nun's nightdress on a saucy evening:

Vogue 8897
The latter is the more accurate picture. Why I looked at this picture and still decided to use the pattern is beyond me. The fit is horrendous and that badly pressed pink fabric with the wonky stripes is hurting my eyes!

To cut a long story short, I should have listened to those wise sewers who had gone before me. However, I am not one to abandon a project so, once I'd started, I fussed with this until it was wearable. I'm very happy with the dress now, but I wouldn't recommend the pattern unless you are after an unwearable sack a loose beach cover-up.


Having established that the pattern was a dud, let's talk about the fabric. This is unlike any fabric I've seen before. It is cotton with random flower patterns slashed into it. The flowers seem to have a dot in the centre indicating that perhaps a special tool was used to make the cuts. I bought it at the 'Breathless' designer fabric sale in Perth a couple of months ago. I don't know if the cuts were made by the designer or if she bought it like that. I would love to find out.


The fabric was originally white and I dyed it blue with the Dharma Trading Indigo kit. I dipped the fabric three times, for about five minutes each time, to get this intensity of colour. To highlight the flowers, the dress was completely lined with white cotton.


The pattern has a centre seam, which was useful to drastically reduce the length of the neckline opening. I omitted the facings since I had lined the dress.


To improve the fit I added back darts using the Colette Laurel shift dress pattern as a guide for length and placement of the darts. I also took in the side seams a fair bit and omitted the pockets, which would have added bulk in the wrong places.


The fit adjustments were numerous, but fortunately not difficult due to the simplicity of the pattern. I love how the dress turned out, but that is mostly down to the interesting fabric and the indigo dyeing. I hope I've learned my lesson not to ignore the findings of my pattern research in future!

Sunday 22 November 2015

Megan Nielsen Mini Tania Culottes


Living in a house full of boys, I don't get many chances to sew girly clothes. However, I do have two nieces, so when Megan Nielsen was looking for pattern testers for her new girls collection, I jumped at the chance.


These are the Mini Tania Culottes - little shorts that look like skirts. Girly and practical, the perfect combination.


The Mini Tania pattern comes in three lengths, short, above the knee and below the knee. I made the shortest length and I think it's just right, cute without being too short.


I have made Megan Nielsen patterns before for myself and have always been impressed. The instructions are very clear and the patterns are well drafted and carefully thought out. The children's patterns are made to the same high standard. These culottes were super easy to make and the instructions gave enough information for a beginner to achieve a professional result.


I chose the sizes based on the girls' measurements and they were spot on for their ages. The fit is perfect.


I made both these pairs from white cotton calico. The smallest pair was embellished with circles of calico that I had sprayed with Tumble Dye, cut out then sewn on to the culottes. The Tumble Dyes were bought from Dharma Trading.


The blue pair were shibori dyed in navy blue dye that had been used a few times for other things, so it gave a pale denim colour. The circles were produced by stitching, a method I found in my book 'The Modern Natural Dyer' by Kristine Vejar. I love this book as a very practical introduction to natural dyeing.


The front and back of the garment was pinned together and stitched as one piece to save on sewing. I drew circles with disappearing ink and pinned the two layers together.


I then stitched around each circle, with the stitches extending about 1cm inside the circle. Once complete, the thread was pulled tight and knotted ready for dyeing.


I was really pleased with the effect this produced.


The girls loved their culottes and have worn them a lot since they were made a couple of months ago.


 They also enjoyed the photoshoot!


Such little cuties.


I've got lots more girly sewing planned for Christmas prezzies. Hello Mini Briar tee and Mini Virginia leggings!

Monday 26 October 2015

Indigo dyed twisted dress (Burdastyle 06/2014#102)


I loved the Japanese-influenced patterns from the June 2014 issue of Burdastyle and have finally got round to making something from the collection. This is the 'twisted cap-sleeve dress', so called because the side seams and sleeves are asymmetrical, causing both to twist. As the wearer puts on the dress, the lower half needs to be twisted, moving the side seams to the sides and producing subtle wrinkles across the torso.

Burdastyle 06/2014#102 - I wish I looked like this in my dress!
In order for the dress to stay in its twisted state, it is quite tight. This is all very well on the beanpole model, but when I look in the mirror all I see is tummy and VPL. As much as I admire the twisty design, I think I may need to perform some surgery on this dress to make it looser and more flattering on me.

Truffle is unimpressed.
The dress is made from medium-weight, stable, knit fabric found at Remida. It was originally an oatmeal marle colour, which I decided to dye in an attempt to recreate the subtle striped look of the Burdastyle dress.

Blurry back view
I used natural plant indigo dye from a kit I bought online from Dharma Trading. This contains everything you need for small-scale indigo dyeing. I used half the kit, which was plenty for some experimenting.
Indigo kit from Dharma Trading

Here is the dress on the mannequin before dyeing.


I folded some of the front of the dress into fairly even pleats and hand stitched them loosely in place so the dye would penetrate most of the fabric and produce subtle stripes.


Then into the dye it went. Elbow-length gloves for me!


Here's how the pattern looked when it came out of the dye.


When it dried it was lighter and the neckline had some dark splotches, but that's all part of the unpredictability and fun of natural dyeing.


All in all, I'm really happy with this project. Although the dress is too tight on me, I loved playing with the dye and the indigo colour is beautiful. I'm pleased with the stripy effect and I definitely think the dress is worth adjusting for a more flattering fit.

LinkWithin

Related Posts Plugin for WordPress, Blogger...