Showing posts with label Natural dyeing. Show all posts

Saturday 12 September 2015

Japanese natural dyeing workshop with Kitta from Okinawa


Naturally dyed fabrics in Trudi Pollard's studio


At the end of August, the Perth 'One Year One Outfit' crew and a few other interested dye-hards (!) travelled to the studio of textile artist Trudi Pollard in the Perth hills. We were there for a unique and rare workshop, 'The Colour of Wonder' with Kitta (Yuko Sawano), a Japanese natural dye artist, her husband and some colleagues. We had the whole day for the workshop. It was a gorgeous, sunny, late winter's day and Trudi's studio was rustic, comfortable and filled with things of beauty.

You may remember that 'One Year One Outfit' is a worldwide challenge to make an entire outfit by hand from locally sourced materials. I've already done some felting and knitting with Western Australian wool and was keen to learn more about dyeing with plants. The challenge has been incredibly inspirational and creative. I've made new friends, learned unusual techniques and become increasingly aware of sustainable fashion and our local environment.


This workshop was another fascinating component in our quest for the creation of a beautiful and sustainable outfit. We hoped to gain knowledge of dyeing to apply to our locally sourced textiles.

Following a welcome, cups of tea and homemade goodies, we chose a two metre piece of Japanese linen to use for our dyeing. The linen had been prepared beforehand and was either washed and pre-wetted in water for the blue indigo dye or soaked in soybean juice and dried for red madder dyeing. We had to choose which dye we wanted to try and select our linen accordingly. I chose some wet linen for indigo dyeing.


The Indian madder root was already boiling in water over a fire. We went outside to strain it through cloth, add more water and put it back to boil for a while longer.


Strained madder root, which can be reused

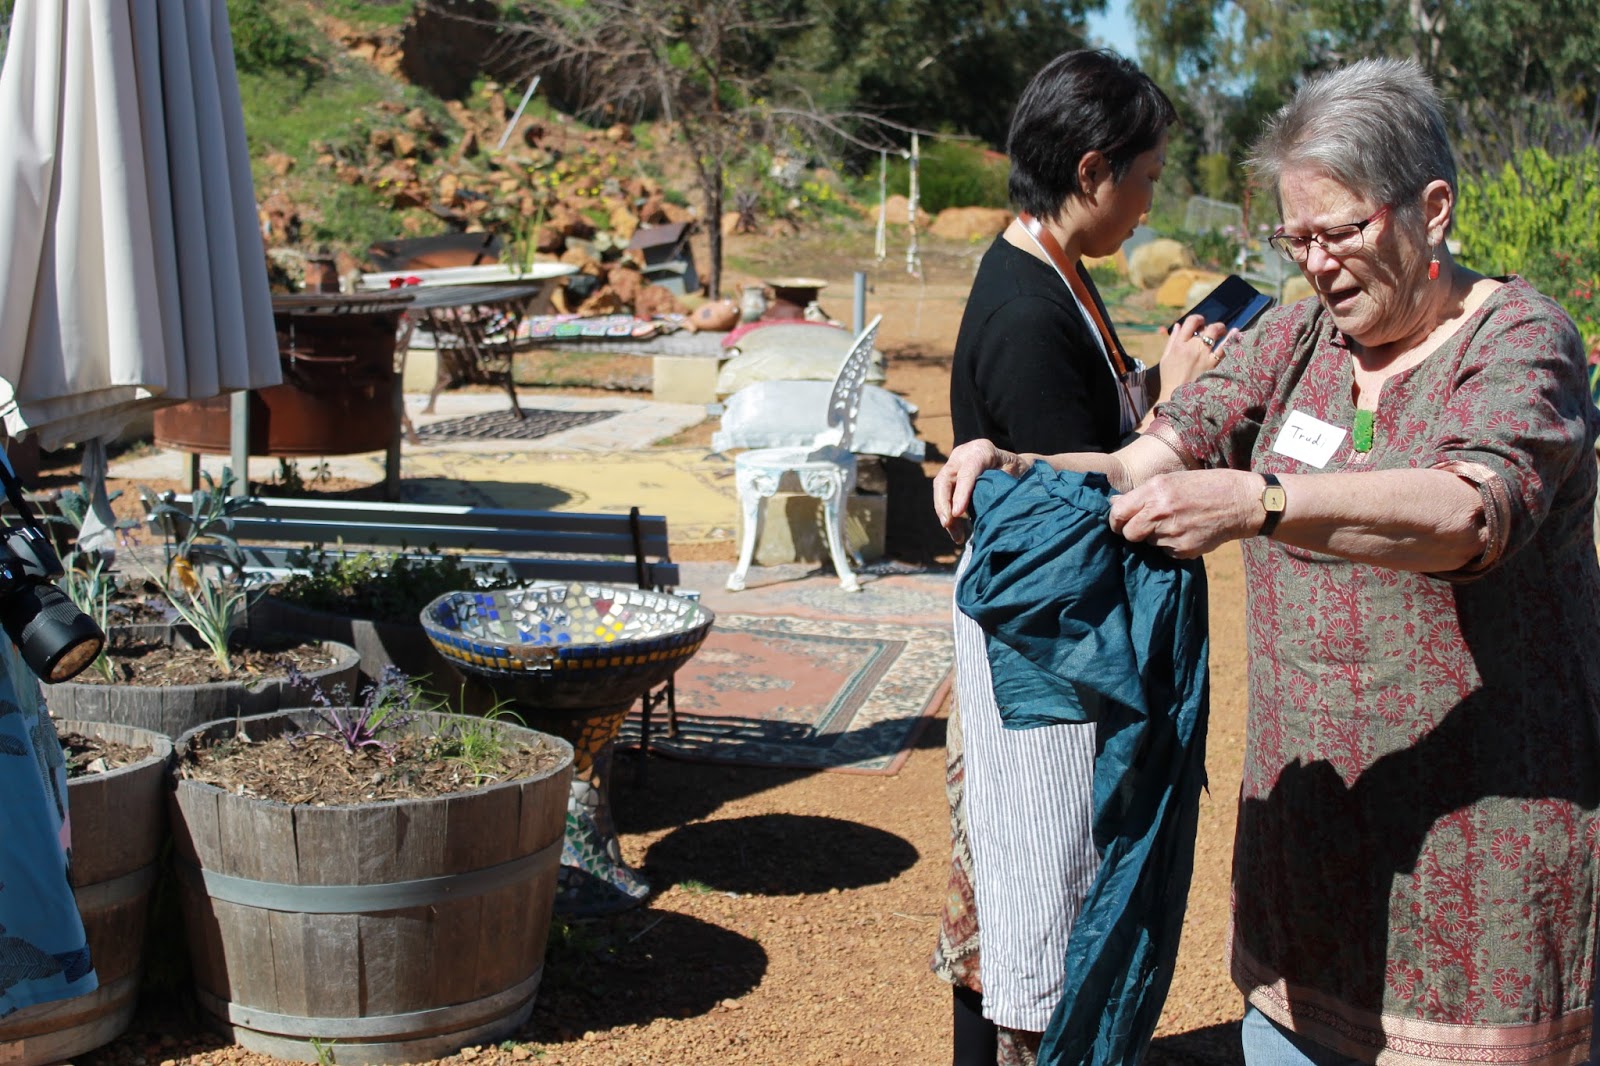
That's Kitta in the centre (below), wearing her gorgeous, naturally dyed clothes, and her husband on the left. Nicki (right) came up with the whole 'One Year One Outfit' idea and organised this workshop. Yay Nicki!


If I remember correctly, Kitta and her family, being passionate about the environment and interested in Japanese history, purchased an indigo factory in Okinawa, Japan. They revived the traditional techniques of growing the Ryukyu Indigo plants, harvesting them by hand with simple tools and extracting the dye from the leaves using vats dug into the ground. We were shown a video of the process while Kitta's husband played soporific and beautiful guitar music.


Kitta had brought some of her Indigo dye with her and it was growing and fermenting in a large tub in the studio. I'm not quite sure how she got it past the strict Australian customs! The bacteria must be carefully tended and kept alive throughout the dyeing process and beyond so the dye can be used over and over again. The temperature and pH must be checked and adjusted daily and only a certain amount of fabric can be dyed on any one day so as not to 'exhaust' the bacteria. That was why only half of us could use the indigo dye. This aspect of the process was fascinating to me and reminded me of growing bacteria and parasites during my scientist days! Biology and dyeing fabrics, what could be better!?


One by one we dipped our linen into the warm indigo tub, massaging the liquid into the cloth. We had to keep the linen below the surface and try not to introduce bubbles of air. After a few minutes, we brought the fabric out and waved it in the air to oxidise the dye, which quickly changed from greenish to blue. That's Trudi below right.


Some people got right into the experience and used their bare hands. I used gloves to preserve my natural skin colour!


Trudi had some Australian native indigo, Indigofera Australis, growing in her garden, amongst other natural dye plants. Apparently the crushed leaves of this species were used by aborigines to stun fish and eels in water.

Native Australian indigo
Eucalyptus coreopsis (below) is another sought-after plant to create reddish dye.


We left our linen to dry and later gave it another dip in the indigo to deepen the colour.


After a full morning of dyeing we were ready for lunch. The Japanese bento boxes had been prepared by Kitta's friend and were delicious.


After lunch we watched another video about the beautiful clothes Kitta creates from her naturally dyed fabrics. It was a whirl of delicious colour and more gentle guitar music. Sue had a nana-nap and I was struggling to stay awake myself!


Fortified by lunch and sleep, we again ventured into the garden for the madder root dyeing. The madder plant produces the deepest red of any natural dye. It can also be used medicinally for blood flow and menstrual problems. Our strained madder root was boiling away nicely.


Those with the soybean-treated linen took turns stirring their fabric in the madder dye for ten minutes. Bubble, bubble toil and trouble...


Oops, I think Carolyn just splashed hot madder over Sue's shoes!


The linen was then removed from the madder pot and placed in an alum mordant solution for 20 minutes to set the dye. It could then be dyed again and rinsed in water.


I was able to do some madder dyeing myself using some Cambodian silk purchased from Trudi.

My madder turned out vibrant orange and my indigo a deep, gentle blue.


We had a magical day learning ancient and fascinating techniques. This experience has certainly whetted my appetite for natural dyeing and I can't wait to experiment more. It's very special to harvest parts of plants and produce beautiful colours.

Here are some pictures from around Trudi's studio:

A mosaic wall featuring little ceramic ducks and chickens.


The outdoor area.


Beautiful knitted cushions.


An impressive array of solar plant dyes.


And some of Trudi's lovely work.


Friday 1 May 2015

Jasper Sweater crossed with Alabama Chanin with some natural dyeing thrown in


I had agreed with myself not to buy any more patterns for a while and then, what do I see, but this gorgeous Jasper Sweater by Paprika Patterns. Well, I couldn't help myself and, what's more, I don't regret it!


The main fabric I used for this was hemp/cotton knit, bought on a recent excursion to the Margaret River Hemp Co. in Fremantle with the One Year One Outfit (OYOO) Perth crew. This fabric has a lovely natural colour and feel. Unfortunately it doesn't pass muster for the OYOO challenge as poorly thought out local laws don't allow hemp to be grown here. I hope this changes as hemp is fantastically sustainable and has a very low environmental impact. The fabric is also really nice and smoking it doesn't get you high, or so I'm told. This one metre length cost me $12.95. It wasn't quite enough for the Jasper, especially after some pre-washing shrinkage, so I hunted around and found a piece of cotton knit fabric that I had dyed with Eucalyptus leaves during a natural dyeing course some time ago.

During the dyeing process the fabric was folded, clamped with popsticks (from ice creams) then dyed, Shibori style, in a pot of boiling eucalyptus leaves (species unknown). I forgot to take a photo of the uncut piece, but it was similar to this onion skin-dyed sample I made on the same day:


I used the dyed fabric for the collar, the welt pockets and as a backing for some Alabama Chanin style reverse appliqué on the back of the jumper. I used ribbing fabric for the cuffs and bottom band.


I used the Angie's Fall stencil from the Alabama Chanin website. When I last looked it was free to download, but it now costs $8. I traced a flower from my computer screen at the size I wanted, cut the stencil, then placed it here and there on my back pattern piece. I used watered-down acrylic paint applied with a sponge brush to stencil the pattern on the fabric. This is a quick method that I've used before with good results.


I took the back piece on holiday with me recently and stitched away in a very relaxed manner with coffee or local wine to keep me going. Lovely! I used a double strand of brown thread for the stitches. It was fun to cut away the appliqué and see the Shibori pattern emerging underneath.


Once the back was done and I was home again, I made up the jumper. I was impressed with the drafting and the instructions and I'm pleased with the fit.


The epaulet on the collar is a nice touch. I found a handmade clay button in my button drawer that was perfect. I can't remember where that came from, but possibly my Mum made it during her pottery spree.

You can see the eucalyptus dyed fabric on the collar in these pictures. I'm hoping it doesn't look like I spilt my breakfast.


So, a new pattern, unfamiliar hemp fabric, natural dyeing and reverse appliqué. So much creative fun packed into one garment! Sewing is the best.

Wednesday 11 March 2015

One Year One Outfit


Anyone know what this is?

It is a sustainable fabric with a zero carbon footprint and it has been completely sourced from my local area.

Here's a close up:


Still not sure? Here is another hint:


It's dog fur felt! Yes, I clip my dog on the kitchen bench. Don't judge!

Before you wonder if I've gone completely mad, let me explain. Nicki, of This is Moonlight, has challenged Perth sewing bloggers and anyone else from around the world to use 2015 to research local, sustainable fabrics and to produce one wearable outfit using these fabrics by the end of the year. We have been given the south west of Western Australia as the region from which our fabrics or materials can be sourced. Although this corner of WA is bigger than many entire countries, it is actually rather empty and fabrics made entirely from animals or plants in the area are very difficult to come by.

Natural dyeing using Australian Eucalyptus leaves by India Flint

So, our small, but enthusiastic, band of Perth Sewers, led by Nicki, have embarked on the 'One Year One Outfit' mission. The quest will involve excursions to sustainable farms and hidden wool shops. We will investigate unusual fibres like hemp and silk for their suitability and adherence to the criteria of the challenge. We will even congregate for a workshop in natural dyeing using leaves and flowers collected from the local bushland. It is all very interesting and exciting.

We would love you to join us using your own local area as your source for fabric. Contact me or Nicki for more information.


Anyway, back to the dog-fur felt and whether I should use it for my outfit.  The advantages are that it is local, free and I have an endless, if slow-growing, supply. The disadvantages are that it is a bit warm for our climate, is itchy and it falls to bits when handled. Either I need a new fabric source or a way to get the fur felt to hold together better.

Let me show you how I made it. Actually, it was my two boys who made it. First we clipped fur from Truffle the cavoodle (King Charles cavalier/poodle cross). From now on I shall refer to this fabric as 'truffoodle'. I don't know whether poodle-type fur makes different felt to non-poodle dog hair. Something for future experiments.

The fur was laid out on a piece of bubble wrap.


We then wet it with hot water and hand soap and patted it down flat. In retrospect we may have used too much water and soap.


The fur was rolled up in the bubble wrap and rolled back and forth, like a rolling pin, many times.


There were lots of oohs and ahhs when the bubble wrap was unrolled to reveal the exquisite truffoodle fabric.


Now before you get too worried about my future sewing direction, the truffoodle fabric was just a bit of fun. I won't subject you to pictures of me in a flaking, dog fur ensemble any time soon. However, it did turn out to be useful preparation for my first foray into wool felting.

Yesterday, the Perth one-year-one-outfitters met at Bilby Yarns for some local wool research. The wool and equipment in that shop was fascinating. I am not a knitter, so looked a bit blankly at the balls of wool, but once I spotted the unspun, West Australian wool in delicious, natural colours, the spinning wheels, the weaving looms and the beautiful felt samples, I was excited. The two ladies who run the shop were very generous with their time and knowledge. They talked us through the wool production, showed us how to use a spinning wheel and then gave a felting demo.

The felting, for me, was the most interesting, and achievable, method for producing purely WA sourced, sustainable fabric. This was the method we were shown:

Fibres of combed and washed wool were pulled out in clumps and laid on the table all in one direction.


A second layer was placed in a perpendicular direction then a third layer in the same direction as the first layer.


A small squirt of dishwashing liquid was added to a cupful of hot water. Olive oil soap can also be used for a more natural alternative. The soapy water was sprinkled over the wool to dampen it.


The water was incorporated into the wool and flattened using a scrunched-up plastic bag to avoid the wool fibres sticking to the hands.


At this stage, additional wool fibres in different colours can be added to create a design. The edges of this piece were folded in to make them straighter.


The whole thing was then popped into a plastic bag,


wrapped in bubble wrap and rolled back and forth many times.


The resulting felt was rinsed in water and rolled in a dishcloth before being dried.


Just try keeping your hands off the resulting felt!


After seeing all this, I felt (ha ha) that wool felt should form part of my sustainable, local outfit. There were many beautiful colours to choose from, but I eventually decided on this combination of three natural sheep colours. I bought 200g for $16, which I hope is enough for a skirt.


I can't wait to get started, especially after finding this inspiration on a Russian website:

Source

Source
Thank you Nicki, for inviting me to be part of this exciting adventure x

LinkWithin

Related Posts Plugin for WordPress, Blogger...