Showing posts with label accessories. Show all posts

Saturday 16 July 2011

Knitted summer top to circular scarf refashion tutorial


This is a super-quick little project that creates a cute and cosy little circular or infinity scarf.

Start with a knitted top or cardi. Mine was very loosely knitted, which worked well because it stretched out nicely once it was made.


This top was double-layered, so I opened it out to get one layer.


Then cut just below the arm holes so I got a nice chunk of knit.


Then I used my serger to sew a rolled, lettuce hem to the cut edge (stretch slightly as you sew). I found it worked best if I folded the edge over first (about 1cm) and sewed through both layers, otherwise the sewn edge tended to pull away from the fabric. You could also do this with a close zig-zag if you like.


And that's it. Stretch it out and put it on. Fab!

Wear it double...


...or single.

Love a quick project 


You can find this project on the following Link Parties:


Tuesday 28 June 2011

Pink ruffled tutu ballet bag - oh to be a little girl...


My little niece is five years old. She loves ballet and princesses. She is my outlet for all things girl, so how could I resist her request for a tutu ballet bag. This was quite an involved project, which I made up as I went along and took pictures along the way. It is quite a long tutorial so please ask questions if anything is unclear and I would love to see pictures of your creations on my facebook page.

Here is what I did:

Cut four pieces of pink satin 28x28cm with 3x3cm squares cut out of two adjacent corners. Also cut a piece of pink organza (or tulle) 56x40cm.


For the skirt of the tutu, cut a piece of organza or tulle to 40x25cm, fold lengthways and sew up the short sides with a narrow serged (eg. rolled hem) or zig-zag stitch. Then sew a gathering stitch through the two layers on the remaining side, gather tightly and tie ends to keep gathers in place.


Draw the outline of the tutu bodice on to a piece of fusible interfacing and iron it on to your scrap of pretty fabric. Cut around the outline on the interfacing.


If the fabric is likely to fray, carefully seal the edges with fabric glue or nail polish. This would not be necessary for stretch fabric.


Take one of the four pieces of satin you cut for the bag. You will apply your design on the this piece. Remember the bottom and sides of the satin will fold around to become the bottom and sides of the bag, so leave space around your design for this as well as a bit of space at the top for finishing.

Place the skirt and bodice of the tutu on the satin and pin in place. Pin the lower edge of the bodice over the gathers of the tutu so they are hidden. Stitch in place around the bodice using a straight stitch with matching thread. This should be enough to hold the whole tutu in place.


Take two small and three medium sized ribbon roses (you can buy these or easily make them as shown here) to embellish the straps and waist of the tutu. These can be glued on (I used a glue gun) or stitched.


When you are happy with your design, you can sew the bag together. If you liked, you could add sparkles or beads to the skirt or surrounding fabric first. I left mine like this.

With right sides together, sew the bottom and sides of the bag. Make sure the tutu is out of the way of the stitching.


Take each inside corner point and pull apart, then stitch as shown.


Repeat with the remaining two pieces of satin to make the lining.

Next we'll make the gathered top part of the bag. You can see this in the photo below of the finished bag.


Using the large piece of organza, fold in half and stitch the two shorter sides together. Fold in half with the seam inside as shown.


Place flat on the table and mark where you would like the gathering ribbon holes. I did mine in the centre between the seam and the side fold.


Open out the circle of organza and make buttonholes where you drew the lines. Use a scrap of interfacing to stabilise the fabric or it will disappear inside the sewing machine - I learned this the hard way! Trim the excess interfacing when buttonholes are done.


Cut the buttonholes, refold the organza in half, then stitch the ribbon casing.


Thread some ribbon through. 


Place the lining inside the bag, wrong sides together. Then place the organza ribbon section inside the bag, wrong side to the inside. Stitch all six layers together around the top of the bag.


Next make the handles. Cut two pieces of satin 60x4cm. Sew each into a long tube, right sides together and turn right side out.


Trim each to approximately 50cm. Pin to the bag approx 1 inch in from each side seam. The handles should be just inside the upper seam. Stitch in place.


Make a ruffle by stitching a tube of organza and gathering one edge.


Pull the organza ribbon section up out of the bag. Sew the ruffle along the top hem and sew a ribbon on top to cover the hem and ruffle edge. I did this in one step as shown, but it was fiddly and some of the organza slipped out from under the ribbon, so had to be redone.


And that's it! I hope you've managed to stay with me this far and that you've made a beautiful bag for your little princess.

Meg xxx


Monday 21 March 2011

Shirring problem...and a solution! Shirred, ruffled scarf tutorial


Tomorrow is the birthday of a good friend and I had planned to make her a shirred, ruffled scarf as a present as seen on MADE. I have tried shirring once before with limited success, but I thought it would be OK this time. It wasn't.

With my beloved Bernina 1130 in for repair, I am using my 'emergency Bernina', which is an old 801 Sport. Both these machines have a bobbin case which looks like this:


When I put the shirring elastic inside the bobbin case, it is held tightly by a clip on the outer case and is pulled so tightly that the elastic just breaks when I try to sew with it. I have fiddled and fiddled with this method but can't seem to fix it. I don't know if it just the old machine, but I suspect it is the design of the bobbin case.

So, I came up with another method (and apologies if this is already posted somewhere else, but I haven't seen it anywhere). I used my sewing machine foot with a small hole for a thin cord to pass through. Here it is - you can see the hole right at the bottom in the middle:


CHEAT'S SHIRRING METHOD

1.  Thread the machine as normal with thread to match your fabric
2.  Set the machine to a narrow zig-zag stitch (I used 1.5, with a stitch length of 2)
3.  Thread the shirring elastic through the cord hole (leave 1-2cm elastic hanging out the back to tie off later).
4.  Sew a few stitches close together until the elastic feels secure.
5.  Stretch out the elastic and sew!
6.  At the end of the fabric, leave 1-2cm of elastic to tie off later.

I sewed two lines of elastic close together down the middle of the scarf (see below). At the top and bottom ends of the scarf, I tied the loose ends of elastic together and trimmed them close to the knot.


When it was finished, it looked like this from the front and back (I finished the raw edges of the scarf with a serged rolled hem):


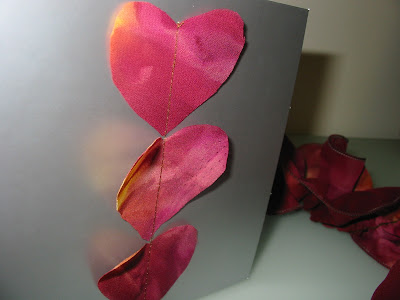
I decided to make a matching card. For this I cut out heart shapes from scraps of fabric, arranged them on a blank card and sewed them on with one line of stitching - how simple is that!?


Thursday 17 February 2011

Cravat for Matt

Ahoy Masterchef fans! I know this is slightly out of date but I just came across some photos of my entry for the 'Make a cravat for Matt' Aussie Masterchef competition last year. This was to be a cravat for the ever colourful Masterchef judge Matt Preston, who always wears a cravat (necktie thingy). Here he is:


So, I thought I would enter. The cravat had to be made from Handee Ultra paper towel as they were sponsoring the competition. I decided to make a huge flower and dye it with food colouring.


I dyed the tie part with watered down food colouring and decorated it with Masterchef logos, which I had photoshopped on to a background in the same pink colour. I dyed the flower with darker pink colouring and used more concentrated dye on the tips  to define them. I then sewed a knife, fork and spoon from the paper towel and dyed them green to make the 'leaf'. It was good fun to do and I really liked the way it turned out. I was hoping that there wouldn't be too many people interested in creating something elaborate for the competition and I might be in with a chance of winning. This was sadly not to be - there were loads of entries and some were absolutely amazing. I really enjoyed looking at the website to see the new ones that were being added all the time. It seems that there are a lot more people out there who sew and craft than I thought. This makes me happy as I worried for years that we were a dying breed and eventually the fabric shops would all close down, as many did in Perth. But now, the trend seems to be reversing and there some lovely fabric shops around. Yay!

Sunday 10 October 2010

Handbag organiser


Inspired by a tutorial I found here, I made my own version of the handbag organiser. I am thrilled with it, my bag is transformed and so organised! I used an stiff cotton fabric from Ikea for the outside and a lighter parachute-type fabric for the inside. I also made one for my sister.

LinkWithin

Related Posts Plugin for WordPress, Blogger...