Showing posts with label One Year One Outfit. Show all posts

Monday 11 May 2015

Fun times felting - One Year One Outfit challenge


As I've mentioned before, I'm taking part in the 'One Year One Outfit' (OYOO) challenge. This involves creating an entire outfit this year that has been sourced only from locally grown and sustainably produced materials. I bought supplies for felting a skirt a while back, but had suffered too much from newbie felting nerves to actually make anything. I mentioned this to fellow OYOOer, Sue of Fadanista, who made the excellent suggestion of getting together for a felting session.


It was a bit of a case of the blind leading the blind, although we both had a tiny amount of felting experience. Sue wrote recently about a felting session she had with a textile artist friend and we used her notes from that as our guide. We decided to begin with my felt and work on it together. This turned out to be an excellent strategy as the rubbing and rolling process was far easier with two people. However, my piece took so long we will need to reconvene to make Sue's felt.

We began by pulling off thin fibres from the wool roving (above) and laying them on a piece of bubble wrap, which was placed over a towel. I had drawn my skirt front and back on a piece of vinyl as a guide for the size. This worked well as a guide, but I should have made it bigger to allow for shrinkage - oops!


The fibres were placed over the pattern guide, the first layer in one direction, the second at 90 degrees to the first, and so on until we had four layers. I had three colours of wool roving, which I separated and placed, lightest to darkest, to create an ombre effect. I also added a few tufts of my dog Truffle's fur between the third and fourth layers at the bottom. Non-wool materials can be felted into wool felt in small amounts.


So fluffy and lovely!

The next step, once I'd laid out the front and back of the skirt, was to cover the wool with netting. We used tulle, but apparently flyscreen also works well.


Then we rolled up our sleeves for action. Using scrunched up plastic bags, we scattered hot water and rubbed olive oil soap (other soap can also be used, but this was local) over the netting until the wool was completely wet. We then did a sustained bout of circular rubbing all over the piece. The netting holds everything in place, but we checked from time to time that it was not felting to the wool. It wasn't.


It was lovely working with the olive oil soap, soft wool and warm water on a cool morning, not to mention the good company. The fibres began to felt together fairly quickly so we neatened up the edges by pushing them towards the main piece. The imprint of the bubble wrap could be seen on the felt at this stage, but this disappeared after further steps. 


At this point we rearranged the felt so it had a piece of netting on both sides. It was placed back on the bubble wrap and the towel, then the whole lot was rolled around a pool noodle to make a cylinder. I haven't got a picture of this as Sue and I took one end of the noodle each and rolled back and forth 1000 times, while moving our hands in and out to cover the length of the noodle. Obviously this was far more cumbersome with my largish piece of felt than with the small pieces we'd done in the past and I was especially glad of Sue's help here. I was also glad of her Fitbit wrist pedometer, which made counting the back and forth rolls so much easier!


My front and back skirt pieces partially felted together in the middle, but that was fine.


The wool was well and truly felting by now. We rinsed it well in cold water and microwaved it for 2 x 30 seconds. The felt was then placed in a plastic bag and whacked down on to the table a few times. This caused much hilarity as it kept bursting out of the bag and showering droplets everywhere. I guess that was a good test of its integrity!


This is the felt before we hung it over a chair to dry.


The full piece. I love the way the ombre effect turned out and the little black Truffle speckles.

The striations of different colour wool add interest too.


I did make my skirt pieces approximately 8-10cm larger than the pattern pieces, but the felt shrunk by more than this amount once it was completely dry. I am not letting this concern me and will simply make more felt at our next session to use as strips along the skirt's sides. I only used about half the wool roving that I had bought (approximately $8 worth) so have plenty more to play with in the future. 

My felt did end up quite thin and translucent in places so I returned to Bilby Yarns, where I bought my wool, and asked the opinion of the very knowledgeable lady there. She said it was fine, but may need lining to stand up to being worn as a skirt. Not knowing how to find locally-produced lining material, I may just ponder that problem for a while before finalising my skirt plans.

In the meantime I have other things to take up my time. I've started knitting for the first time in 25 years! Well I have to wear something on my top half for the OYOO. While at Bilby Yarns, I bought some beautiful West Australian wool in my felt colours to make a jumper. Progress is slow. Better get back to it!


Thank you Sue for the fun morning and the use of her beautiful garden.

Friday 1 May 2015

Jasper Sweater crossed with Alabama Chanin with some natural dyeing thrown in


I had agreed with myself not to buy any more patterns for a while and then, what do I see, but this gorgeous Jasper Sweater by Paprika Patterns. Well, I couldn't help myself and, what's more, I don't regret it!


The main fabric I used for this was hemp/cotton knit, bought on a recent excursion to the Margaret River Hemp Co. in Fremantle with the One Year One Outfit (OYOO) Perth crew. This fabric has a lovely natural colour and feel. Unfortunately it doesn't pass muster for the OYOO challenge as poorly thought out local laws don't allow hemp to be grown here. I hope this changes as hemp is fantastically sustainable and has a very low environmental impact. The fabric is also really nice and smoking it doesn't get you high, or so I'm told. This one metre length cost me $12.95. It wasn't quite enough for the Jasper, especially after some pre-washing shrinkage, so I hunted around and found a piece of cotton knit fabric that I had dyed with Eucalyptus leaves during a natural dyeing course some time ago.

During the dyeing process the fabric was folded, clamped with popsticks (from ice creams) then dyed, Shibori style, in a pot of boiling eucalyptus leaves (species unknown). I forgot to take a photo of the uncut piece, but it was similar to this onion skin-dyed sample I made on the same day:


I used the dyed fabric for the collar, the welt pockets and as a backing for some Alabama Chanin style reverse appliqué on the back of the jumper. I used ribbing fabric for the cuffs and bottom band.


I used the Angie's Fall stencil from the Alabama Chanin website. When I last looked it was free to download, but it now costs $8. I traced a flower from my computer screen at the size I wanted, cut the stencil, then placed it here and there on my back pattern piece. I used watered-down acrylic paint applied with a sponge brush to stencil the pattern on the fabric. This is a quick method that I've used before with good results.


I took the back piece on holiday with me recently and stitched away in a very relaxed manner with coffee or local wine to keep me going. Lovely! I used a double strand of brown thread for the stitches. It was fun to cut away the appliqué and see the Shibori pattern emerging underneath.


Once the back was done and I was home again, I made up the jumper. I was impressed with the drafting and the instructions and I'm pleased with the fit.


The epaulet on the collar is a nice touch. I found a handmade clay button in my button drawer that was perfect. I can't remember where that came from, but possibly my Mum made it during her pottery spree.

You can see the eucalyptus dyed fabric on the collar in these pictures. I'm hoping it doesn't look like I spilt my breakfast.


So, a new pattern, unfamiliar hemp fabric, natural dyeing and reverse appliqué. So much creative fun packed into one garment! Sewing is the best.

Wednesday 11 March 2015

One Year One Outfit


Anyone know what this is?

It is a sustainable fabric with a zero carbon footprint and it has been completely sourced from my local area.

Here's a close up:


Still not sure? Here is another hint:


It's dog fur felt! Yes, I clip my dog on the kitchen bench. Don't judge!

Before you wonder if I've gone completely mad, let me explain. Nicki, of This is Moonlight, has challenged Perth sewing bloggers and anyone else from around the world to use 2015 to research local, sustainable fabrics and to produce one wearable outfit using these fabrics by the end of the year. We have been given the south west of Western Australia as the region from which our fabrics or materials can be sourced. Although this corner of WA is bigger than many entire countries, it is actually rather empty and fabrics made entirely from animals or plants in the area are very difficult to come by.

Natural dyeing using Australian Eucalyptus leaves by India Flint

So, our small, but enthusiastic, band of Perth Sewers, led by Nicki, have embarked on the 'One Year One Outfit' mission. The quest will involve excursions to sustainable farms and hidden wool shops. We will investigate unusual fibres like hemp and silk for their suitability and adherence to the criteria of the challenge. We will even congregate for a workshop in natural dyeing using leaves and flowers collected from the local bushland. It is all very interesting and exciting.

We would love you to join us using your own local area as your source for fabric. Contact me or Nicki for more information.


Anyway, back to the dog-fur felt and whether I should use it for my outfit.  The advantages are that it is local, free and I have an endless, if slow-growing, supply. The disadvantages are that it is a bit warm for our climate, is itchy and it falls to bits when handled. Either I need a new fabric source or a way to get the fur felt to hold together better.

Let me show you how I made it. Actually, it was my two boys who made it. First we clipped fur from Truffle the cavoodle (King Charles cavalier/poodle cross). From now on I shall refer to this fabric as 'truffoodle'. I don't know whether poodle-type fur makes different felt to non-poodle dog hair. Something for future experiments.

The fur was laid out on a piece of bubble wrap.


We then wet it with hot water and hand soap and patted it down flat. In retrospect we may have used too much water and soap.


The fur was rolled up in the bubble wrap and rolled back and forth, like a rolling pin, many times.


There were lots of oohs and ahhs when the bubble wrap was unrolled to reveal the exquisite truffoodle fabric.


Now before you get too worried about my future sewing direction, the truffoodle fabric was just a bit of fun. I won't subject you to pictures of me in a flaking, dog fur ensemble any time soon. However, it did turn out to be useful preparation for my first foray into wool felting.

Yesterday, the Perth one-year-one-outfitters met at Bilby Yarns for some local wool research. The wool and equipment in that shop was fascinating. I am not a knitter, so looked a bit blankly at the balls of wool, but once I spotted the unspun, West Australian wool in delicious, natural colours, the spinning wheels, the weaving looms and the beautiful felt samples, I was excited. The two ladies who run the shop were very generous with their time and knowledge. They talked us through the wool production, showed us how to use a spinning wheel and then gave a felting demo.

The felting, for me, was the most interesting, and achievable, method for producing purely WA sourced, sustainable fabric. This was the method we were shown:

Fibres of combed and washed wool were pulled out in clumps and laid on the table all in one direction.


A second layer was placed in a perpendicular direction then a third layer in the same direction as the first layer.


A small squirt of dishwashing liquid was added to a cupful of hot water. Olive oil soap can also be used for a more natural alternative. The soapy water was sprinkled over the wool to dampen it.


The water was incorporated into the wool and flattened using a scrunched-up plastic bag to avoid the wool fibres sticking to the hands.


At this stage, additional wool fibres in different colours can be added to create a design. The edges of this piece were folded in to make them straighter.


The whole thing was then popped into a plastic bag,


wrapped in bubble wrap and rolled back and forth many times.


The resulting felt was rinsed in water and rolled in a dishcloth before being dried.


Just try keeping your hands off the resulting felt!


After seeing all this, I felt (ha ha) that wool felt should form part of my sustainable, local outfit. There were many beautiful colours to choose from, but I eventually decided on this combination of three natural sheep colours. I bought 200g for $16, which I hope is enough for a skirt.


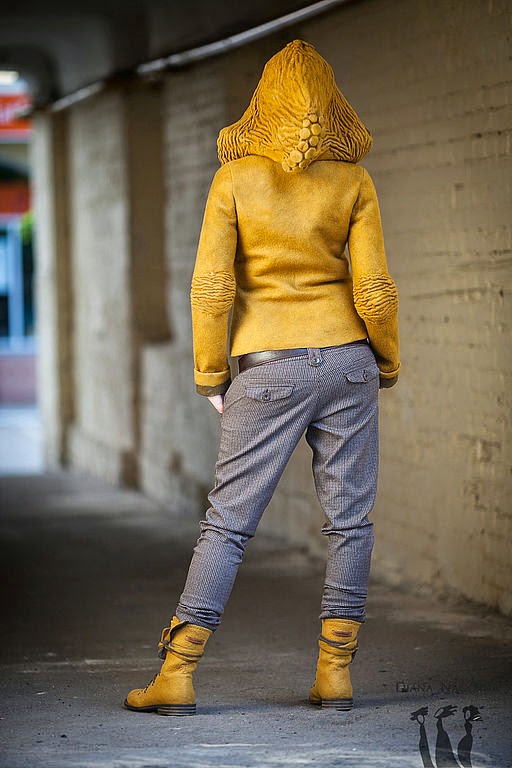
I can't wait to get started, especially after finding this inspiration on a Russian website:

Source

Source
Thank you Nicki, for inviting me to be part of this exciting adventure x

LinkWithin

Related Posts Plugin for WordPress, Blogger...