Showing posts with label Refashion. Show all posts

Sunday 4 November 2012

Drape Drape 2, No. 2 and some thoughts on Japanese pattern books


For my birthday this year, my sister gave me a book I had been coveting for some time - Drape Drape 2 by Hisako Sato. It's a Japanese pattern book featuring some interesting and unique, but wearable, clothes. I really like the clean look of many Japanese designs and this book provides traceable patterns and basic instructions on how to create some yourself.

It was difficult to decide what to make first as my mouth was watering as soon as I opened the cover. However, I eventually settled on Pattern No. 2, the one-piece side drape top, which is actually more of a tunic, or even a dress, than a top. Amazingly, it is cut from a single piece of knit fabric and is actually very quick to sew together as it only requires a couple of seams, neck and armhole binding and a hem.


I decided on this pattern, partly because I had an op-shopped maxi skirt that was just big enough to make this from. The skirt was made from a very stretchy, two-way stretch knit. Here it is before I chopped into it.

I cut one skirt side seam completely open and just managed to squeeze the pattern on to the opened-out fabric. I placed the middle of the No. 2 top pattern, which forms the seam-free right hand side of the top, over the intact skirt side seam. I wasn't able to place the pattern grain line marking on the fabric grain as there wasn't enough fabric, but this doesn't seem to have affected the finished top/dress, perhaps because the fabric was so stretchy. Part of the dress hem had to be cut from the waistband of the skirt, so the stripes go in the other direction in this small section. As it turns out, I quite like this little feature!

The photo below shows the right hand side of the top, which is actually the original skirt side seam. You can also see the little inset piece which was originally the skirt waistband. That's my label inserted into the side seam.


I was worried that this 'top' would be too short to wear as a dress as I am about 5'9 tall. However, it seems to have turned out longer than it looked in the book picture and I'm very happy with the length. Again, this may be because my very stretchy fabric was cut off-grain, although it doesn't appear to be pulling downwards at all.


The neckline and armholes are finished with a strip of knit fabric folded over the edges like bias binding.


You may remember my recent struggle with the kakurenbo pattern from Pattern Magic, another Japanese pattern book. If I had to make a comparison of these two books, based on making one pattern from each book (which I know is completely unscientific, but still interesting right?), I would have to say that Drape Drape 2 is definitely the book to start with. A sewist with some experience, particularly with knit fabric as most patterns in this book require knits, could have an enjoyable Sunday tracing, cutting out, sewing and finishing a garment from Drape Drape 2 (probably also Drape Drape, but I haven't actually seen the first book). This is not to criticise Pattern Magic as it contains some really incredible designs. However, at least for the pattern I made, these pose a far greater challenge to make as they require fiddly pattern drafting (no patterns are provided) and much more complex sewing techniques to put together. The time taken to make my Pattern Magic top was closer to a month of Sundays! OK not quite, but you do need plenty of time, experience and patience to tackle Pattern Magic.


What do you think? Has anyone else tried these two books?

Monday 22 October 2012

Tumble dyed baby outfit


This was a quick little refashion and sewing project for my darling baby niece. I had found the leggings at an op shop for $1. I decided to make them more girly by spraying some Tumble dye flowers on to the legs. I just made a simple flower cut-out from some printer paper and held it in place by hand while I sprayed the dye. I used some scrap knit fabric to blot the excess dye from the paper.


I used pink and yellow dye, which mixed in places to make orange. When I'd finished the leggings I decided that they just had to have a top to make a proper outfit. I found an old baby pattern (Kwik Sew 2596) and made this cute little top from some more knit fabric scraps. Then, I used the blotting fabric, now covered with pink, yellow and orange dye, to cut out little flowers. I sewed these on to the top and pants with a quick spiral stitch.


A very quick and cute baby outfit. It was fun to make too. I can't stop using these Tumble dyes - my wardrobe needs to watch out!

Click below to see my other Tumble dye projects.


Ombre dyed, polka dot t-shirt


Tumble dyeing with a stencil

Sunday 23 September 2012

Ombre dyed, polka dot t-shirt


How much fun is this for spring?

I bought some new spray dyes for fabric. They are called Tumble Dyes and they come in a wide range of colours. They are really easy to apply - just spray straight from the bottle. I ordered these four gorgeous colours from Dharma Trading in the US, (along with a few other things ;) They were not expensive and the postage to Australia was very reasonable.


My mind is spinning with possibilities for these, but to start with I tried this simple t-shirt. I decided to make my t-shirt, but this could easily be done on an existing t-shirt.

Here's what to do:

Fold a piece of paper into four and draw some circles (or whatever shape you fancy). I used my old school Math-o-mat. A circle punch would be even better.


Cut out the circles and place them on your t-shirt. I Tumble-dyed my t-shirt before I sewed it together. This gives a neater dye finish at the seams, but is not necessary if you have a ready-made t-shirt. Place the dots randomly or in a pattern. Remember to place some card or newspaper inside your shirt if you are using an existing one.


After blowing some of my circles away while spraying the dye, I decided to weigh them down using metal washers. If you have freezer paper you could iron the circles on to your fabric before dyeing.


Hold the bottle 10-15cm from the fabric and spray away. I sprayed more at the top of the t-shirt and less near the bottom to create the ombre effect.


Once the spray has dried, remove the circles and iron the fabric (or place in a warm dryer) to heat-set the dye.


Make your t-shirt. I used white trim for the neckband, but you could dye some to match or contrast with your design.


Told you it was simple!


Have you Tumble dyed anything lately?

Thursday 20 September 2012

Perth Fashion Festival


I was sitting with my coffee this morning surfing through some sewing and fashion blogs, as I do occasionally every day ;) when I saw that a fellow Perth blogger was going to be in the Restyle fashion parade....today....starting in an hour and a half!!

If you've been reading my blog for a while, you'll remember that I (unofficially) took part in the Restyle Challenge, where my outfits had to consist of at least 50% op-shopped items every day for the month of August 2012. Well, today's parade featured the ten Perth bloggers who were officially part of this challenge along with some op shop volunteers who were styled in op shop clothes for the parade.

Op-shopped clothing, bloggers and a free fashion parade, oh my! I could not miss this event. I quickly slung the washing out on the line, grabbed my camera and hot-footed it to the bus stop. Luckily I live quite near Perth city and I found myself hustling into the inflatable-pillow tent, settling into my seat and snuffling through the goody bag with excitement (I know, a goody bag! I was beside myself) with ten minutes to spare.


The show was introduced by a TV presenter from Channel 9, who was wearing a dress bought for $3 from Good Sammy's. So great to see a celebration of op-shopping.


I thoroughly enjoyed the show, especially as there were some bloggers in the parade that I had 'met' online. The clothes were lovely. It was hard to take good photos as I was in the fourth row and just had to hold the camera above my head and click. Here are some of my favourite looks:

Gorgeous, soft leather jacket in yummy orange.
This girl had attitude! 
Fab DIY leather shorts from op-shopped jeans
A stunning jumpsuit. 
Amazing dress.

There are some professional pictures of the show here.

After the bloggers came the op shop volunteers. This was a lovely part of the parade as these women, of all ages, were so happy to be there and all looking so gorgeous with their makeovers. The highlight had to be the two visually impaired volunteers who were led down the catwalk with their guide dogs. Even the dogs were dressed up. Again, it was hard to get photos.


So, all in all, a very enjoyable morning.


Afterwards, I popped into His Majesty's Theatre as JJ's entry in the WA Ballet Pinocchio puppet competition was among the finalists and is on display there. After that I browsed through Sass and Bide and Kookai for some DIY inspiration - and found some :) There are some gorgeous things in those shops at the moment. Lots of neon and bright colour blocking that are on my radar for summer. So exciting!

Monday 3 September 2012

Refashion baggy yoga pants into svelte leggings tutorial


My sister recently gave me these yoga pants. She'd had them for a while but not really worn them as they were just never quite right. "I thought maybe you could do something with these" were her words as she tossed them my way. I was only too happy to have them as they were Metalicus so the fabric was gorgeous. I pondered what to do with them until it suddenly came to me while lying in bed having been woken up too early (again) by JJ.

Leggings! Leggings with cuffs!!


These would be great for women or girls. Want to make some? I'll show you how!

On a large surface, lie one leg of your yoga pants out flat. Get a leggings pattern (I made my own), or just an existing pair of leggings, and lie these on top aligning the outside legs and matching the crotch as much as possible. Don't worry if it's slightly off as mine is below. Also don't worry if the top of your pattern extends over the waistline, as long as the yoga pants fitted around your hips and tummy, the leggings will too.


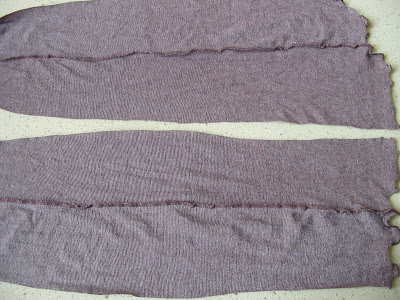
Cut the inside leg of the yoga pants from the hem to the crotch. Don't forget to add a seam allowance if you are using existing leggings as your pattern! Hold on to your cut pieces as they will become the cuffs on the leggings.


Repeat for the other leg. I left a little bit of the original seam right at the crotch to maintain the original fit. You could make the crotch higher towards the waistband if you want hipster leggings.

Sew the entire inside leg seam, sewing over the original seam if you have left it at the crotch as I did. Use a serger or stretch stitch, such as zig-zag.


My yoga pants had a rolled, lettuce hem, so it was necessary to place the two legs together and cut this off to neaten the lower edges.


OK, so now you have the leggings basically done, it's time to add the cuffs. Take your two offcuts from the inner legs. Choose the widest part of the offcuts and trim the edges straight if necessary.


Fold them (top to bottom) along the original seam and measure against the bottom of your new leggings. Then fold over again (left to right) so you have four layers of fabric. You want to cut them at the same width, or just less than, the lower edge of your leggings. Repeat for the other cuff.


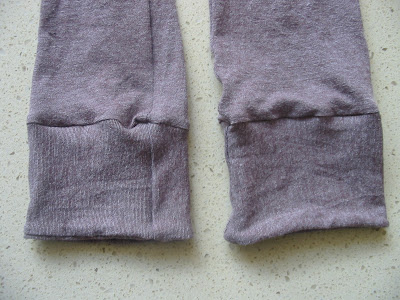
 This is what you will end up with. The cuff on the left is opened out. The one on the right is folded (left to right) ready for sewing.


Sew a stretch stitch along the raw edges (below left). Then fold in half, wrong sides together, to end up with your cuff (below right).


Turn your leggings right side out and put one cuff over the end of one leg, matching raw edges (see below). Match the cuff side seam with the inside leg seam on the leggings.


Sew along the raw edge, making sure you catch all three layers. Repeat for the other leg, fold down the cuffs and you're done!


My yoga pants had this fold down piece of fabric attached to the waistband. I just cut it off to reduce bulk in that area and left the edge raw as it will always be covered by a long top :)


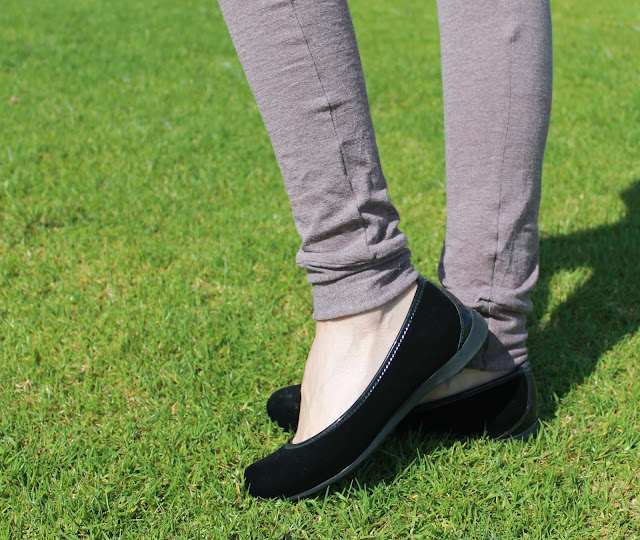
These turned out really, really well. In fact, I was so pleased with them, I (reluctantly) gave them back to my sister as part of her birthday present! She was thrilled with the refashion and wore them straight away. These photos are of her lovely, long legs!


LinkWithin

Related Posts Plugin for WordPress, Blogger...