Showing posts with label Tutorials. Show all posts

Saturday 29 December 2012

Anyone for tennis?


I did lots of sewing for Christmas presents this year, mostly for my two sweet, little nieces. The biggest project was this tennis outfit, which was made according to stringent requirements stipulated by Miss 7. She wanted a college-style jacket with a zip and short sleeves and the number '64' on the back.

I immediately remembered that Andrea (and her daughter) of Fabric Epiphanies had used Jalie pattern 2795 to make a boys college jacket. I also have this pattern, so that was my starting point. I decided to make a little matching skirt using Jalie pattern 3023.


 I made the jacket first using white stretch mesh fabric for the main jacket with contrasting pink knit fabric for the waistband, collar, cuffs and pocket welts.

Before sewing the jacket together I made the number applique for the back. I searched the internet for 'college fonts' and found one I liked. I couldn't get it to install for some reason, so I copied the font picture into Word, cropped and resized it, then printed it out. I traced the large outer number on to the glue side of some fusible interfacing and fused it to a scrap of pink fabric. I pinned it to the back jacket piece and sewed it on with a narrow zig-zag stitch.  I repeated the process for the inner number with white fabric and sewed it to the pink number.


I made the jacket according to the pattern instructions in a size J. I chose the size based on exact measurements. If I was making this again I would go up a size or two as it just fits now with no growing room! The upper/top sleeve is made from two pattern pieces, one finishing at short sleeve length and one to make a long sleeve. I just used the piece that finished at short sleeve length along with the the two lower sleeve pieces, which I shortened accordingly. I finished it off with a cuff of pink fabric.

The collar was made with a long strip of pink fabric that I tapered at the front edges to get the 'college' look. This led to a slight problem with the upper zip edge, which would normally be hidden inside the jacket collar. I overcame this by adding a scrap of fabric to each side of the top of the zip. The process took a bit of trial and error so I made myself some instructions in case I ever needed to do this again (see below).

The zip was attached to the jacket leaving the last 3cm unstitched. I cut two pieces of knit fabric 6x2cm, folded each in half and stitched about 0.5cm from the long edge. This was turned right side out and the corner placed over the upper edge and teeth of the zip. I used a narrow zig-zag stitch to attach the fabric to the zip, then trimmed off the excess, sewed in the zip and topstitched. This gave quite a neat finish.

I added a little heart charm for extra girliness.


For the skirt, I used the Jalie 3023 skirt pattern without the sewn-in pants. I used a size K this time, one size up from the measurements I had, but again, this only just fits! I made the waistband from white cotton lycra as the mesh did not have enough stretch. I added piping in pink and a smaller number applique done as described above.


This outfit took a lot of time and I agonised over the size before Christmas day. I had my 7 year-old son try it on numerous times to check the fit (he is a very tolerant child!) and I almost made another in a bigger size, but my sewing machine suddenly died on Christmas Eve, so that was the end of that idea!

I watched little Miss 7 open her present with bated breath. Would she like it? Would it fit? Would she wear it?

She loved it.

Her beautiful, sparkly Christmas dress was cast aside as she rushed to put on her new outfit. She wore it all day and, by all accounts, has worn it every day since. I don't know who's happier, she or I :)


Oh, and the other good news is that my sewing machine has been fixed by the amazing man at Cockburn Sewing Centre. He has performed miracles on my machine and I highly recommend him to anyone local to Perth. Life is good for Auntie Meggie :)

PS: this outfit has been entered in the 'Sewing for children' competition on 'Sewing Pattern Review'. It would be great if you could vote :)

Thursday 13 December 2012

School Christmas markets

'You won't let me have fairy floss Mummy, so I'm buying it with my own money!'
Every year, my son's school has a Christmas market. It is a lovely idea that takes place in the evening a few days before school finishes for the year. Anyone who wants to (from the school community) can have a stall for only $5. Lots of children get busy making things or finding their old toys to sell. Mums and dads also get busy, sometimes making traditional food from their country of origin, making crafts (guess who) and helping the children get their stalls ready.

I have had a stall for the last four years selling children's clothes, jewellery and other crafts that I have made. This year, my boys were keen to get involved for the first time so half of my table was donated to their cause. We had a whole load of fart bombs, practical jokes in little packs and plastic cockroaches (as you do), which we had accumulated somehow, mostly as surplus goodies from the little bags we gave to friends at birthday parties. The boys were super-keen to sell these and also made some paper ninja stars to supplement their income.


Learning from experience, we got everything ready beforehand. We made the labels and packed things into containers which could just be opened and displayed on the table.

My merchandise consisted of simple bracelets, necklaces, baby tutus, baby ruffle pants and vest sets,  girls' clothes, fabric flowers and Christmas fairies (get the tutorial here). The best sellers at these school markets are things that appeal to children spending 50c to $2 of their pocket money. The mums sometimes buy a more expensive item, but mostly it's just the cheap rubbish stuff that sells. 


In the past, I have used a proper clothes rail for my display. This time I wanted to be able to set up and pack away quickly and carry things easily to and from the car, so I used my camera tripod. I adjusted the legs so it sat on the table perfectly and it packed away to nothing.


I covered a cork pinboard with fabric to display the jewellery and other knick knacks. This could be taken straight out of a bag and propped up on the table.


So, once all the merchandise was ready, I just needed a sheet for the table, a float in a lidded container, spare labels, sticky tape, pens, scissors and a money belt. At the last minute I grabbed snacks and water and I borrowed a trestle table from a friend. I didn't bring a chair as you tend to be standing up at these things anyway.


I used strong bags with handles, bought very cheaply from Ikea, to pack everything into so it was easy to carry.


We only had about 15 minutes to set up the stall as we were rushing there from the boys' guitar lesson. All the preparation paid off. We carried everything over in one trip and set up with time to spare. Stress-free marketing!

Here we are in business! Despite a rainy evening, the market was packed with people and we sold lots of stuff. As predicted, the fart bombs were the biggest hit. We had crowds of boys, girls and dads (!) around the stall buying them up. Later in the evening, loud bangs and dubious smells were emanating from all corners of the market!!


The boys earned $20 each for their hard work. LJ did ten minutes of busking with his guitar and was thrilled to get $3 from that! I sold a few things and generally had a fun time watching the children and soaking up the atmosphere. All in all, a very successful evening.

Quote of the day:

JJ (aged 7): 'What happens if Father Christmas is watching you on the toilet?'
Me: 'Oh, he doesn't watch people on the toilet. He doesn't want to see that'
JJ: 'But what if you are being bad on the toilet??!'
Me: 'Errr, well....(help!)'

Monday 3 December 2012

Can you make me 23 charleston dresses in 48 hours???


The doorbell rang on Friday morning and in came my dance teacher laden with sequin fabric and a last minute request for the concert on Sunday! Could I make 20s style dresses for the teens, just 23 of them!!! Luckily she'd bought the dresses and I just had to sew on the fringes...except that there weren't actually any fringes, I had to create those too  :-o

After making the 27 circle skirts for the younger girls in the concert, I knew I had to work FAST to get these done. I took some photos along the way to describe what I did, just in case anyone else is in need of a quick and dirty way of mass producing flapper dresses!


Ideally, these dresses would have been made with ready-made fringing, sewn on in rows. Unfortunately, because we needed so many dresses, the shop didn't have enough fringing and the dance teacher bought this gorgeous sequinned fabric instead. Having to cut the fringing added significant time to the making of these, but they did look fantastic when they were done.

First I cut the fabric across the rows of sequins into rows. Each row was 17cm long and went the width of the fabric (150cm). I needed approximately 1.5 rows per dress. The dresses were simple, black, stretchy dresses in a fitted, t-shirt style.

Cutting the strips of fabric
I laid out each dress and marked with dressmaker's chalk where the strips of fabric needed to be stitched on. I marked the first line just below the underarms and neckline and the other rows in 16cm  increments down the dress. This meant that the 17cm strips would overlap slightly down the dress and hang just below the hemline at the bottom.


Then I got stitching! Luckily the mesh backing of the sequin fabric was stretchy so I could just sew it on to the stretchy dresses using a simple zig-zag stitch without any stretching adjustment. If you were sewing non-stretch trim to stretchy dresses, you would need to stretch the dress as the trim was being sewn on to it. The needle mostly went through the sequins without any trouble and I only broke two needles in making all the dresses - not bad.


Here is a dress with the rows of fabric stitched in place. When I reached the end of a strip of fabric, I just butted the next strip up to it and carried on sewing (see join in second row from top). I only did the front of the dresses and left the backs plain.


Here is a close-up to show how the rows overlapped.


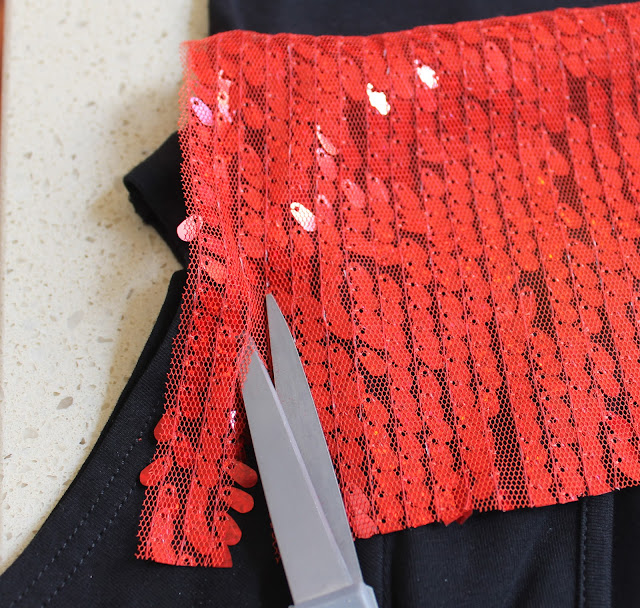
Next the cutting. At this point it was necessary to call in the volunteers. There is no way I could have got these dresses done in two days without helpers to cut the fringes as it was taking around 45 minutes per dress to cut it properly. What we did was to cut along every third gap between the rows of stitching that were holding the sequins in place. We avoided cutting the sequins or the stitching holding them on so as to maximise the number of sequins left on the fabric, rather than on the floor! However, one of my lovely helpers took more of a shortcut and didn't worry too much about these rules. She ended up getting a lot more dresses done in the time and I don't think you could really see the difference in the end ;)


Thank you so much to my wonderful helpers. Between us we performed a miracle and got the dresses done!


Here are some of the gorgeous girls backstage ready to perform. I am told that the dresses looked incredible under the stage lights - Yay!


Tuesday 20 November 2012

27 Dresses...well skirts actually


My sons' hip hop dance class consists of three boys (including my two) and 27 girls!

One of their dances for the end-of-year concert has a 50s theme and I was enlisted to make circle skirts for the girls. I did volunteer my sewing skills, but the dance teacher was rather apologetic when she told me how many skirts she needed!

I needed no excuse to go to the fabric shop for supplies. I bought 30m of polka dot fabric in two colours - white with black spots and black with white spots, 20m of black elastic and some overlocker thread. I had planned to make my own pattern, but then I found a pattern for girls' circle skirts (Simplicity 7401) in the op shop for 20c. Must have been fate!


 I modified the pattern a bit and made three sizes (6, 8 and 10 years) on sturdy brown paper. Then I got cutting and sewing.

Here is a finished skirt.


I wanted the skirts to be as quick and simple to make as possible as there were so many. They needed to look good on stage, but it was fine if they were a little rough on the inside! The pattern suggested attaching a separate casing for the elastic waistband, but I made them with an exposed elastic waistband instead.


The waistband was attached by dividing the elastic and the skirt waist into quarters, stretching each elastic quarter to fit each skirt quarter and attaching the skirt with a simple zig-zag stitch. This can be seen more easily from the inside. Of course, simple ribbon size labels were a must.


 After a while, I got a bit of a production line happening where I grouped the skirts into sizes then did all the side seams, followed by the elastic waistbands. Once they were all made, I changed the overlocker to rolled hem mode and went for it. Metres and metres of rolled hems. It was quite therapeutic actually, although I had to chase the overlocker around the table if I went too fast :)


I calculated that, once they were cut out, each skirt took about 15-20 minutes to make.

Done!

Monday 22 October 2012

Tumble dyed baby outfit


This was a quick little refashion and sewing project for my darling baby niece. I had found the leggings at an op shop for $1. I decided to make them more girly by spraying some Tumble dye flowers on to the legs. I just made a simple flower cut-out from some printer paper and held it in place by hand while I sprayed the dye. I used some scrap knit fabric to blot the excess dye from the paper.


I used pink and yellow dye, which mixed in places to make orange. When I'd finished the leggings I decided that they just had to have a top to make a proper outfit. I found an old baby pattern (Kwik Sew 2596) and made this cute little top from some more knit fabric scraps. Then, I used the blotting fabric, now covered with pink, yellow and orange dye, to cut out little flowers. I sewed these on to the top and pants with a quick spiral stitch.


A very quick and cute baby outfit. It was fun to make too. I can't stop using these Tumble dyes - my wardrobe needs to watch out!

Click below to see my other Tumble dye projects.


Ombre dyed, polka dot t-shirt


Tumble dyeing with a stencil

Monday 1 October 2012

Tumble dying with a stencil to make a cool t-shirt


After watching me making my ombre dyed, polka dot t-shirt, my boys were desperate to get in on some Tumble Dye action. After some discussion, they decided on a Party Rock Gym design. There are images all over the internet for this and, after looking at a few, I came up with this design of my own using MS Word and Powerpoint.

If you would like to use my design, you can download it here and resize as necessary.

I printed the design on to normal paper, covered it in clear Contact plastic film (only to keep it strong enough to be used more than once) and cut out the lines with a scalpel.


The inside bits of the letters are saved and stuck to the bottom corner of the stencil. If you can, I would recommend cutting out letters as I've done for the circular part of the design, leaving a bit of paper to hold any middle bits in place, as for the 'P', 'A', 'R' etc. The little connector bits hardly show in the finished product.

After being asked at least 67 times if it was ready yet, I finally finished cutting out the stencil! It was then laid on to a square of t-shirt fabric, placed outside on newspaper and I let the boys loose with the dye spraying!


They were actually really careful and loved doing it.

My tips for children using these dyes would be:

  • Make sure the nozzle is pointing in the direction you want the dye to go (yes, we learned this the hard way!); 
  • Spray approximately 10cm from the fabric;
  • Don't saturate the fabric with dye as it will run under the stencil, just gradually build up to the intensity you want; 
  • You can mix colours to get fantastic effects, but be careful not to mix more than two colours or you get muddy brown.
  • It's worth dyeing a square of fabric, rather than the actual t-shirt in case of mistakes and resulting meltdowns (we had both!).


When the dyeing was finished, we blotted off excess dye that was pooling on the stencil using paper towel and carefully lifted the stencil away from the fabric. I ironed the designs to set the dye, trimmed the edges, then stitched them on to t-shirts (which I'd also made, it was a busy day!) for the boys.


I used a strip of the trimmed fabric to sew a zig-zag along the side of the t-shirt for extra coolness!! I've been saving all my dye-covered scraps to use as embellishments for future projects.


The boys are SO thrilled with their t-shirts. They wore them to their hip hop class and proudly announced that they'd made them themselves when the teacher admired them!

A very rewarding project, which could be adapted for varying ages.

LinkWithin

Related Posts Plugin for WordPress, Blogger...