Showing posts with label meggipeg. Show all posts

Thursday 14 September 2017

Named Earth Science Collection - Beryl Bomber Dress


This was, without a doubt, my favourite pattern when I first saw the new Named Earth Science Collection. I was a pattern tester for this, the Beryl Bomber Dress, as well as for the Gaia Coat (review coming soon). I love how unique this dress is and the cool, casual vibe of the pattern. The lightened photo below shows some of the features including the bomber jacket style ribbed collar, the elasticated waistband and cuffs, big pockets, front zip and slit at the hem.


The sleeves are integrated into the front and back yoke, which is another lovely feature. I made a mistake on this version and cut the back yoke in two pieces instead of on the fold, so had to insert a 'design feature' to cover the error. I was already adding more topstitching than the pattern indicted, so I think I got away with it. The little tab on the back yoke is also a cute feature of this pattern.


I made this dress from non-stretch denim in a medium weight. I like to cut patterns out with absolute minimal fabric wastage and found the fabric requirements in the pattern to be spot on, which was great. Parts of this pattern were a bit tricky, but the instructions and diagrams were very good.


The denim was possibly slightly heavy for the style as the front doesn't sit quite flat below the front yoke. The layers of fabric in this area were quite thick as I used very sturdy ribbing for the collar in addition to the thick denim. I could also have done with wearing a more supportive bra, but I was in a hurry to get the pictures done! I think in a softer fabric, this would not be an issue. Otherwise I love this dress. It feels completely comfy, cosy and very stylish. It is so refreshing to see a completely different style of dress pattern and this one is right up my street. Definitely check out the new Named collection for some other unique designs.


Sunday 27 August 2017

Tessuti Yuki Dress


This is my first time making a Tessuti pattern, but I couldn't resist the Yuki Dress. It's just the sort of dress to wear when I want to eat a big lunch and feel completely comfortable! Having said that, I could probably have gone down a size from the Medium as it is a bit roomy. 


What drew me to this pattern was the neckline, which has a funnel style piece gathered in at the top with a drawstring. The dress itself is a simple cocoon shape with side seam pockets.


I made the dress with a thick, spongy, wool blend (I think) from the Morrison sale. I used blue and black printed knit from a $5 remnant bag from Potter Textiles for the neck and a twisty drawstring I found in my bag of strings. Since this is a winter dress, I made a Nettie Bodysuit to go underneath and added some of the remnant fabric to the sleeves. I also made black Virginia leggings to complete the outfit.


It was difficult to photograph this black outfit on a dull day, but you can just about see the details.


I really like the simplicity of this pattern and it was very quick and easy to sew. I thought the instructions were good too. The dress, although slightly big, is so lovely and cosy to wear and I love the overall effect of the contrasting neckline and matching bodysuit sleeves.

Tuesday 8 August 2017

Go big and bold or go home!


I have finally made up the third piece of fabric that I had custom printed by Contrado UK. This print is from a painting by my Mum of a Western Australian Eucalyptus species called 'Flat Topped Yate'.

'Flat-Topped Yate' by Chris Oxberry

The pattern is the Named Inari Tee Dress, which I've made many times before. I chose Contrado's cotton-linen 228gsm fabric for this dress and ordered a print size of 140x100cm. This worked out well to accommodate the sewing pattern with minimal waste. The print quality is beautiful and the colours were reproduced very accurately. The fabric is a nice quality and the perfect weight for this dress.


I had chosen not to mirror or repeat the print this time, so it's huge! I spent quite some time deciding which side should be the front and placing my pattern very carefully to avoid a large anus in the back!


I think I just about got away with it!


Once that was decided upon, everything went very smoothly. I have made this enough times that I now have two sleeve pieces traced for this pattern: the original one which is perfect for knit fabrics; and a wider one for wovens to allow more movement. I left off the sleeve cuffs as I decided it looked too busy and also made the front a bit longer in this version of the dress. The neckline is finished with bias binding.


I love that the dress is different from every angle and that on this side the pattern almost matches. I'm not quite sure how that happened.


I am really thrilled with this dress. The colours and print worked out just as I imagined and I couldn't be happier with the quality and service from Contrado UK. I would love to try out some of the other fabrics from their huge range. I'm thinking bomber jacket....

I have so enjoyed the process of fabric design. It has pushed me to be a bit more creative, while still being completely achievable using the fabric design website. I can recommend it!


It is so lovely to have a dress that is completely unique and that reminds my of my Mum every time I wear it.


My other projects with Contrado custom-printed fabric were a bathing suit and a completely different dress. The post I wrote about the dress also has some info on how I designed the fabric and kept costs to a minimum.

Monday 17 July 2017

Burdastyle Jumper Dress 10/2016 #117


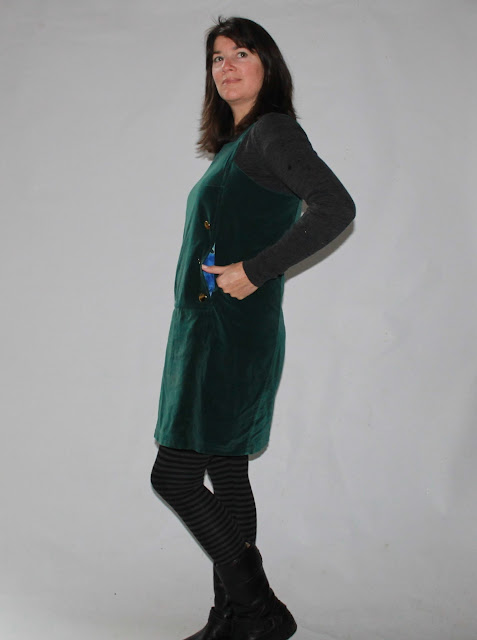
I was all set to make the dungaree dress from the April 2017 issue of Burdastyle, when I saw this one in the October 2016 magazine. I decided this pattern offered something a bit unique, so I changed my plans. 


This is the 'Jumper Dress' from the October 2016 Burdastyle magazine. It has interesting seaming at the front with pockets at the waist.

Burdastyle 10/2016#117
I used cotton velvet fabric for this that I acquired in a closing down sale recently. The business selling it made set designs for stages and elaborate parties. They had almost sold all their fabric, but I got this velvet in green and some more in black. While I was there, I got chatting to the guy about their business. He showed me some massive pieces of red and blue fabric that had been used to decorate the house of Australia's richest woman for a party a few years ago. I mentioned that my son's primary school was doing a musical and wondered if they could use the fabric. He immediately beetled off and showed me some huge wooden stage backdrops. He said they would be perfect for the school and, before I knew it, I'd somehow agreed to having six of them strapped to my roof rack. I tentatively drove along the highway to the school, warning the music teacher of the impending arrival of the enormous backdrops (not texting and driving, of course). Then, she and I attempted to unload them. This was easier said than done. We were huffing and puffing after moving just one. Fortunately there were some road workers nearby and one was more than happy to ditch his Stop sign and help the young and attractive music teacher heave the rest of them into the school hall. Traffic chaos ensued, but eventually my car was unloaded and I scurried home with my velvet.


When I make Burdastyle patterns, I do try to follow the instructions, but almost always end up doing my own thing. This pattern was no different, but was fairly straightforward to make. The back has an invisible zip, which is positioned on my back in a place that is almost impossible to reach. Luckily I can get this on and off without using the zip.


The pockets are inserted into the seams of the side panel. I didn't have enough fabric to line them with the velvet, so they show a bit from the side, but that's ok.


The dress turned out a bit loose, so I took in the side seams a bit. I also needed to lower the darts. The gold buttons are decorative and just sewn in place without buttonholes.


This fabric is really difficult to photograph, but it is really quite nice. The dress is cosy and I love the style. I'm wearing it here with a cashmere jumper from Potter Textiles (RTW from a fabric shop isn't really RTW, you know) and Megan Nielsen Virginia leggings.

Friday 16 June 2017

The Sizzler Sundress - Naughty Bobbin Patterns


Well, if you're ready to amp it up to full volume this summer, this is the pattern for you! Being a pattern tester and not having seen a photo or drawing of the dress, I had no idea of the va va voom factor until I'd finished it. Then I pulled it on, looked in the mirror, and I was strutting around like Kim Kardashian at a beach resort!* This is the Sizzler Sundress by Naughty Bobbin Patterns and if you want to look like you've dropped two dress sizes in 30 seconds, you need this pattern now!

*I hasten to mention that this was all in the privacy of my own home and that any public strutting will slightly more subdued. Just slightly!


The dress is fitted with a flattering front neckline and gorgeous v-back. It is designed so that bra straps won't show and I can happily report that mine were well hidden. The bodice is lined, the front has a ruched overlay and the back can be lined if desired. I chose to line the back, which helped to smooth out any underwear lines or other imperfections beneath! I used my main fabric as lining for this dress.


The bodice has a faux-wrap design with pleats below the bust. It is surprisingly supportive, stays firmly in place and shows things off very nicely. Insider tip: hoick up the boobage once the dress is on and you can gain a cup size or two as well! The ruched front panel is very flattering and cleverly covers lumpy bits. Who's going to look at your tummy with that neckline on offer?!


The dress is straightforward to sew with a couple of little tips included for a really great fit and finish. I have absolutely nothing negative to say about this. I love it! It's such a sexy and fun design and I feel like a million dollars in mine. Go on and get it.


I received this pattern free of charge. All opinions are my own.
Apologies for the brazen hussiness of this post. I blame the Sizzler Sundress!

Thursday 25 May 2017

Refashioned StyleArc Ziggi Leather Jacket


I love a good refashion and was inspired to do this one when I read about the Australian Sewing Guild's 'Castaway to Couture' competition. The idea is to refashion up to three secondhand garments into one new wearable garment with minimal waste. The competition closes on 31st May and is open to Australian residents, so get in quick!


I wanted to make a leather jacket and the StyleArc Ziggi was the obvious choice. I have made it before in two tone brown leather and I love the fit and style. This time I wanted a classic, black, leather jacket.


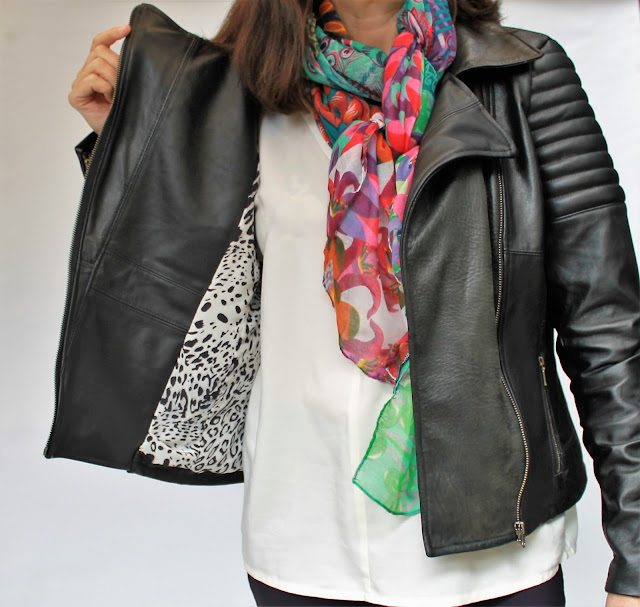
I started off with a leather jacket that my grandmother bought for me many years ago and which I no longer wear. It was made with lovely soft, thick leather, but there wasn't enough leather in it to make the Ziggi, which did surprise me a bit. I cruised the op shops and found a second leather jacket for $20 and a silk, leopard print maxi dress for the lining for $8. Interestingly, op shop leather jackets vary hugely in price, even between stores in the same chain. Also, I really struggled to find a silk dress. In the end I just went down the dress rail looking at every label until I finally found one that said it was silk. 


Next came the planning. The Ziggi jacket has 23 pattern pieces, 14 for the main fabric and 9 for the lining. This part took absolutely ages. I wanted to try to avoid holes made by the original stitching and buttons and to minimise the wastage. I planned to cut all the main body pieces from the thicker leather jacket and the sleeves, large front facings and other bits from the thinner one. I also wanted any original seamlines to be symmetrical in the new jacket. I had to draw a rough diagram to remember the layout. As luck would have it, the collar from one jacket was exactly the right size and could be re-used intact. 


Next, I unpicked the original jackets to give me large enough pieces from which to cut my new pattern. I got impatient a couple of times, but that resulted in tearing the leather, so I was forced to go slowly! I was then ready to cut everything out. I ended up having to make some changes to my first cutting plan, partly because I forgot to mirror the side front piece and cut two the same and partly because I did a last minute broad back adjustment, but I eventually got there. The dress was not quite enough for all the lining pieces, so I cut the midsection of the sleeves from some of the original polyester jacket lining. This doesn't show in the finished jacket.


I topstitched any remaining seams from the original jackets and all the new seams so they would match and look intentional. Those blasted side fronts didn't have their original seams matching after my cutting error, but all the other pieces did. The lower edge showed some original stitching holes, but these were hidden once the hem was folded under.


 I decided to quilt the upper sleeves like some jackets I'd seen online. I was very happy to have found the wadding at Remida recycling centre, so that was also saved from landfill. The only thing I bought new were the zips. They were from Homecraft Textiles.


I inserted sleeve gussets that weren't in the Ziggi pattern. For the sleeve gussets, and the pocket zips, I used tutorials by Shams of 'Communing with Fabric'.


Leopard print is not really my style, but I quite like it as jacket lining. The silk feels lovely to wear. You might just be able to see the original hanging loop (below) that I saved and restitched into the new collar seam. You can also see the original seamlines in the leather front facings. These are mostly hidden when worn.


 The finished jacket, which is completely recycled except for the zips:


I like how the original seamlines add extra detailing to the new jacket.

And here is what was left over from the project. Some leather scraps that I will save to make something else, most of the original linings and tiny scraps of the dress.


This has been one of the most ambitious projects I've ever done and the whole process was incredibly time consuming. I really had to think carefully and go slowly the whole time to avoid silly mistakes. It was incredibly enjoyable and satisfying though and I have ended up with a jacket that I absolutely love. The fit is excellent and the leather and silk are soft and comfortable to wear. I will be wearing this at every opportunity. I am also very happy to have breathed new life into my treasured, but long unworn, jacket from my dear old Nan.


This is the collage I put together for my entry. Voting for the competition begins next week on the 1st of June. If you are an Australian resident with some spare time over the next few days, get refashioning and enter yourselves. There are some great prizes on offer.

LinkWithin

Related Posts Plugin for WordPress, Blogger...