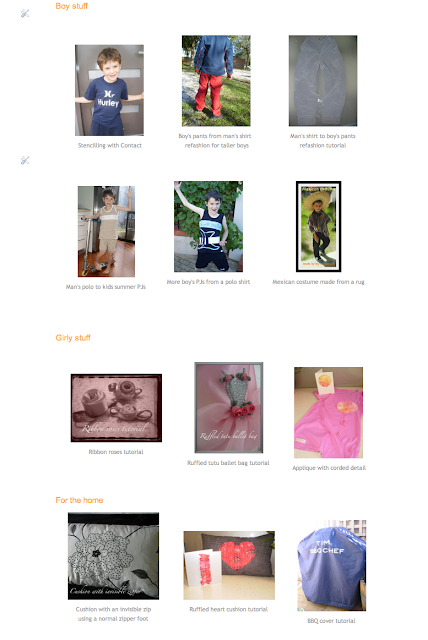
Are you struggling to make a tutorial page for your blog that looks something like mine above? I spent hours and hours searching the internet for a method that worked and was simple to use. After much trial and error I finally found one and I've tweaked it into a user friendly format that I thought I would share. In my version you can click the picture or the caption to take you to the tutorial/blog post.
The most helpful resource I found was here and I adapted my version from that one. It is basically a table that you can add pictures and links to as needed. The pictures are always centred so everything looks neat and you can put as many per row of the table as you like. I chose a three column table.
I keep the code saved in Word and just copy and paste as required. Here it is:
[table border="0" cellpadding="5"
style="font-family: Times; width: 700px;"][tbody][tr]
[td align="center"
valign="center"]
[a href="FULL LINK TO BLOG POST">[img
border="0"
src="FULL LINK TO JPG FILE ON PHOTOBUCKET OR BLOG"/][/a][/div]
[span class="Apple-style-span"
style="font-family: 'Trebuchet MS', sans-serif;"]
[a href="FULL LINK TO BLOG POST AGAIN"]
CAPTION FOR IMAGE[/a][/span][/td]
[/tr]
[/tbody][/table]
Change all the pink '[ ]' to '<' and '>' so the html code works properly
Repeat the above text from [td] to [/td] for each column of the table (i.e. each time you add a tutorial picture to your table)
To start a new row copy from [table...] to [/table] for each subsequent row.
NOTES:
- You need to be in the 'html' mode in a new page in blogger.
-You may need to change the width from 700px (first line) to fit your blog.
-To get the link to your jpg photo file, either save the picture into a photo sharing site like Photobucket or Flickr and copy the url from there, or open the picture in your blog and right click on it to copy the url.
- If you want more than three pictures per row, just copy the '[td] to [/td]' part as many times as you need.
-Switch into 'compose' mode to check how it's looking. You may need to resize your pictures. I just make them 'small' by selecting that option on the photo itself.
-You can add categories (eg. 'Girl's clothes', 'Crafts' etc.) in 'compose' mode. Begin a new table below each category heading.
I hope that makes sense. Please let me know if you have any questions or comments, I love to hear them.
Good luck!


5 comments:
okay, girl- you are a goddess for posting this! I just spent about 3 hour trying to figure this out and almost gave up. Thank you SO much for this post. I have a ton of beautiful tutorials and only links on my page. It's going to take an eternity but will be gorgeous when it's done. Thank you thank you thank you!!!!
Woo hoo! I'm so pleased that this has helped someone. Thanks so much for the comment and good luck x
This isn't working for me. My pictures are all over the place, and my captions are non-existent. Would you mind at all sending me your html coding for that particular page, so I can compare apples to apples to figure out what I'm doing wrong?
mandi.hulse2@gmail.com
Mandi @ All My Happy Endings
Hi there Megan would love your help as well mine also isnt working xx
Hi, I'm happy to help. Just send me some details. I tried to find you via your comment but the link won't allow access to your profile so please contact me again :)
Post a Comment