Showing posts with label Jalie. Show all posts

Monday 14 October 2013

Jalie 3132 Hoodie


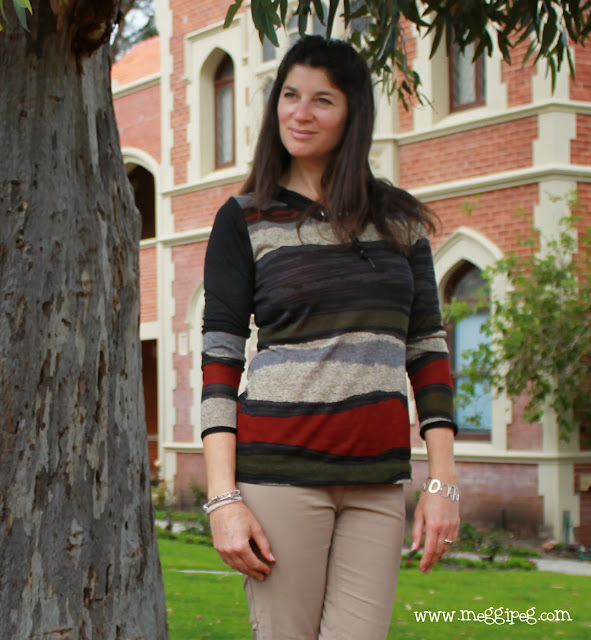
After seeing all the lovely Jalie creations popping up on Pattern Review in honour of Jalie's 30th birthday, I couldn't help feeling inspired to make a Jalie myself. I chose 3132, which I have made before as a nursing hoodie and as a t-shirt (also this one). In true Jalie spirit, I am also wearing a pair of my many Jalie jeans.


I had this stripy knit fabric that I'd bought from Textile Traders in the half price sale recently. I think I bought a metre for about $5. There wasn't quite enough fabric to make the hood, so I used some black knit fabric from my stash for that.


I was keen to try to match the stripes as much as possible, even though they were a bit wavy. I spent much time placing the front, back and sleeve just right on my fabric. To get the sleeve placing right I matched the sleeve notch with the notch in the armhole and I think it worked pretty well (below).


However, there was a slight fail when I happily held up my cut fabric and realised that, with all my precision, I'd only cut one sleeve and didn't have enough fabric for the second. Oops!

Enter another scrap of black knit fabric.


Hey, what can I say - it balances the hood! I cut the lower section of the second sleeve as best I could to keep the stripes in the right place. It's not perfect, but it'll do and I'm sure I won't make that mistake again. The sleeve cuffs were finished with a strip of black lycra used as foldover elastic, stretched slightly and zig-zagged into place. I used silver grommets/eyelets for the hood tie. These needed reinforcing with some thin vinyl on the inside so they didn't fall out of the delicate knit fabric of the hood. The tie is a shoelace from my box of string-type things (I have many assorted boxes of sewing treasures just waiting for the right use).


And there you have it - a well-fitting, stripe-almost-matching top to take me through spring. I don't think I've ever had a failure with Jalie.


Sunday 22 September 2013

Jamie jeans - Named patterns


I came across Named Patterns a few weeks ago and was immediately enamoured with their Jamie jeans. I have been on a long quest to find the perfect jeans pattern. I've made several pairs of Jalie jeans and a couple of pairs of modified Jalies. The Jamies looked great in the pictures, but would they deliver in real life? Would the substitution of the 'l' for an 'm' produce substantial improvement in style, fit and general fabulousness?

I looked for reviews. There were none...until suddenly Novita appeared on my screen modelling a pair. Click, click and I'd bought the pattern within minutes!

I bought size 38-40 (10-12) based on their size chart. My waist measurement was closer to 40 and my hips were 38, so I graded accordingly between sizes from waist to hip. Other changes: nil. I made them from a sturdy denim with some, but not loads of, stretch.

So did they fit?


Did they ever!


I love the detailing on these jeans - the front, top-stitched seams, the two-part back pockets, the inside out denim piece on the front pocket opening. The overall shape of these is very on trend and flattering.


The pattern took an hour or so to arrive in my inbox, while I hopped from foot to foot and alternated between refreshing my email and checking the time zones between Finland and Perth. Suddenly there it was and I wasted no time printing it (only 12 pages), taping it together (easy) and tracing it (yes, you have to trace as the pieces overlap, but I didn't mind as I was experimenting with the size between waist and hip as previously mentioned). Quick note on the printing - the pattern suggested using A4 paper, which is standard in Australia, but the very bottom of each page was missing on my printout. I'm not sure why this was as the print size was accurate, but was easy enough to piece together anyway, so not a big deal.


Then I made them. In one (very long) day!


The instructions are clear, but there are no pictures. With careful reading and concentration, I was fine, but I have made jeans several times before. Newbies may struggle with some parts. I followed the instructions completely, but next time I will change the order of assembly. The pattern has you cut the fly of one front piece slightly narrower than the other side. My advice - DON'T. The zip was then inserted after the front and back pieces were sewn together and it just didn't work well for me at all. In the end, I unpicked the zip and sewed on a scrap of fabric to make the front fly pieces even again. I was slightly less of a happy camper at this point. Then I followed my favourite ever tutorial for fly insertion as best I could with the jeans assembled. Things were not perfect, especially with the tacked-on piece (luckily you can only see this when the zip is undone), but passable. Happy camperness was restored.


There is very little else I'd do differently next time (and there will be a next time, probably several). I will probably play around with the leg seams slightly, making the thighs a bit tighter and the calves a bit looser, just a little bit. A stretchier denim would probably produce a better fit.


So, nitpicking aside, is this the perfect jeans pattern? Well, I think these jeans are pretty damn close to perfect, especially for the first draft, so to speak. The fit, the detail and the style are all winners in my book. These have become my 'go to' jeans to be worn in preference to all others.


Sorry Jalie, I've got a new fav jeans pattern.

Jacket: Burdastyle Blouson Jacket 04/2013 #123. To be blogged soon.
Boots: Refashioned by moi.

Monday 19 August 2013

Inspired by Prada


Flicking through the May 2013 issue of Burdastyle magazine, I spied this DIY inspiration from the Prada 2013 Spring collection:

Page 19, Burdastyle May 2013.
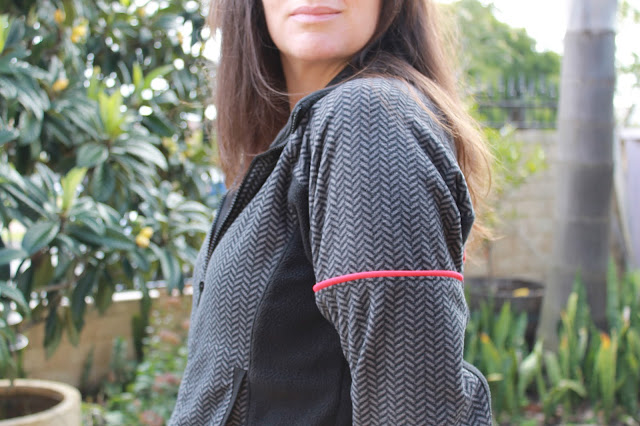
I liked the handmade look of the red and white applique and decided to use it on a jacket. I chose my much loved Jalie 2795 pattern as I wanted a cosy, easy to wear jacket to see out the winter. I used polar fleece in a grey and black pattern for the main jacket and in black for the sides and lower sleeves, both from my stash.


I cut the applique shapes free hand, in keeping with the handmade look of the inspiration. I used scraps of red and white fabric from old t-shirts, machine sewed them in place and then embellished the circle with hand stitches. I couldn't find embroidery thread in time for the project, so just used four strands of normal thread. The applique was quick and fun and adds quite an impact to the jacket.


For added interest, I used a strip of red lycra between the upper and lower sleeve sections. This was simply folded lengthwise and stitched between the two fabric pieces - much easier than piping, but looks the same.


I'm happy. A warm, casual jacket that I can throw on and look like I made an effort getting ready, even if I didn't!


Saturday 1 June 2013

Floral skinny jeans


Here I am leaping into the floral jeans trend (not into the river, although Truffle did have a dip).

I bought this bright, stretch woven fabric a few weeks ago in the Textile Traders sale. I got one metre for only $5. Cheap pair of jeans hey?


I am not thrilled with the t-shirt, which I didn't make, so a bit of thought is needed on how to style these pants. Suggestions welcome!

Now, I had planned to use McCalls 6404, a leggings pattern, for these. But after the mediocre denim pants that resulted from my first attempt with this pattern I decided against using it this time. Instead, I drafted a new pattern using a great-fitting pair of RTW (ready-to-wear) pants and my tried and tested Jalie 2795 (UPDATE: this should be 2908) jeans pattern.

I traced the RTW pants very carefully, then compared the result to my Jalie pattern.

Correction: Jalie pattern is 2908

The shaky black line shows the outline of the Jalie pattern (pants back) and the even shakier yellow line is the RTW tracing. There is quite a difference in the shape of the back crotch curve. There is also a difference in the waist height, but this is partly explained by the fact that the Jalie jeans have a yoke (not seen here), while the RTW pants do not. Hmmm, interesting. The other notable difference was that the seams of the RTW pants were placed differently to the Jalie jeans, particularly the inner leg seam which was significantly further forward on the RTW pants. I don't know that this affects the final fit. I suspect probably not much.

Out of curiosity, I decided to just make the RTW pattern and compare it to my previous Jalie 2795 efforts.


So here it is. I only had a metre to squeeze this from, so I eliminated all pockets. I had just enough fabric to do a fly front and separate waistband. I think the fit is pretty good.


I should have made them longer though. I'll buy 1.1m next time!


Here is a picture of my denim Jalie jeans for fit comparison.

I think the less scooped back crotch curve of the floral jeans is more flattering than the deeper scoop of the Jalie jeans. The fit at the front is similar, although the Jalies are higher waisted (these denims were made from the higher waisted version of the pattern). The inner leg seams are just visible on the floral fabric but don't seem to impact the fit. On a plain fabric the forward-placed seams would be more visible and could be top-stitched in a contrasting thread for additional detail.


I think I like these and, once I work out what to wear with them, I'll wear these a lot before the fashion changes! The comparison of patterns was an interesting exercise (for a sewing nerd like me) and I am very pleased to have improved the fit at the back. Yay!

Tuesday 22 January 2013

Jacket rashies for the beach (Jalie 2795)


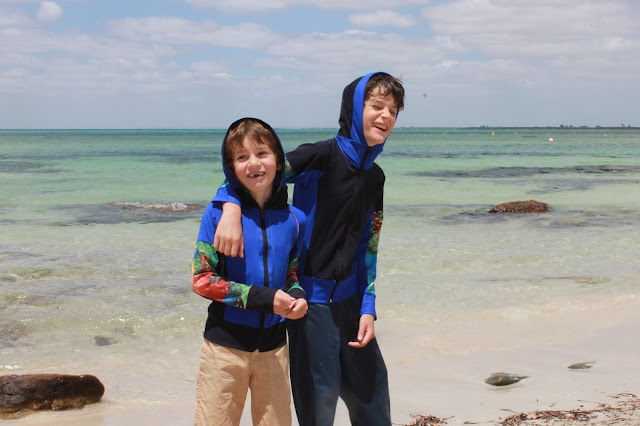
We have just returned from a five-day camping trip to the idyllic, beachside town of Dunsborough (approx. three hours drive south of Perth, Western Australia). I knew we would spend most of our time on the beach while we were there, so I wanted to make new 'rashies' (rash vests/sun shirts) for the boys, with hoods to keep their necks protected from the sun.

While flicking through my patterns and pondering how to attach a hood to the standard t-shirt style rashie (like this one I made for LJ, with matching shorts and hat), I came across my trusty Jalie 2795 jacket pattern. The more I thought about it, the more it seemed to be a good idea. The front zip would make it so much easier to get the rashie on and off (usually after swimming, I am faced with a wet child shouting "help!", their arms and head trapped by the too-tight neck of the inside-out rashie. Many's the time someone has almost lost an ear!). Also, this pattern is slim-fitting for swimming and the hood is exactly what I was looking for.


So it was decided. Another two Jalie 2795 jackets coming up quick-smart for the holiday. 

I have a large stash of lycra thanks to a fantastic sale at a local swimwear manufacturer late last year. The boys chose the aquarium print lycra fabric and I chose the black and blue lycra to go with it. I switched the positioning of the black and blue on each jacket so I would be able to quickly tell them apart as I dug around in the swimming bag while running after the boys reminding them to put their rashies on!


I followed the pattern exactly except that I left the pockets off as I thought they'd just get full of sand. I went up two sizes from the measurements of each of my sons. This worked well for JJ (aged 7), but LJ (aged 9) could have done with some extra length in the body and sleeves of the jacket. He is a beanpole. The measurements on the pattern are for a girl (here is a Jalie 2795 jacket I made for a seven-year old girl) and I think the different proportions of an older boy need to be taken into account when deciding on sizing. I'd say the best rule would be 'if in doubt, go up another size or two'!


Before I made these, I toyed with the idea of adding a sun visor to the hood, but I decided against it in case it hampered the swimming. Wearing a cap inside the hood works well on dry land. 

I cut both jackets out together and sewed them one at a time, so as not to mix up the numerous pattern pieces. Once cut out, they took around two hours each to sew and were ready in time for the trip.

These jackets were invaluable on the holiday. They were great for keeping the sun off, but the boys also used them, once dry, for warmth once the cooler evenings arrived. They were light and easy to carry around, looked good and, most importantly, easy to get on and off. Hooray!

Saturday 29 December 2012

Anyone for tennis?


I did lots of sewing for Christmas presents this year, mostly for my two sweet, little nieces. The biggest project was this tennis outfit, which was made according to stringent requirements stipulated by Miss 7. She wanted a college-style jacket with a zip and short sleeves and the number '64' on the back.

I immediately remembered that Andrea (and her daughter) of Fabric Epiphanies had used Jalie pattern 2795 to make a boys college jacket. I also have this pattern, so that was my starting point. I decided to make a little matching skirt using Jalie pattern 3023.


 I made the jacket first using white stretch mesh fabric for the main jacket with contrasting pink knit fabric for the waistband, collar, cuffs and pocket welts.

Before sewing the jacket together I made the number applique for the back. I searched the internet for 'college fonts' and found one I liked. I couldn't get it to install for some reason, so I copied the font picture into Word, cropped and resized it, then printed it out. I traced the large outer number on to the glue side of some fusible interfacing and fused it to a scrap of pink fabric. I pinned it to the back jacket piece and sewed it on with a narrow zig-zag stitch.  I repeated the process for the inner number with white fabric and sewed it to the pink number.


I made the jacket according to the pattern instructions in a size J. I chose the size based on exact measurements. If I was making this again I would go up a size or two as it just fits now with no growing room! The upper/top sleeve is made from two pattern pieces, one finishing at short sleeve length and one to make a long sleeve. I just used the piece that finished at short sleeve length along with the the two lower sleeve pieces, which I shortened accordingly. I finished it off with a cuff of pink fabric.

The collar was made with a long strip of pink fabric that I tapered at the front edges to get the 'college' look. This led to a slight problem with the upper zip edge, which would normally be hidden inside the jacket collar. I overcame this by adding a scrap of fabric to each side of the top of the zip. The process took a bit of trial and error so I made myself some instructions in case I ever needed to do this again (see below).

The zip was attached to the jacket leaving the last 3cm unstitched. I cut two pieces of knit fabric 6x2cm, folded each in half and stitched about 0.5cm from the long edge. This was turned right side out and the corner placed over the upper edge and teeth of the zip. I used a narrow zig-zag stitch to attach the fabric to the zip, then trimmed off the excess, sewed in the zip and topstitched. This gave quite a neat finish.

I added a little heart charm for extra girliness.


For the skirt, I used the Jalie 3023 skirt pattern without the sewn-in pants. I used a size K this time, one size up from the measurements I had, but again, this only just fits! I made the waistband from white cotton lycra as the mesh did not have enough stretch. I added piping in pink and a smaller number applique done as described above.


This outfit took a lot of time and I agonised over the size before Christmas day. I had my 7 year-old son try it on numerous times to check the fit (he is a very tolerant child!) and I almost made another in a bigger size, but my sewing machine suddenly died on Christmas Eve, so that was the end of that idea!

I watched little Miss 7 open her present with bated breath. Would she like it? Would it fit? Would she wear it?

She loved it.

Her beautiful, sparkly Christmas dress was cast aside as she rushed to put on her new outfit. She wore it all day and, by all accounts, has worn it every day since. I don't know who's happier, she or I :)


Oh, and the other good news is that my sewing machine has been fixed by the amazing man at Cockburn Sewing Centre. He has performed miracles on my machine and I highly recommend him to anyone local to Perth. Life is good for Auntie Meggie :)

PS: this outfit has been entered in the 'Sewing for children' competition on 'Sewing Pattern Review'. It would be great if you could vote :)

Wednesday 19 December 2012

New bathers revealed


You may remember my previous blog post where I pondered swimwear for this summer and which styles might be most flattering for me. I eventually settled on this design by Jets. I liked everything about it apart from the white bands around the legs, so I omitted these.

Source: www.jets.com.au
I made my design using a combination of resources. The top, bust area was designed using the Pattern School website, which has a wealth of useful information on swimwear design. Be prepared to read and click for quite a while though! I used this information to design a halter top that would fit my measurements. I then cut it so I could add in the white bands around the neckline.

Source: www.patternschool.com


The bottom part of the bathers was designed using my Jalie tankini pattern 3023.


 I used an old J&L bathers pattern and some RTW (ready to wear) bathers to work out the rest! There was a LOT of planning involved, but it was quite absorbing in a way. Now it's done, I should be able to design future bathers with minimal changes to the basic design blocks.


I began by making a muslin with some lycra offcuts.


Much time was spent in front of the mirror pulling and adjusting and trying to see the back! Once I'd sorted out the fitting issues, which mainly consisted of the fit at the sides of the chest and the back straps, I got cutting into the navy blue and off-white lycra for the real thing. I used a buckle for the front and secured it with invisible hand stitches.


I fiddled about with the back for ages, trying different ways of getting the straps to look attractive and placing them so they didn't cause any pulling or wrinkling in the main part of the bathers. Eventually I settled on this design, which is a variation on a cross-over back using a ring. I just kind of arrived at this after much trial and error and it seems to work well.


I lined the front completely with blue fabric. I used swimwear elastic, held in place with a triple zig-zag stitch for the openings and I lined the bra cups with padded cups designed for swimwear use.


And here it is in action!
I have to say that this was quite an undertaking, but I worked through it with baby steps and it ended up being a very satisfying project. I saved well over $100 on the cost too. I am over the moon with the outcome and felt rather proud strutting up and down the dog beach last weekend :)

LinkWithin

Related Posts Plugin for WordPress, Blogger...