Showing posts with label Womens. Show all posts

Thursday 8 November 2018

The Perth Dress - Carolyn and Cassie


Way back at the beginning of the year, Carolyn asked for testers for her first pattern. I jumped at the chance. The Perth Dress appears to be a classic shirt dress at first glance, but it has a unique collar opening detail that creates a pleat from the front neckline.


A single button is cleverly used to close both sides of the neckline opening. The sleeves and a back yoke and pleat continue the shirt-like vibe of the dress.


I used a lightweight shirting cotton for the dress, which my son tells me makes it look like a hospital gown. Now he's said that I am tending to agree. I may decide to convert this one into a top and try a dress in a different fabric. 


Thank you to Carolyn and Cassie for the opportunity to test their unique and lovely first pattern. I look forward to seeing what they come up with next.


Friday 17 August 2018

Named Anni Building Block Pattern


I haven't had much time for sewing or blogging lately. Life has been complicated and time has been short. However, I was thrilled to have the opportunity to pattern test the newest Named Anni pattern. This was a special pattern released in celebration of Named's 5th anniversary. It includes pieces to make a huge variety of styles including a dress, jumpsuit and playsuit, each with multiple bodice, neckline and sleeve options.


With it being winter here in Perth, I went for a long sleeved dress with bell cuffs. Although I usually go for lower necklines, I couldn't resist making the diamond cut-out neckline and I was not disappointed. The construction is really cool and not too difficult (just be as precise as possible) and the result is lovely. The picture below has been lightened to try to show the seamlines. You might just be able to see the inset piece above the V neckline that creates the diamond.


The dress is made from a wool blend fabric that I got free in a warehouse smash and grab earlier this year. A local clothing manufacturer, Morris and Co., had shut up shop in the 80s and the warehouse hadn't been touched since. Just before renovations commenced this year, a few sewing ladies were allowed in to take what we wanted. It was a quite amazing (and dusty) array of fabrics, zips, industrial sewing machines and equipment, school and nursing uniforms, hats etc. I got a few handfuls of zips and buttons and a bit of fabric, including a massive roll of this black wool, which just about killed me as I struggled out of there and back to the car park!


The fabric was easy to work with and I love how the dress turned out. The style is elegant and flattering and it fits like a glove. The only issue I have is that the zip at the back is difficult to do up on my own. This is fine for the dress, but I'm not sure how I would manage in the bathroom if I'd made the jumpsuit!


This is a lovely pattern and I highly recommend it. It has unique details and the proportions are spot on. The number of options is also quite amazing, making this pattern excellent value for money. I am very keen to try a few more of the styles...when I have time!


Wednesday 13 June 2018

Designing fabric with Spoonflower for a Jalie Charlie Bomber Jacket


I was rather thrilled to be contacted by Spoonflower recently and invited to have some fabric printed for a project of my choice. Spoonflower have a massive library of designs to choose from, or you can upload your own design for a completely unique print. 

***DISCOUNT: If you are interested in having fabric, wallpaper or giftwrap printed for your own project, you can get a 10% discount on the Spoonflower website for the next month using the code meggipeg10. The design I created for this jacket can be found here***


I immediately thought I'd like to use my Mum's artwork as the basis for the fabric design. Mum paints a lot of landscapes with a sea of flowers in the foreground. I decided to use just the flowers as the basis for the design and to make a jacket. I chose a painting with lots of blue, khaki and white so it would be wearable with lots of colours of pants and skirts.


I selected an area of flowers and photographed that part of the painting in high resolution using the close-up setting on my camera. I then used that photo to create a repeating pattern with the larger flowers at the top and bottom of the fabric, transitioning to smaller flowers in the middle. If you would like to use this print, you can find it here. I have only just set this up for sharing, so I hope it works. I had the fabric printed on Organic Cotton Sateen Ultra (see fabric types here), which is just a lovely fabric. I prewashed it before making the jacket and the colours held up beautifully.

My design as it would appear on one yard of fabric


The pattern I used was the Jalie Charlie Bomber Jacket. I have made this before in adult and child's sizes and it's a brilliant pattern.   


I added about 4cm to the length, but otherwise chose the size based on my measurements. My tip for the jacket would be that the pocket fabric will show on the outside of the jacket as the welts are cleverly formed from the pocket piece, so it's best not to use lining fabric for the pocket! I chose to use some striped ponte to match the cuffs, neckline and hem band. I love the classic look of striped ribbing on bomber jackets, but it's hard to find and this ponte does the trick just fine.


I decided to line the jacket. The pattern is unlined, but I just used the front, back and sleeve pieces to make the lining and I drew a front facing piece that was cut from the main fabric. I lined the jacket with white cotton that I had dyed blue to match the outer colours. I bagged the lining for a clean finish. There are lots of online tutorials for this.


I used a nice black and silver zip with a fancy pull from Homecraft Textiles to finish it off.


I was very pleased with the print quality and the way the design worked out. I was easily able to cut the pieces so the larger flowers were at the bottom of the jacket. I deliberately made the sleeves slightly different for a more random effect.


I could not be happier with this jacket. I love the print (thanks Mum!) and the colours will make it such a useful piece of clothing. The Jalie pattern is also very comfortable and easy to wear.

Thank you so much to Spoonflower for providing the fabric. This has been a super-fun opportunity and has definitely got my creative juices flowing to create more designs.

Don't forget to use meggipeg10 for a discount if you order from Spoonflower!


Sunday 8 April 2018

Alabama Chanin inspired t-shirt


Last year, before our epic family road trip to the outback of Western Australia, I was looking for projects that I could take in the car to pass the time. Scrolling through the Alabama Chanin website, I came across a t-shirt with hand-beaded text on the front.
Alabama Chanin tee from their website
I decided to make my own version using the free Plantain tee pattern and the word 'Create'. I cut out the pattern from some blue knit fabric and stencilled the word across the front using a handmade stencil, silver acrylic paint and a sponge brush. Then I gathered together some beads, sequins, needles and thread and stuffed everything in a bag for the trip.


I'm not brilliant at looking down while I'm in the car as it makes me car sick, not to mention wanting to keep an eye out for kangaroos etc on the road, but I did manage to get a bit of beading done while we were travelling. After the trip, I carried on over the school holidays at the local theme park.


Finally it was done. I stitched the pattern pieces together by hand and embroidered a decorative stitch down the side seams, shoulder seam and on the neck binding using navy or pink embroidery thread.


Some close-ups:


I love this t-shirt with it's rustic, handmade look and added blingy beads. I wish I had more time to make all the Alabama Chanin things. I love them all!

I'm also wearing my Sasha trousers in these pictures.


Thursday 29 March 2018

Tessuti Skylines Competiton - Burdastyle jumpsuit and Naughty Bobbin Cap


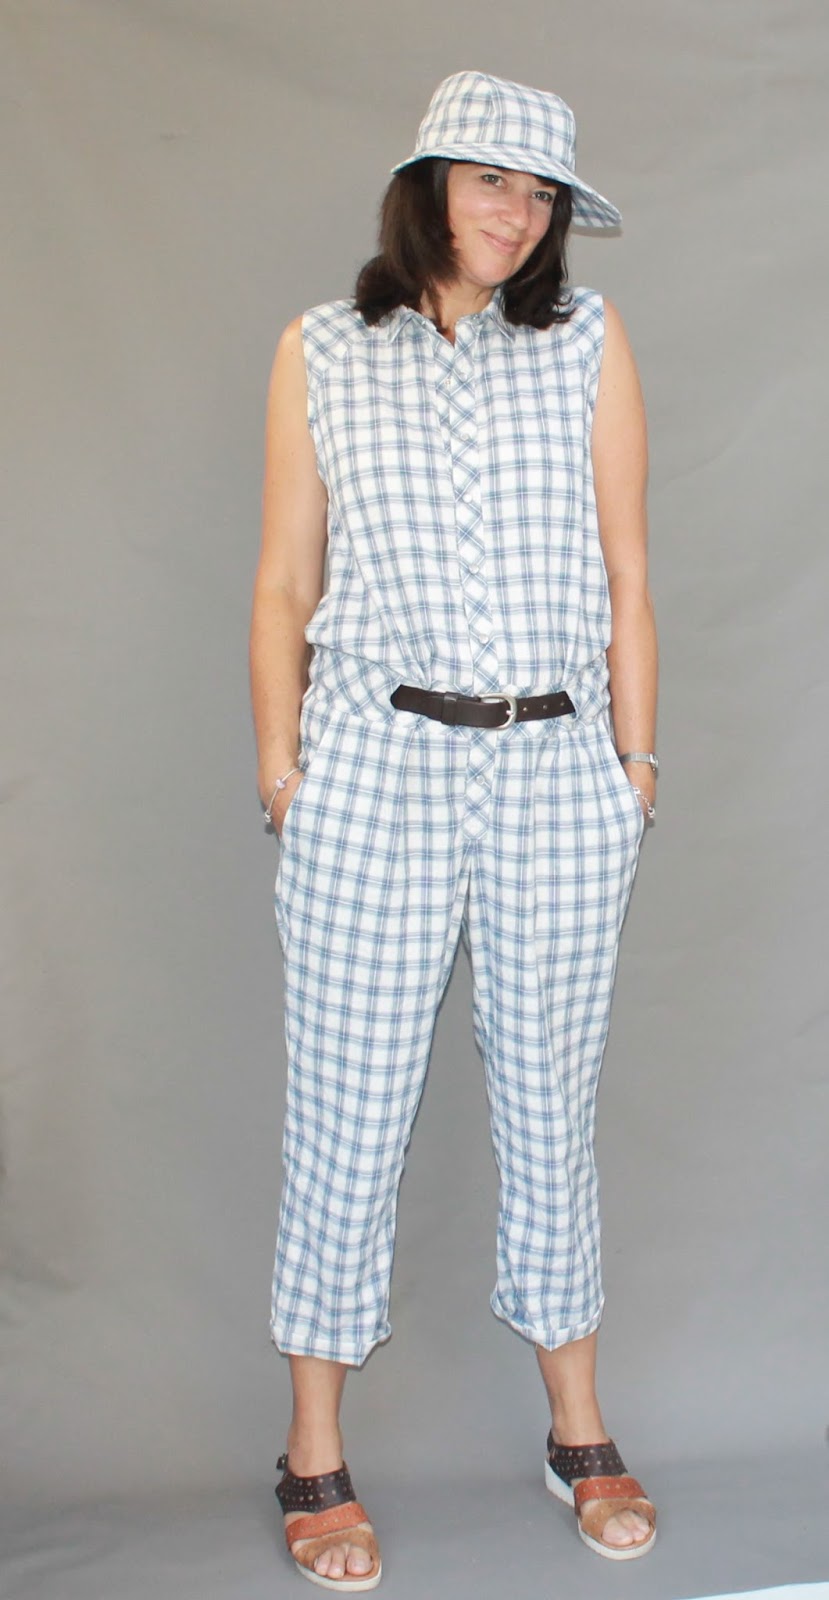
Well this was a slow sewing project if ever there was one! Many hours were spent during the planning, the pattern adjusting, the muslining, the additional adjusting, the cutting and the construction. This is, of course, my entry for the Tessuti Skylines Competiton, where the rules state that this checked fabric alone must be used for the entirety of the outside of the garment.

Choosing the project was fairly easy. I loved the idea of making a special occasion dress in this fabric, but such a thing would never have fitted into my casual lifestyle, so I chose a jumpsuit that I could wear every day. I was inspired by a loose-fitting jumpsuit I saw on Etsy. I perused many patterns trying to find something similar and finally settled on Burdastyle FS/2014 #I. In addition to the jumpsuit, I made a little cap using the Naughty Bobbin Patterns Summer Ensemble Pattern. That pattern for a skirt, top and cap is fantastic btw!

Burdastyle Jumpsuit FS/2014 #I
There were several features of the jumpsuit that I wanted to modify, so I began by making a muslin. I experimented with the bodice, trying a wrap style and a loose bib style, but eventually settled on this sleeveless shirt/boiler suit style.

Here I am wearing a heavily modified muslin and experimenting with sleeves (my family said NO to sleeves!). I made a size 42 according to my measurements, but then took in the sides, took 2cm off the bodice length and altered the back shoulder seam for a better fit. Other changes I made to the original pattern included: raising the neckline and adding a collar - I used the collar and stand from the Named Wenona shirtdress pattern; enlarging the pockets; adding a button placket and press studs instead of the zip - I used the button placket from the Closet Case Patterns Kalle dress and lengthened it so it extended into a fly front; adding back patch pockets; and lengthening the leg 5cm.


I cut the pattern on a single layer of fabric so I could match the print as perfectly as possible in every direction. I made sure the bodice and pants matched for the vertical stripes and that the horizontal stripes matched across the front and on the sides. I cut the shoulders, waistband and button placket on the bias for some visual interest. The stripes also match on the cap as much as possible with a little bias-cut pocket on the side!

Spot the front and back pockets!!


Here are some close ups:

I used press studs instead of buttons for emergency toilet situations...


...and a press stud on the back of the collar (I love the shape of the Named Wenona collar).


Topstitching on the waistband and pockets and the double waistband that hides the belt at the back.


The button placket extends into the pants


and the cap. I love this cap and have worn it every day since I made it.


So there we have it, finally finished! I really enjoyed the challenge of this project and I am very happy with the outcome. This jumpsuit fits perfectly into my casual lifestyle and the cap is so well-fitting and comfortable, not to mention providing lots of shade with the large brim. I'm very pleased I entered the competition as it pushed me to spend time making something I really wanted and love.


There's still time to enter!


Thursday 22 February 2018

StyleArc Sadie Tunic and Closet Case Patterns Sasha Trousers


I've had my eye on both these patterns since they were released and they did not disappoint! I bought the StyleArc Sadie Tunic pattern after seeing Blogless Anna's gorgeous versions here and here. I've had this silk for quite some time after snatching it up at a local Morrison sale. I think quite a few of the Perth sewers have the same fabric. It is soft and dreamy to wear. I'm not even going to tell you what my teenage son said about the print. I think it's rather elegant!


The standout feature of this pattern is the sleeve design. It is so cool and interesting and I should have got a better picture of it. I was careful to follow the instructions and it was fairly straightforward to put together.


I also love the curved hem and the neckline and just everything really. The proportions seem to work very well together.


The back has a centre seam to accomodate a button and loop closure at the neckline. I ended up skipping this as I can easily fit the top over my head without it. Next time I may cut the back on the fold.


OK, now I'll just tuck that tunic in so you can see the pants. These are the Closet Case Patterns Sasha Trousers. (Embarrassingly I always have to stop myself saying that name in a Canadian accent since I heard Heather Lou speaking on the 'I love to sew' podcast! By the way, that episode is worth a listen if you haven't heard it yet).


I spent ages examining the sizing of these pants before cutting them out as the ones in the pattern pictures looked too tight to me. I wanted mine fitted, but not super tight. I read the blog posts, I looked at the size charts and got myself into a bit of a tizz. In the end I decided I was overthinking it and just made the size according to my measurements.


I made a toile and did a couple of fit modifications according to this very helpful blog post. I could have been fussier on the fit, but I had had enough of taking back selfies over my shoulder so got started. 


I am very happy with the result. These pants are so comfy and look smart and modern. The fit is just right and the stretchy bengaline allows easy movement. As an added bonus they go with my new blouse. I'm ready for an outing!


LinkWithin

Related Posts Plugin for WordPress, Blogger...