Showing posts with label Boys. Show all posts

Wednesday 27 June 2012

Finishing touches for a boy's bedroom


This is part of my
Bedroom makeover series
Click image above for more

Following my recent tutorial on making a canopy for my son's bed, I thought I'd show you some of the other things we've made and found to decorate his room.


I made this star with stripes cushion by following this tutorial by Fleece Fun. I made mine from Ikea cotton fabric and denim, instead of fleece. I also added the distressed denim 'J' applique before I sewed everything together.

The gorgeous space themed quilt was from the op shop. That was a good find :)

There are three paintings in the room. This large one done by me. It's a copy of a page in a favourite Zigby Zebra story.


This gorgeous penguin painted by JJ, aged 3.


And this banksia flower and boomerang, also painted by JJ, aged 5. The banksia painting was done with my Mum who is an artist. She paints mostly Australian landscapes and flowers. You can find her paintings here.


For any non-Aussies who may be interested, this is what a real banksia flower looks like. They are quite amazing, large cylindrical flowers with a woody centre. They come in all shapes, colours and sizes.

Source
Then, of course, there is this 'treasure chest' which I've mentioned previously. Being guarded here by Spike the sock monster. I had originally planned to do a makeover on the chest, but I have grown to like it in its original state.


It's fun to have handmade and treasured finds in a child's room. OK, it doesn't look like a room out of a magazine, but the items have meaning and their own special value. What child wants to live in a magazine anyway - well maybe there are some, but certainly not my boys. They want to relax and be creative and wrestle and make forts and throw the football around and bounce on the bed. And I can say 'yes, but please clean up afterwards'. And once in a while they do :)

Wednesday 20 June 2012

Quick fixes: How to lengthen jeans for kids


This is a useful way of adding length to jeans, particularly for the boys who obviously won't stand for adding a cute frill to the hems!

I used similar black denim to the original jeans, but use whatever takes your fancy. Patterns would be gorgeous for younger boys.

Quick and easy. Go for it!

Monday 14 May 2012

Let's make the bed


Yes, I mean literally!

As I've mentioned before, my boys' bedrooms were in desperate need of attention. I decided that this year I would make the effort to sort them out. At the beginning of this year, we bought JJ (aged 6) a cabin bed. It was one of those that's high up with lots of storage and a cubby house underneath. We hoped that this would encourage him to sleep in his own bed all night. I put the bed together on my own while Mr Meggipeg was in Canada. Now, call me strange, but I love flatpacks. Well I did until I attempted this one. It nearly killed me, but I wrestled and swore and finally put it together. Standing back to admire my handiwork, I decided there and then that I hated that bed. It was enormous. There was no room left to play in. The boys liked the cubby, but getting in there with the vacuum cleaner was nigh on impossible. Eventually I gave up cleaning the room altogether and it ended up like this:


Ugh. Shudder. Let's say no more about it. But at least JJ was sleeping in his bed all night, right?

Wrong. Total disaster.

Plan B. Obviously the new bed had to go, but it took me a while to convince JJ of this. Despite refusing to sleep in it, he didn't want to let it go. In the end I promised to keep it forever so his children could sleep in it. Without wasting a moment, I wrenched the thing apart and bundled it into the garage. It's currently advertised on Gumtree. Any takers?

So, we needed a replacement bed. As luck would have it, our area was having a verge rubbish collection and I spied an old wooden bed a couple of streets away. JJ and I inspected it and he gave it the thumbs up. While he was at school that day I put on some dark sunglasses and drove round to get it. After much heave-hoing I finally got it into the back of the car (seats down). I would like to say that no one saw me doing this but, despite nonchalantly leaning on a nearby tree whenever a car went past, I think I may have been spotted once or twice.

That weekend, the boys and I set to work doing up the 'new' bed. The idea was that we would shorten it to maximise the space in the bedroom.

JJ did a great job undoing the screws. We measured the long side pieces and cut them off to fit the kids mattress I'd bought from Ikea. LJ was so keen to help, he didn't even change out of his pyjamas (meggipeg ones of course).


After a quick break for a babycino...


...we painted the whole thing fire engine red.


Then we put it all together again.


I love it! JJ kind of loves it, but still pines slightly for the old bed. This is such a cute little bed now. It is about 1.5 feet shorter than a standard single bed so it would suit a child up to about 8 or 9 years old. It takes up about a third of the space of the old hulking bed (and cost a tenth of the price for the mattress and the paint!!) so I can face cleaning the room again...sometimes...when I haven't got an exciting sewing project on the go.

To make it even cosier, I made a red curtain to hang over/around the bed (tutorial to come).


And I'm happy to say that JJ sleeps in this bed (quite) often. The boys had a blast doing all the woodwork and painting, so I'd say this was a win :)


This tutorial is part of the
Click for more

Saturday 7 April 2012

Boy bedroom makeover - Scout blanket with binding. A tutorial


My boys' bedrooms have been rather neglected for a long time and I've finally decided to do something about it. I'll show you bit by bit as I get things done in there.

Here are some 'before' pictures.


The first project is this old scout blanket. I found it at the op shop (thrift store) with all the badges already sewn on. As you can see, they date back to the early 80s and many of them are from the area of Perth where I grew up. I just had to have it. When I first bought it, the blanket had no edging and looked like this:


And here are some close-ups of some of the badges:


If something goes on the floor, Truffle has to try out lying on it.


I decided to edge the blanket with blue and white gingham fabric to finish it off. I had bought 1m of the fabric, so not enough to make bias trim. I decided to try making the trim by cutting straight strips of fabric and sewing them together. It worked! I'll show you how I did it.

To start, I cut strips the entire length of the fabric. Each strip was 15cm wide.


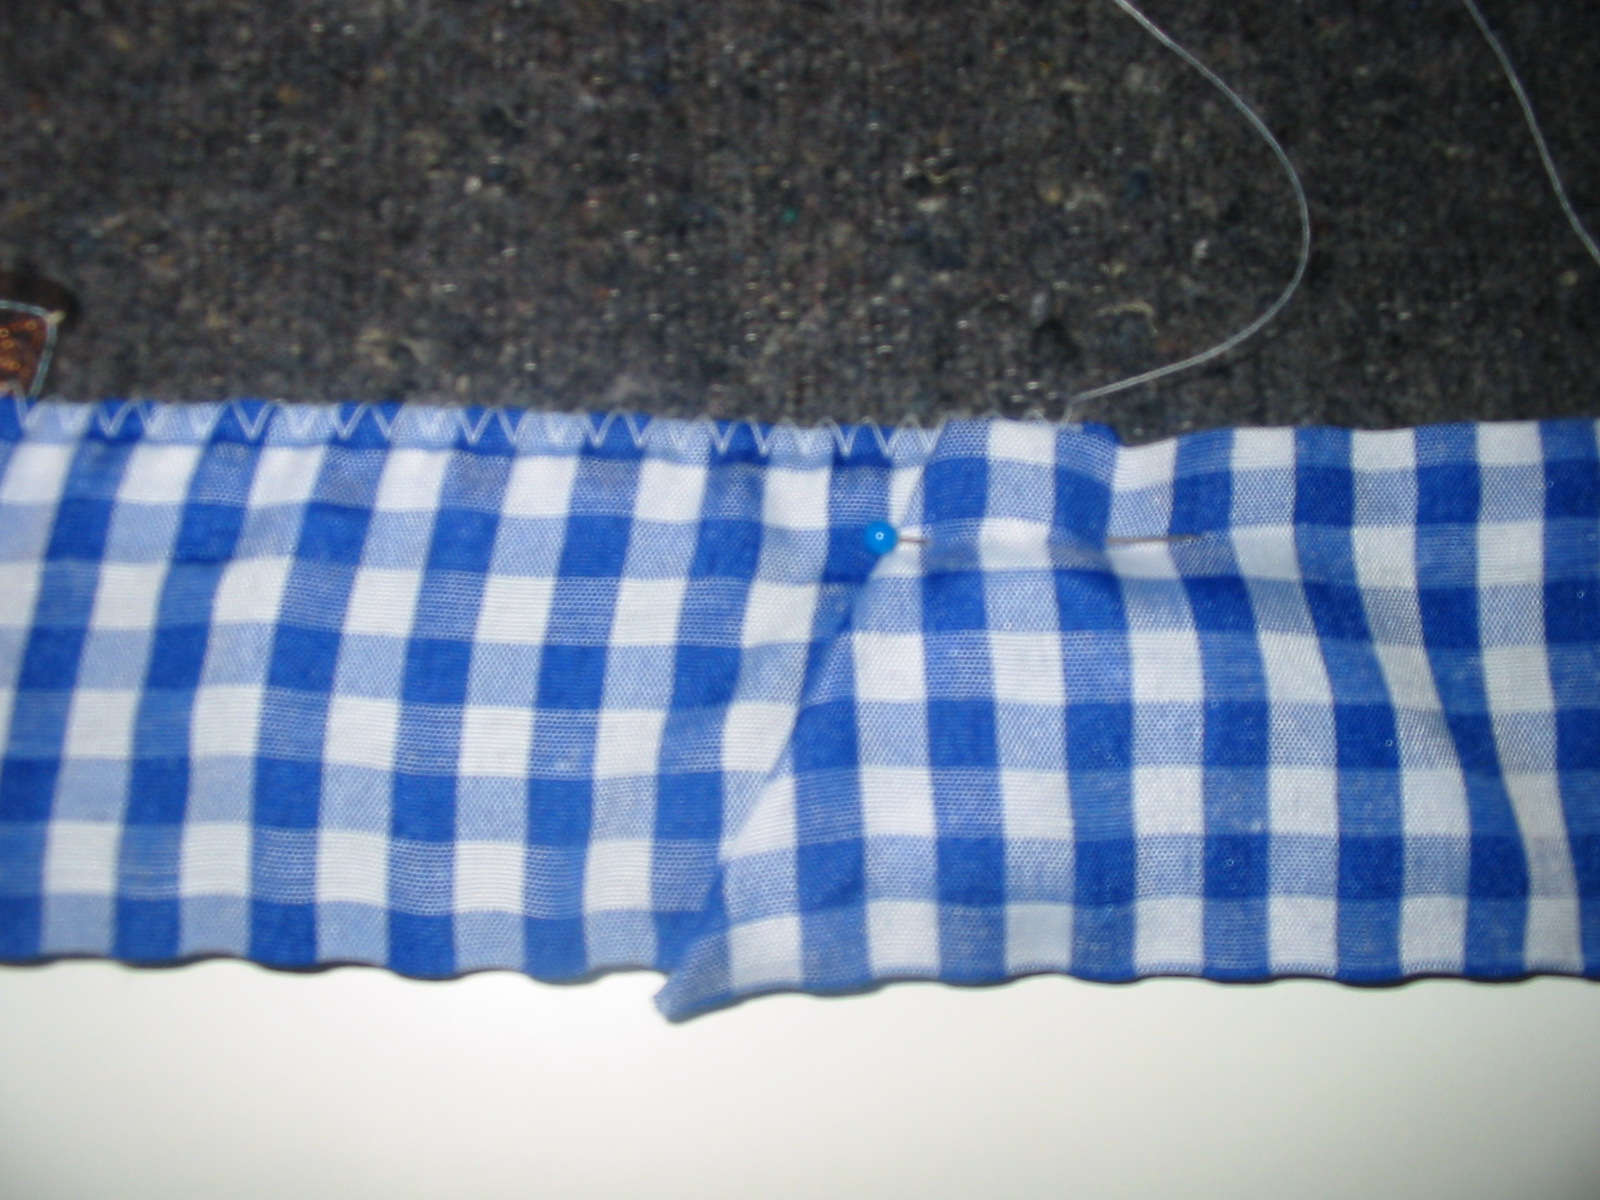
I sewed the strips together,


folded the edges over approximately 1cm on each side and ironed them.


Then I folded the long strip almost in half lengthwise, but with one 'half' slightly longer than the other.

That's the binding done. To begin attaching it I folded the ends inward to a point and pinned it to the side of the blanket. The central fold of the binding is right on the edge of the blanket. This picture shows the fold of the blanket pinned in place. The next few pictures will show how to sew neat corners.


With the shorter 'half' of the binding on top, sew zig-zag stitch along the side of the blanket across to the corner. The zig-zag should easily catch the slightly longer lower edge of the binding.


Keeping the fold of the binding at the edge of the blanket, wrap the binding around the corner of the blanket and pin in the position of the yellow pin below.


Neaten the corner fold so it is at 45 degrees from the corner of the blanket and pin in the position of the red pin below.


Starting at the outside corner, sew zig-zag down the fold (backstitch or do close-together stitches to start). Pivot at the inside edge and continue sewing down the next side of the blanket to the next corner.

When you reach the end, trim and fold the binding as shown below and stitch in place. Yay!

All done :)

I am really pleased with how this turned out. The badges add colour and interest. My son likes to relax and look at all the different badges. He's even started making his bed neatly!


If you can't find a scout blanket, maybe you can find scout badges on ebay, garage sales or op shops. Alternatively use patches of printed fabrics, buttons or other interesting embellishments. As always, I'd love to hear from you if you make one!


This tutorial is part of the
Click for more

Saturday 24 March 2012

Fun with flashing


'What kind of flashing?' I hear you ask, possibly with raised eyebrows. Well, not that kind, this was aluminium flashing - and much more fun!

I first had the idea for this when I saw this post for a DIY chic metal belt (Geneva's blog is gorgeous and well worth a read by the way). I bought a roll of aluminium flashing from Bunnings for about $14. The boys fell on it when I brought it home and immediately started cutting and hammering. Of course, being boys, they had to make armour! They got pretty creative though and it was so much fun to work with this stuff - it cuts with scissors, bends with fingers or pliers and is easily hammered into any shape. Make sure children are supervised with tools and that all sharp edges are turned in and hammered down.


After much industrious work, here are some of the things we ended up with...


Belt and arm cuffs made by my 8 year old


with double sword carrier and dagger holders!


And this incredible helmet designed by my six year-old.


Good, cheap, creative entertainment - the best kind :) I'd love to see what you made if you try this. I wonder what gorgeous things girls might create with this lovely silver.

LinkWithin

Related Posts Plugin for WordPress, Blogger...