Showing posts with label Tutorials. Show all posts

Tuesday 9 April 2013

Refashion flared pants into skinny cuffed capris - a tutorial


It's been a while since I did a refashion, but when I spied these lime green, ankle-freezer, flares in the op shop for only $4, I saw potential!

I have turned pants into shorts before...(brown ones, blue ones, black ones)


...but previously I have always added a stretch knit fabric for the cuffs. This is actually what I had planned to do this time, but when I checked my ribbing stash, nothing matched the green. 

Bummer.


After some thought I decided to use the fabric that I cut off the bottom of the pants to make cuffs. I did some googling and found this useful tutorial for lengthening boy's pants with cuffs. 

Here is what I ended up doing:

First, cut the pants just below the knee (or 2cm below the length you want the finished shorts to be). Save the scraps.


Try on the shorts inside out and pin where you want to take them in so they fit nicely (and skinnily) on your legs. Stitch your new side seam(s). Depending on the seam finishing and topstitching you may only be able to neatly take in one side seam, not both. Take in the seam with no topstitching. I was able to take in both sides. You can see my new seams below.


Cut off the excess fabric, leaving approximately 1cm seam allowance. Neaten with an overlocker or zig-zag stitch if desired.


Measure the lower edge of the shorts where your cuff will go. Make sure the fabric is lying flat. Mine measured 21cm.


Using your cut-off piece of fabric, line up any centre or side seams and mark lines showing the width of the cuff (21cm in my case).


Cut, then sew along your marked lines. The seam allowances should be the same as your shorts so the cuff is still the same size as the lower edge of the shorts. I kept the original hem on my cuffs as I wanted them fairly wide. The total height of my cuff piece is 20cm.


Fold the cuff in half with wrong sides together. Now the height of mine will be 10cm.


Now, with your shorts right side out, and cuff with original hem side up, pin and sew the cuff to the shorts as shown. Don't worry, this seam and the original hem stitching will be hidden inside the cuff.


The inside of your shorts will look like this.


Press seams and cuff to neaten. Yes my iron is held together with masking tape coz I dropped it!


Then fold back the cuff to the outside of the shorts. Voila!


This is what it should now look like. The cuff should be folded back approximately 1cm below the seam you have just sewn.


To hold the cuffs in place, stitch in the ditch along the side seams of the cuff on the right side of the shorts. This will hide the stitches.


Wear your stylish new shorts with pride!


I had a bit of an embarrassing experience while I was making these. It was Easter holiday Monday and I had finally got Mr Meggipeg and the boys out of my hair around 4pm (I sent them to the skateboard park). Getting into my sewing groove, I had just put on my lime green, too short flares, so I could plan my refashion, when the doorbell rang. Thinking the boys must have forgotten something, I opened the door to see their young, 'I'm with the band' guitar teacher standing there! I looked at him in horror. The flares! What was he doing here on Easter Monday?? I had to invite him in while I rang Mr M (who'd left his phone at home), all the while, flitting quickly across the room  (in the hope of becoming an indistinguishable green blur) and hiding behind the kitchen bench. I finally managed to propel the guitar dude out of the front door great speed, with him probably thinking that I was a complete basket case. The following Monday (yesterday) I wore my new cuffed shorts for him and strutted about. Funny, that he didn't comment....

Wednesday 13 March 2013

Knit meets woven (Burdastyle 11/2012 #104)

Every year in March, a fabric shop near me has a 50% off everything sale. The shop is Homecraft Textiles. It is run by a lively and helpful bunch of Middle Easterners and is stuffed full of fabrics and haberdashery. I love browsing through all the interesting bits and pieces which tend to be quite different from the other chain store fabric shops in Perth. The sale is a great time to stock up on good quality thread, sewing implements, press studs, zips, ribbons and trims and, of course, fabrics. I had this Burdastyle top in my head when I visited at the beginning of the sale (oh yes, I will be visiting several more times before the sale is finished) and when I spied this fabric I thought it would be perfect.
Burdastyle banded tank 11/2012 #104 (Source)
 The fabric is a closely woven sporty fabric. I don't know exactly what it is called, but it is light and doesn't crease. I loved the pale pink and mushroom coloured floral print.


The unique feature of this very simple top is the knit fabric bands at the neckline, armholes and waist. I thought I'd have this all sewn up in under an hour - and I would have if it was knit on knit - but knit on woven is a different matter altogether. I ended up re-doing the neckline about five times before it was sitting properly. I have summarised my final method below:

The ribbed knit, in a perfectly matching shade of pink, was from my stash and, would you believe, is possibly the first fabric I ever bought. It was left over from a fleece windcheater I made in my high school sewing class! I have probably had this ribbing for 30 years, proving that you should never throw anything away just in case you need it one day. I will be reminding Mr. Meggipeg of this next time he complains about the clutter in the vicinity of my sewing room!


The trick for attaching the knit at the neckline and armholes was to stretch it very slightly, but only the gentlest bit, as it is pinned and sewn to the woven fabric. The lengths suggested by the pattern for the knit bands was too long for my ribbing, but ribbed knits vary in stretch so may be different with different fabrics. Clip the curves and topstitch in place for a neat finish.


The ribbed waistband is easy peasy to attach. Its just a folded strip which is stretched to fit the woven edge and stitched in place. I used the suggested measurement for the width of the waistband, but I shortened the height of it to give a finished measurement of 9cm instead of 12cm.


I really like the knit and woven combo. It smartens the knit and gives a sporty, comfortable feel to the woven. I can see more of these in my future, especially now I've got the method sussed.

A birthday present for Grandad


I always struggle to find presents for my Dad, but this year I did have an idea. My sister and I had bought him an ipad for Christmas, so I decided to make him a bag to carry it around in when he went on holiday or to the cafe.


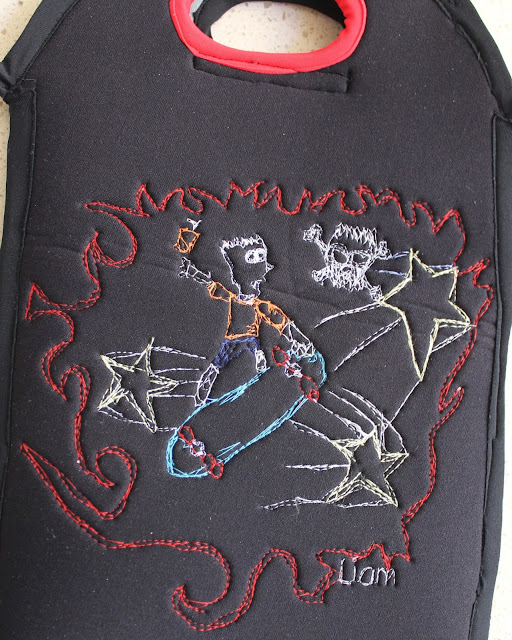
To make the bag more personal I got my boys to draw a picture each and I transferred the pictures to the bag using free-motion sewing. Unfortunately the boys are going through a Bart Simpson phase so the pictures were not quite what I had envisaged, but that's what they wanted to draw for Grandad, so that's what I used. It's funny how children don't quite see things the same way as we do!

I made the bag from an old diving wetsuit made from very thick neoprene. It is nicely padded, but was a nightmare to sew. I am not happy with the seam finishes but they were the best I could do after several attempts. I decided to put together a tutorial for this as I did work out some tips for sewing with neoprene. So here goes.

I folded the top of the wetsuit with side seams together so I could avoid the zips and joins as much as possible. I then drew around the ipad to get the right size and shape for the bag.


This is what it looked like opened out with holdes cut for the handles.


I used this striped fabric to cover up the wetsuit logo.


I traced the main lines of each drawing on to baking paper (or use tissue paper) placed the paper on to the neoprene fabric and stitched along the lines using appropriately coloured thread.

Needle and thread: I found the best needle to use was a very thin (70-75) ball point needle for knit fabric. All the other needles I tried caused skipped stitches. Poor quality thread also resulted in some skipped stitches, but sometimes you just have to use what you have in the right colour.


Once I had the basic outline (above), I set the machine up for free motion sewing (lowered feed dogs, darning foot) and 'drew' and 'coloured in' the rest of the picture. I love the freedom of this type of sewing. It's really fun to see what appears as your hands move the fabric.


Once the pictures were done on both sides, I used a strip of lycra, 2.5cm wide. to bind the inside of the handles. After several attempts, I found the best result was obtained by stretching the lycra quite taut as it was stitched in place. I also sewed a strip of velcro below each handle to hold the ipad inside.

Next it was time to sew up the sides. I used lycra strips again. This time, I sewed one edge of the lycra approximately 1cm from the edge of the neoprene (on the right side) for the full length of each side from a point level with each handle.


The bag was then folded right sides together and the lycra strip was sewn together close to the neoprene. I used the zipper foot to get as close to the edge as possible.


The sides were sewn this way because the neoprene was too thick to fit two layers under the presser foot. This method avoids sewing the neoprene, only the lycra is sewn. Below, each vertical side seam is lycra sewn to neoprene and the centre seam is lycra to lycra.


Lastly, the top edge of the bag was bound all around with lycra, stretching as it was sewn in place.


It's not perfect, but it has character and Dad loved it (once I'd told him what it was)!


I have done two other projects involving free motion sewing, a cushion cover and some boys pyjamas.

Monday 14 January 2013

Hemlines: the long and short of it


I had two dresses in my wardrobe that I wasn't wearing, well actually there are more, but cleaning out the wardrobe is such a dreary task so we'll just concentrate on these two for now. One dress was too short and the other two long. What to do?

The too short: the khaki dress was from the op shop. I thought I'd wear it as a tunic with leggings in the winter, but the fabric was too flimsy and summery and just didn't go with leggings. It was too short to wear as a summer dress and I didn't even wear it over bathers. 


I decided to add two fabrics at the hemline to fit in with the colour blocking trend of the minute. The red fabric was left over from a sheet I had cut up to fit a toddler bed. It was lightweight cotton, similar to the dress fabric, so looked right with the rest of the dress. I sewed this directly to the hem of the dress. Then I sewed on the strip of blue stretch knit to cover the join. Done!

Perfect for a casual summer outing.


The too long: the second dress was also op-shopped. It is made from lovely quality, very stretchy knit fabric so I couldn't resist it, even though it was an unflattering length on me (no 'before' pic, sorry).

Rather than just chopping a bit off and re-hemming, I decided to make a feature of the shortening process by adding horizontal pintucks to the lower edge of the dress.

I wanted three tucks, so I determined the amount I wanted the hem taken up and divided that number into six (eg. to take the hem up by 18cm, divide 18 by 6 to get 3cm. Each tuck is 3cm wide from the fold to the stitching, or 6cm wide in total if opened out). I carefully measured, folded and sewed the tucks, one at a time, by folding the fabric wrong sides together and stitching 3cm from the fold. I chose to have them next to each other, but you could leave gaps in between.

Here are the tucks from the outside of the dress showing the undersides of the tucks on the right of the photo:


The inside of the dress, showing the three seams:


 And the finished dress. Yes, the beach was stunning that day. You can see my boys having their swimming lessons in the background. I have my self-drafted bathers on underneath  :)


These were both very quick refashions which give a little extra interest to the dresses. I wear both dresses a lot now.

What are you doing with your hemlines?

LinkWithin

Related Posts Plugin for WordPress, Blogger...